
Wash BeadChips
This step prepares the BeadChips for the staining process.
| • | ATM |
| • | EML |
| • | PB1 |
| • | LX1 |
| • | LX2 |
| • | RA1 |
| • | SML |
| • | XC3 |
| • | XC4 |
| • | 95% Formamide/1 mM EDTA |
| • | Alconox powder detergent |
| • | Decant only the reagent volume needed for each step. Some reagents are needed later in the protocol. |
| • | Except PB1, all reagents prepared in this step are for use in a subsequent step. |
This set of reagents contains potentially hazardous chemicals. Personal injury can occur through inhalation, ingestion, skin contact, and eye contact. Ventilation should be appropriate for handling of hazardous materials in reagents. Wear protective equipment, including eye protection, gloves, and laboratory coat appropriate for risk of exposure. Handle used reagents as chemical waste and discard in accordance with applicable regional, national, and local laws and regulations. For additional environmental, health, and safety information, refer to the SDS at support.illumina.com/sds.html.
| 1. | Remove the hybridization chambers from the hybridization oven. Cool for 30 minutes at room temperature before opening. |
The hybridization chambers are hot to the touch. Wear insulated gloves when removing them.
| 2. | Fill two wash dishes with 200 ml PB1 each and label them Wash 1 and Wash 2. |
| 3. | Using a graduated cylinder, fill the Multi-Sample BeadChip Alignment Fixture with 150 ml PB1. |
| 4. | Remove the following |
| • | Black frames |
| • | Spacers (separated for ease of handling) |
| • | Clean glass back plates |
| • | Clamps |
| 5. | Prepare the following consumables for the subsequent Extend and Stain BeadChips: |
|
Reagent |
Storage |
Instructions |
|---|---|---|
|
95% Formamide/1mM EDTA |
-25°C to -15°C |
Thaw at room temperature. Invert 10 times to mix. |
|
ATM |
-25°C to -15°C |
Thaw at room temperature. Invert 10 times to mix. Centrifuge at 280 × g for 1 minute. |
|
EML |
-25°C to -15°C |
Thaw at room temperature. Invert 10 times to mix. Centrifuge at 280 × g for 1 minute. |
|
RA1 |
-25°C to -15°C |
Thaw at room temperature. Shake vigorously to resuspend. If necessary, vortex until dissolved. |
|
LX1 |
-25°C to -15°C |
Thaw at room temperature. Invert 10 times to mix. Centrifuge at 280 × g for 1 minute. |
|
LX2 |
-25°C to -15°C |
Thaw at room temperature. Invert 10 times to mix. Centrifuge at 280 × g for 1 minute. |
|
SML |
-25°C to -15°C |
Thaw at room temperature. Invert 10 times to mix. |
|
PB1 |
Room temperature |
Invert 10 times to mix. |
|
XC3 |
Room temperature |
Invert 10 times to mix. |
|
XC4 |
Room temperature |
Invert 10 times to mix. |
Procedure
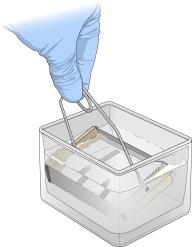
| 1. | Attach the wire handle and submerge the wash rack in Wash 1 containing 200 ml PB1. |
Replace PB1 in Wash 1 after every 12 BeadChips.
| 2. | Remove the |
| 3. | Remove the BeadChips from the hybridization insert. |
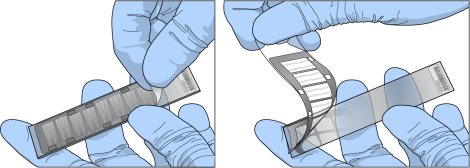
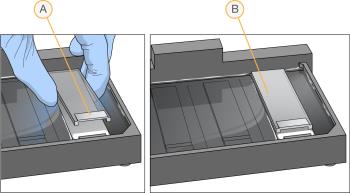
| 4. | Hold the BeadChip securely and by the edges in one hand. Remove the entire seal in a single, continuous motion. Do not touch exposed arrays. |
BeadChip Seal Removal
| 5. | Immediately and carefully slide each BeadChip into the wash rack in Wash 1. Make sure that the BeadChip is submerged in PB1. |
| 6. | Repeat steps 4–5 until all BeadChips are transferred to the submerged wash rack in Wash 1. |
| 7. | Move the wash rack up and down for 1 minute. Break the surface of the PB1 with gentle, slow agitation. |
| 8. | Move the wash rack to Wash 2 containing clean PB1. Make sure that the BeadChips are submerged. |
| 9. | Move the wash rack up and down for 1 minute. Break the surface of the PB1 with gentle, slow agitation. |
| 10. | Remove the BeadChips from the wash rack and inspect them for remaining residue. |
If there is residue, submerge the BeadChip in PB1 and carefully use a pipette tip to remove the remaining residue.
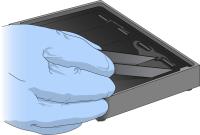
| 1. | Confirm that you are using the correct Infinium glass back plates before proceeding. Use only LCG glass back plates. |
| a. | Make sure the LCG glass back plates have no chips or cracks. |
| b. | Clean the glass back plates if necessary. |
Correct Infinium Glass Back Plates
![]()
| 2. | Fill the BeadChip alignment fixture with 150 ml PB1. |
| 3. | For each BeadChip, place one black frame into the BeadChip alignment fixture. |
For example, if you are processing four BeadChips, place four black frames into the fixture.
| 4. | Place each BeadChip into a black frame, aligning the barcode face-up with the alignment fixture ridges. Fully submerge each BeadChip. |
| 5. | Place a clear spacer onto the top of each BeadChip. Use the alignment fixture grooves to guide the spacers into position. |
The white spacers are not a substitute for the clear spacers.
![]()
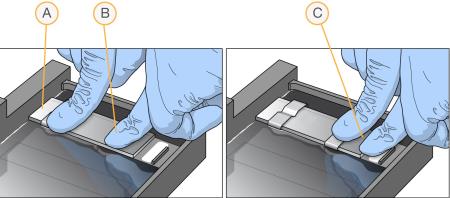
| 6. | Place the alignment bar onto the alignment fixture. Fit the groove on the alignment bar over the tab on the alignment fixture. |

| 7. | Place a clean glass back plate on top of each clear spacer. Position the plate reservoir at the barcode end of the BeadChip, facing inward to create a reservoir against the BeadChip surface. |
| A. | Reservoir at the barcode end of the glass back plate |
| B. | Glass back plate in position |
| 8. | Secure each flow-through chamber assembly with metal clamps as follows. |
| a. | Using one finger, gently push the glass back plate against the alignment bar. |
| b. | Place a metal clamp around the flow-through chamber 5 mm from the top edge. |
| c. | Place a second metal clamp around the flow-through chamber at the barcode end, 5 mm from the bottom of the reagent reservoir. |
| A. | One stripe is visible between the first clamp and the alignment bar. |
| B. | Glass back plate pressed against the alignment bar. |
| C. | Stripes are not visible between the second clamp and the barcode. |
| 9. | Remove the assembled flow-through chamber from the alignment fixture. |
| 10. | Starting at the nonbarcode end, trim the spacers from each end of the assembly using scissors. |
![]()
| A. | Trimming the spacer at the nonbarcode end. |
| B. | Trimming the spacer at the barcode end. |
| 11. | Leave assembled flow-through chambers on the lab bench in a horizontal position submerged in PB1 until ready to load onto chamber rack in Extend and Stain BeadChips. |
| • | Do not place on absorbent paper. |
| • | Do not place in the chamber rack until instructed to do so. |
| 12. | Wash the hybridization chamber reservoirs with deionized water. |
Immediate and thorough washing ensures complete removal of PB1 from the wells.
