
Extend and Stain BeadChips
This step washes unhybridized and nonspecifically hybridized DNA samples from the BeadChips and stains the extended probes. After the flow-through chambers are disassembled, the BeadChips are coated for protection.
| • | ATM |
| • | EML |
| • | PB1 (310 ml for 1–8 BeadChips) |
| • | RA1 |
| • | SML |
| • | LX1 |
| • | LX2 |
| • | XC3 |
| • | Resuspended XC4 (310 ml for 1–8 BeadChips, 285 ml for 9–24 BeadChips) |
| • | 70% EtOH (Ethanol) |
| • | 95% formamide/1 mM EDTA |
| • | Alconox Powder Detergent |
| • | Kimwipes |
| • | Make sure that the label of each SML tube indicates the same stain temperature. |
| • | Decant only the necessary volume of reagent. |
| • | Use fresh RA1 for each step that requires it. Properly stored RA1 that has not been dispensed for the previous resuspension step or this extend and stain step is considered fresh. |
| • | RA1 might form visible precipitate or crystals. Before each use, hold in front of a light and inspect. Invert several times to redissolve the solution as needed. |
| • | The XC4 coat is slippery and makes the BeadChips difficult to hold. Self-locking tweezers grip the BeadChip firmly and help prevent damage. |
This set of reagents contains potentially hazardous chemicals. Personal injury can occur through inhalation, ingestion, skin contact, and eye contact. Ventilation should be appropriate for handling of hazardous materials in reagents. Wear protective equipment, including eye protection, gloves, and laboratory coat appropriate for risk of exposure. Handle used reagents as chemical waste and discard in accordance with applicable regional, national, and local laws and regulations. For additional environmental, health, and safety information, refer to the SDS at support.illumina.com/sds.html.
The amount of reagent depends on number of BeadChips being processed, as shown in the following table.
|
Number of BeadChips |
LX1 (tube) LX2 (tube) EML (tube) SML (tube) ATM (tube) |
XC3 (ml) |
RA1 (ml) |
95% Formamide/1mM EDTA (ml) |
|---|---|---|---|---|
|
1–4 |
1 |
46 |
10 |
8 |
|
5–8 |
2 |
46 |
10 |
8 |
|
9–12 |
3 |
84 |
17 |
15 |
|
13–16 |
4 |
84 |
17 |
15 |
|
17–20 |
5 |
122 |
23 |
21 |
|
21–24 |
6 |
122 |
23 |
21 |
Procedure
| 1. | Open ILASS on the IAPS controller PC and sign in. |
| 2. | Select the Infinium Genotyping Assay with PGx workflow. |
| 3. | Select the Extend and Stain BeadChips step. |
| 4. | Select the Product Type drop-down, and then select Infinium Genotyping with PGx Array LCG-8. |
| 5. | In Container Input Quantity, enter the number of 96-well plates to be processed. Manually enter the value or set the value using +/-. |
ILASS displays the number of required materials based on the number of plates.
| 6. | Select Continue |
| 7. | Confirm that the BeadChips are not loaded in the Te-Flow, and then select Confirm. |
The water circulator increases the temperature to 44°C in the Te-Flow.
This process takes between 15–25 minutes from room temperature or ~5–10 minutes from 40°C (the temperature used to degas the Te-Flow heat exchanger).
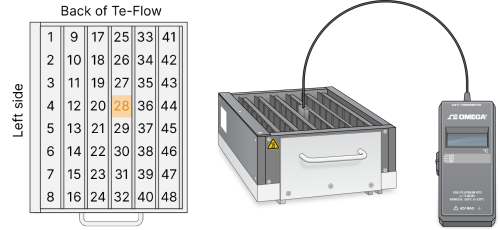
| 8. | While waiting for the Te-Flow to reach 44°C, turn on the Illumina Temperature Probe and put it in Te-Flow position 28. Make sure that the back side of the temperature probe touches the base of the chamber rack. Refer to the following illustration for probe position. |
| 9. | Vortex or invert reagents 10 times to mix. |
| 10. | Centrifuge the tubes at 280 × g for 1 minute or manually flick the bottles to remove reagent from underside of cap. |
| 11. | After ILASS confirms that the Te-Flow has reached 44°C, select Continue. |
If the temperature is not within ± 0.5°C, ILASS cannot proceed. Contact Illumina Technical Support if you need assistance resolving a temperature issue.
| 12. | After waiting at least five minutes in position 28 to allow the probe temperature to stabilize, manually confirm that the Te-Flow is at 44°C ± 0.5°C. |
Do not leave the temperature probe in any Te-Flow column containing BeadChips for the run. Move the temperature probe to any position in the column immediately to the right of the last column containing BeadChips (when facing the front of the IAPS) to monitor the Te-Flow temperature for the entire run.
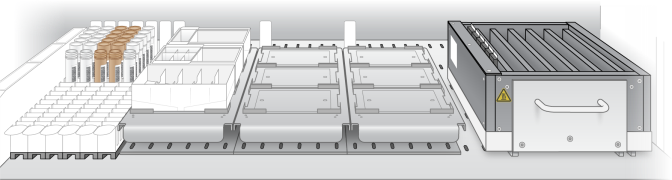
| 13. | After confirming the Te-Flow is at 44°C ± 0.5°C, load reagents and troughs onto the IAPS with ILASS worktable as indicated in ILASS and shown in Worktable Setup. |
To prevent the BeadChips from drying out, keep BeadChip flow-through chambers submerged in PB1 until ILASS prompts you to load them.
Place reagent tubes into the innermost tube rack position first, with the barcodes facing the center of the instrument.
Make sure to remove the tube caps.
| a. | Pour XC3 into a full reagent trough. |
| b. | Pour RA1 into a half reagent trough. Place the trough into a reservoir frame, and then place the trough and reservoir frame on the worktable as indicated in ILASS. |
| c. | Pour 95% formamide/1mM EDTA into a quarter reagent trough. Place the trough into a reservoir frame, and then place this on the worktable as indicated in ILASS. |
| 14. | When all reagents are loaded onto the worktable, select Auto-Scan Item(s). |
| 15. | Select Manual-Scan Item(s). |
| 16. | Manually enter information for the trough reagents according to the user interface. |
| 17. | Select Submit & Continue. |
| 18. | Make sure that the correct glass chamber is in use, and then select Confirm. |
| 19. | Load BeadChips into the Te-Flow when prompted by ILASS. Retain the alignment fixture on the lab bench and save the PB1 for use after the robot finishes. |
It is important to scan the BeadChips and start the run as quickly as possible to prevent the BeadChips from drying out.
| 20. | When the BeadChips have been loaded into the Te-Flow, select Auto-Scan Item(s). |
| 21. | After the BeadChips have been successfully scanned, the interface displays a timer. Select Execute Run to begin the run. |
ILASS monitors the Te-Flow temperature by monitoring the calibrated water circulator temperature throughout the run. If the temperature deviates from the calibrated temperature ± 0.5°C, ILASS notifies the user and records the event but does not stop the run. Periodically check the interface for such notifications. Optionally, check the Te-Flow temperature manually using the attached Illumina Temperature Probe to maintain the necessary operating temperature (44°C for extend and 32°C for stain, ± 0.5°C). Keep the IAPS door closed during the run. Only check the temperature if the probe is already in the Te-Flow before starting the run. Refer to Chamber Rack and Temperature Probe for probe positioning instructions.
| 22. | When the robot finishes, turn off the Illumina Temperature Probe, if used, and immediately remove the flow-through chambers from the chamber rack. |
| 23. | Place the flow-through chambers in reserved alignment fixtures with PB1 at room temperature on a lab bench. |
Depending on the run batch size, the volume of reagent remaining in tubes after Xstain completes might vary from tube to tube. This is expected and is not indicative of variable fill volumes or pipetting issues.
The following instructions describe the use of the clear plastic wash dishes. If you are using the blue plastic wash dishes, refer to Wash and Coat BeadChips Using Blue Plastic Wash Dishes.
| 1. | Gather the following equipment: |
| • | Kimwipes, large |
| • | Staining rack |
| • | Self-locking tweezers |
| • | Tube rack |
| • | Vacuum desiccator |
| • | Vacuum hose |
| • | Wash dishes (2) |
| 2. | During the procedure, prevent dust or lint from entering the wash dishes as follows. |
| a. | Clean wash dishes with low-pressure air before use. |
| b. | Cover wash dishes with wash dish covers when not in use. |
| 3. | Wash the tube racks and wash dishes thoroughly after each use as follows. |
| a. | Rinse with deionized water. |
| b. | Dry racks and wash dishes upside down on a wash rack. |
| 4. | Place a clean tube rack on top of several layers of Kimwipes or an absorbent pad. |
After you remove the staining rack containing BeadChips from the XC4 wash dish, place it on this rack.
| 5. | Prepare another clean tube rack that fits the internal dimensions of the vacuum desiccator for removal of the BeadChips. Allow one rack per eight BeadChips. |
Kimwipes are not needed under this tube rack.
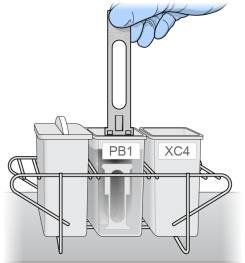
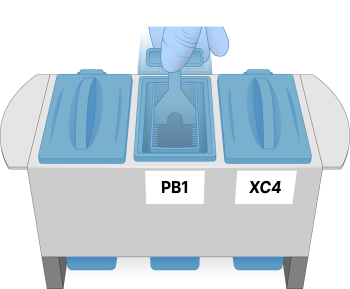
| 6. | Set up two top-loading wash dishes labeled PB1 and XC4. |
| 7. | To indicate fill volume of each wash dish do as follows. |
| a. | Add 310 ml water. |
| b. | Mark the water level on the side. |
| c. | Empty the water. |
Indicating fill volume before adding reagents allows reagents to be added directly from the bottles, minimizing contamination.
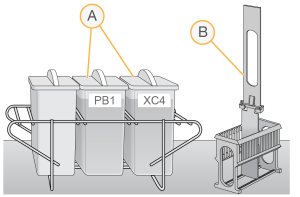
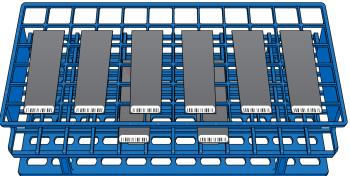
| A. | Labeled and filled wash dishes |
| B. | Staining rack |
| 8. | Add 310 ml PB1 to the PB1 wash dish. |
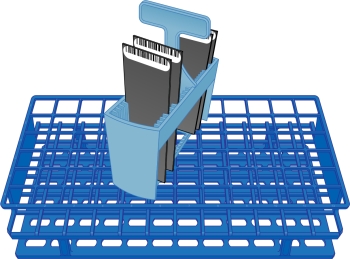
| 9. | Submerge the staining rack in the wash dish so that the locking arms and tab face you. |
This orientation ensures that you can safely remove the BeadChips.
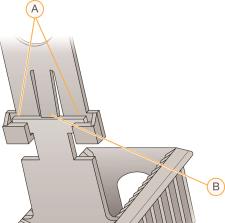
| A. | Locking arms |
| B. | Tab |
| 10. | Leave the staining rack in the wash dish for later use (carrying the BeadChips after disassembling the flow-through chambers). |
| 11. | Using the dismantling tool, remove the two metal clamps from a flow-through chamber. |
The dismantling tool prevents chipping the glass back plates.
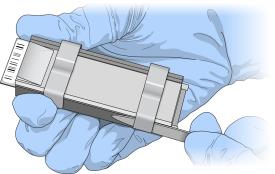
| 12. | Lift the glass back plate straight up to remove. Set aside for cleaning after finishing this procedure. |
Sliding the glass along the BeadChip can damage the BeadChip.
| 13. | Pull out the spacer so that the long side slides along the BeadChip sides. |
This technique prevents damaging the BeadChip stripes.
| 14. | Remove the BeadChip from the black frame. Handle the BeadChip only by the barcode end or edges. |
| 15. | Repeat steps 11–14 to disassemble each flow-through chamber one at a time. |
| 16. | Place the BeadChips into the submerged staining rack. Make sure that the BeadChip barcodes face away from you. |
Submerge each BeadChip as quickly as possible to prevent drying.
| 17. | If necessary to seat a BeadChip, briefly lift the staining rack from the wash dish and seat the BeadChip. |
| 18. | Make sure that the BeadChips are submerged. |
| 19. | Slowly lift the staining rack up and down 10 times, breaking the PB1 surface. If the tops of the BeadChips touch, gently wiggle the staining rack to separate the slides. |
Free circulation of PB1 between BeadChips is important.
| 20. | Soak in PB1 for 5 minutes. |
| 21. | Vigorously shake the XC4 bottle to resuspend completely. If necessary, vortex until dissolved. |
| 22. | Add 310 ml XC4 to the XC4 wash dish. |
| • | Cover to prevent lint or dust from entering. |
| • | Do not let sit for more than 10 minutes. |
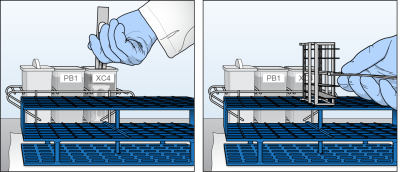
| 23. | Transfer the staining rack from the PB1 wash dish to the XC4 wash dish. |
![]()
| 24. | Slowly lift the staining rack up and down 10 times, breaking the XC4 surface. If the tops of the BeadChips touch, gently move the staining rack from side to side to separate the slides. |
| 25. | Soak in XC4 for 5 minutes. |
| 26. | Remove the staining rack in one quick motion and place it onto the prepared tube rack. |
| 27. | Make sure that the staining rack is in the center of the tube rack to ensure uniform coating. Avoid the raised edges. |
| 28. | [Optional] Remove the staining rack handle to facilitate BeadChip removal: |
| a. | Holding the top of the staining rack in position, grasp the handle between your thumb and forefinger. |
| b. | Push up the tab with your thumb and push the handle away from you, unlocking the handle. |
| c. | Pull up the handle and remove. |
| 29. | Working top to bottom, dry each BeadChip as follows. |
| a. | Holding the staining rack handle (if present), use self-locking tweezers to grip the BeadChip by the barcode end. |
| b. | Clean the back of each BeadChip using a Kimwipe sprayed with 70% EtOH: |
| • | Hold the BeadChip at a downward angle to prevent excess EtOH from dripping onto the stripes. |
| • | Without touching the stripes, wipe the underside of the BeadChip until XC4 is removed (5–6 times). |
| c. | Place the BeadChip onto a tube rack with the barcode facing up and toward you. Do not place on the bottom rack or allow BeadChips to rest on the tube rack edge or touch each other. |
Proper BeadChip placement prevents wicking, uneven drying, and pooled dye protectant.
| 30. | Place the tube rack into the vacuum desiccator. |
Each desiccator can hold one tube rack (eight BeadChips).
| 31. | Make sure that the vacuum valve is seated tightly and securely, and remove the red plug from the three-way valve. |
| 32. | Gently lift the vacuum desiccator lid to ensure proper sealing. Make sure that the lid does not lift off the desiccator base. |
| 33. | Dry the BeadChips in the vacuum desiccator for 50–55 minutes at 675 mm Hg (0.9 bar). |
Drying times can vary according to room temperature and humidity.
| 34. | Release the vacuum by turning the handle slowly. |
Make sure that air enters the desiccator very slowly to avoid disturbing the contents. Improper use of the vacuum desiccator can result in damage to the BeadChips, especially if you remove the valve plug while a vacuum is applied. For detailed vacuum desiccator instructions, refer to the documentation included with the desiccator.
| 35. | Return the desiccator to storage. Store with the red valve plug in the three-way valve of the desiccator to prevent dust and lint from accumulating in the valve port. |
| 36. | Touch the BeadChip borders (not the stripes) to make sure that the barcode sides of the BeadChips are dry to the touch. |
| 37. | Image the BeadChips immediately, or store them protected from light. |
The following instructions describe the use of the blue plastic wash dishes. If you are using the clear plastic wash dishes, refer to Wash and Coat BeadChips Using Clear Plastic Wash Dishes.
| 1. | Gather the following equipment: |
| • | Kimwipes, large |
| • | Staining rack |
| • | Self-locking tweezers |
| • | Tube rack |
| • | Vacuum desiccator |
| • | Vacuum hose |
| • | Wash dishes (2) |
| 2. | During the procedure, prevent dust or lint from entering the wash dishes as follows. |
| a. | Clean wash dishes with low-pressure air before use. |
| b. | Cover wash dishes with wash dish covers when not in use. |
| 3. | Wash the tube racks and wash dishes thoroughly after each use as follows. |
| a. | Rinse with deionized water. |
| b. | Set dry racks and wash dishes upside down on a wash rack. |
| 4. | Place a clean tube rack on top of several layers of Kimwipes or an absorbent pad. |
After you remove the staining rack containing BeadChips from the XC4 wash dish, you will place it on this rack.
| 5. | Prepare another clean tube rack that fits the internal dimensions of vacuum desiccator for removal of the BeadChips. Allow one rack per eight BeadChips. |
Kimwipes are not needed under this tube rack.
| 6. | Set up two top-loading wash dishes labeled PB1 and XC4. |
Wash Dishes
| 7. | Add PB1 to the PB1 wash dish as indicated in the following table. |
|
Number of BeadChips |
Volume of PB1 |
|---|---|
|
4 |
283 ml |
|
8 |
276 ml |
|
12 |
270 ml |
|
16 |
266 ml |
|
20 |
263 ml |
|
24 |
250 ml |
| 8. | Submerge the staining rack in the wash dish. |
Staining Rack

| 9. | Leave the staining rack in the wash dish for later use (carrying the BeadChips after disassembling the flow-through chambers). |
| 10. | Use the dismantling tool to remove the two metal clamps from a flow-through chamber. |
The dismantling tool prevents chipping the glass back plates.
| 11. | Lift the glass back plate straight up to remove. Set aside for cleaning after finishing this procedure. |
Sliding the glass along the BeadChip can damage the BeadChip.
| 12. | Pull out the spacer so that the long side slides along the BeadChip sides. |
This technique prevents damaging the BeadChip stripes.
| 13. | Remove the BeadChip from the black frame. Handle the BeadChip only by the barcode end or edges. |
| 14. | Repeat steps 11–13 to disassemble each flow-through chamber one at a time. |
| 15. | Place the BeadChips into the submerged staining rack. |
Submerge each BeadChip as quickly as possible to prevent drying.
| 16. | If you must seat a BeadChip, briefly lift the staining rack from the wash dish and seat the BeadChip. |
| 17. | Make sure that the BeadChips are submerged. |
| 18. | Move the staining rack up and down 10 times, breaking the PB1 surface with fast agitation. If the tops of the BeadChips touch, gently move the staining rack side-to-side to separate the slides. |
Free circulation of PB1 between BeadChips is important.

| 19. | Soak in PB1 for 5 minutes. |
| 20. | Vigorously shake the XC4 bottle to resuspend completely. If necessary, vortex until dissolved. |
| 21. | Add XC4 to the XC4 wash dish as indicated in the following table. |
Do not let sit for more than 10 minutes.
|
Number of BeadChips |
Volume of XC4 |
|---|---|
|
4 |
283 ml |
|
8 |
276 ml |
|
12 |
270 ml |
|
16 |
266 ml |
|
20 |
263 ml |
|
24 |
250 ml |
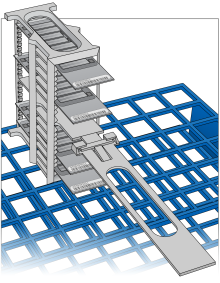
| 22. | Transfer the staining rack from the PB1 wash dish to the XC4 wash dish. |
![]()
| 23. | Move the staining rack up and down 10 times. Break the XC4 surface with gentle, slow agitation. If the tops of the BeadChips touch, gently move the staining rack from side to side to separate the slides. |
| 24. | Soak in XC4 for 5 minutes. |
| 25. | Remove the staining rack in one quick motion and place it onto the prepared tube rack. |
Make sure that the staining rack is in the center of the tube rack to ensure uniform coating. Avoid the raised edges.
| 26. | Dry each BeadChip as follows. |
| a. | Use self-locking tweezers to grip the BeadChip by the barcode end. |
| b. | Place the BeadChip onto a tube rack with the barcode facing up and toward you. Do not place on the bottom rack or allow BeadChips to rest on the tube rack edge or touch. |
Proper BeadChip placement prevents wicking, uneven drying, and pooled dye protectant.
BeadChip Placement on Tube Rack
| 27. | Place the tube rack into the vacuum desiccator. |
Each desiccator can hold one tube rack (eight BeadChips).
| 28. | Make sure that the vacuum valve is seated tightly and securely, and then remove the red plug from the three-way valve. |
| 29. | Gently lift the vacuum desiccator lid to ensure proper sealing. Make sure that the lid does not lift off the desiccator base. |
| 30. | Dry the BeadChips in the vacuum desiccator for 50–55 minutes at 675 mm Hg (0.9 bar). |
Drying times can vary according to room temperature and humidity.
| 31. | Release the vacuum by turning the handle slowly. |
Make sure that air enters the desiccator very slowly to avoid disturbing the contents. Improper use of the vacuum desiccator can result in damage to the BeadChips, especially if you remove the valve plug while a vacuum is applied. For detailed vacuum desiccator instructions, refer to the documentation included with the desiccator.
| 32. | Thoroughly wash alignment fixtures that no longer contain flow-through chambers with DI water to ensure complete removal of PB1 from the wells. |
| 33. | Return the desiccator to storage. Store with the red valve plug in the three-way valve of the desiccator to prevent dust and lint from accumulating in the valve port. |
| 34. | Without touching the stripes, wipe the underside of the BeadChip with a Kimwipe sprayed with 70% EtOH until XC4 is removed. |
| 35. | Touch the BeadChip borders (not the stripes) to make sure that the barcode sides of the BeadChips are dry to the touch. |
| 36. | Image the BeadChips immediately, or store them protected from light and dust. |
