V2 Maintenance Wash
The software prompts for a maintenance wash at the following times:
|
•
|
When there has not been a maintenance wash within the last 14 days. |
|
•
|
When a post-run wash fails or is incomplete. |
The maintenance wash flushes the system with user-supplied dilutions of Tween 20 and NaOCl. The dilutions are pumped from the wash cartridges to the flow cell, used reagent bottles, and each cartridge reservoir to wash all sippers. Wash duration is approximately 120 minutes.
A maintenance wash requires a used buffer cartridge and the following, which are provided with the instrument:
|
•
|
Four-lane wash flow cell |
Like the reagent cartridges, the wash cartridges are color-coded to prevent loading errors. The SBS wash cartridge has a center well for the Tween 20 dilution. The NaOCl dilution is added to four reservoirs on the cluster wash cartridge.
CAUTION
Failure to empty the used reagent bottles can result in a terminated wash and overflow, which damages the instrument and poses a safety risk.
SBS Wash Cartridge (Left) and Cluster Wash V2 Cartridge (Right)

 Prepare Wash Solution
|
1.
|
Add 400 ml laboratory-grade water to a 500 ml centrifuge bottle. |
|
2.
|
Add 0.2 ml 100% Tween 20 to result in at least 400 ml 0.05% Tween 20 wash solution. |
Using a freshly prepared dilution of Tween 20 limits the introduction of contaminants into the fluidics system.
|
4.
|
Remove the lid from the center well of the SBS wash cartridge. |
|
5.
|
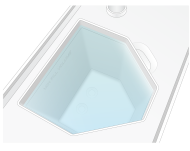
Add wash solution to the center well. Fill to the fill line, which indicates the minimum required volume. |
The other reservoirs remain empty.
Center Well Filled to Fill Line
|
6.
|
In a 50 ml centrifuge tube, combine the following volumes to prepare 40 ml of 0.12% reagent grade NaOCl: |
|
•
|
5% reagent grade NaOCl (1 ml) |
|
•
|
Deionized water (39 ml) |
CAUTION
Only use reagent grade NaOCl. Avoid general-purpose bleach products as these can contain ammonia compounds, which may lead to runs with low percentage passing filter reads.
|
8.
|
Add 4 ml 0.12% reagent grade NaOCl to the marked positions of the cluster wash V2 cartridge. |
The locations are marked Fill and are circled in orange. All other reservoirs remain empty.
Positions for 0.12% NaOCl

Load the Wash Flow Cell
|
1.
|
Remove any items from the surface of the instrument. |
Keep the surface clear during the maintenance wash and avoid leaning on the instrument.
|
2.
|
From the main menu, select Sequencing, select Wash, and then select which side to wash: |
|
•
|
A+B—Wash both sides simultaneously. |
Staggered start of maintenance washes is not supported. The software initiates the series of wash screens.
You can only start a maintenance wash for a single sidewhen the other side is either idle or performing SBS read cycles. The NVOS staggered start time indicates the instrument's availability for starting a new run or a wash. Refer to Staggered Start of Runs for more information.
|
3.
|
Select OK to acknowledge the warning and open the flow cell door. |
|
4.
|
Load a wash flow cell. |
|
5.
|
Select Close Flow Cell Door. |
The door closes, the sensors and RFID are checked, and the flow cell ID appears on the screen.
Load the Wash Cartridges
Wash cartridges are required for a maintenance wash. Do not use the used SBS and cluster cartridges.
|
1.
|
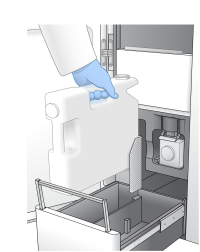
Open the liquid compartment doors, and then open the reagent chiller door. |
|
2.
|
Remove the used SBS and cluster reagent cartridges. Dispose of unused contents in accordance with applicable standards for your region. |
For safe disposal of position #30 of the cluster cartridge, refer to Detach Position #30.
|
3.
|
Load the wash cartridges into the reagent chiller drawer as follows, so that the Insert labels face the back of the instrument: |
|
•
|
Place the SBS cartridge (gray label) into the left position. |
|
•
|
Place the cluster wash V2 cartridge (orange label) into the right position. |
|
4.
|
Slide the drawer into the chiller, and then close the reagent chiller door. |
The sensors are checked and the RFID for each cartridge is scanned and displayed on the screen.
|
5.
|
Open the buffer drawer. |
|
6.
|
If not already present, load a used buffer cartridge. |
Empty Used Reagent Bottles
Use the following instructions to empty the used reagent bottles with every sequencing run. If your system is configured to route used reagents externally, the small bottle collects used reagents and must be emptied for each sequencing run. The large bottle must be in place.
CAUTION
This set of reagents contains potentially hazardous chemicals. Personal injury can occur through inhalation, ingestion, skin contact, and eye contact. Wear protective equipment, including eye protection, gloves, and laboratory coat appropriate for risk of exposure. Handle used reagents as chemical waste and discard in accordance with applicable regional, national, and local laws and regulations. For additional environmental, health, and safety information, refer to the SDS at support.illumina.com/sds.html.
|
7.
|
Remove and empty the small used reagent bottle as follows. |
|
a.
|
Raise the lever and remove the small used reagent bottle from the alcove. Grasp the bottle by the sides. |
|
b.
|
Remove the threaded cap from the cap holder on the front of the bottle. |
|
c.
|
Seal the bottle opening with the cap to prevent spills. |
|
d.
|
Keeping the contents separate from the contents of the other bottle, discard in accordance with applicable standards for your region. |
|
e.
|
Return the uncapped bottle to the alcove, and then lower the lever. Store the cap on the cap holder. |
|
8.
|
Remove and empty the large used reagent bottle as follows. |
|
a.
|
Using the top handle, remove the large used reagent bottle from the left side of the buffer drawer. |
|
b.
|
Remove the threaded cap from the cap holder on the front of the bottle. |
|
c.
|
Seal the bottle opening with the cap to prevent spills. |
|
d.
|
Discard the contents in accordance with
applicable standards for your region. Grip both handles when emptying. |
|
e.
|
Return the uncapped bottle to the buffer drawer. Store the cap on the cap holder. |
Returning the Empty Bottle
|
9.
|
Put on a new pair of powder-free gloves. |
|
10.
|
Close the buffer drawer, and then close the liquid compartment doors. |
CAUTION
Failure to empty the used reagent bottles can result in a terminated run and overflow, which damages the instrument and poses a safety risk.
Start the Wash
|
1.
|
Select the checkbox to acknowledge that both used reagent bottles are empty, and then select Start Wash. |
The wash starts and the estimated time of wash completion is displayed.
CAUTION
Failure to empty the used reagent bottles can result in a terminated wash and overflow, which damages the instrument and poses a safety risk.
|
2.
|
When the wash is complete, select Home. |
|
3.
|
Leave the consumables in place until the next run. |
The sippers remain in the SBS and cluster cartridges to prevent air from entering the system. The sippers in the buffer cartridge are raised so that the used reagent bottles can be emptied. Before the next maintenance wash, dispose of wash liquid remaining in the wash cartridge and rinse the reservoir with clean water. Allow the cartridges to dry fully between uses.

