
Infinium Assay Best Practices
Adhere to the following best practices when performing Infinium Assay protocols.
The Infinium protocol uses a linear amplification process to increase the quantity of input DNA samples to optimal levels. The laboratory space where you perform pre-amplification processes, such as quantification and normalization, must be separate from the post-amplification laboratory space. Amplification products can contaminate reagents, instrumentation, and DNA samples, causing inaccurate and unreliable results. Amplification product contamination can shut down lab processes and significantly delay resumption of normal operations.
When setting up an Infinium lab
| • | Separate equipment, such as lab coats, gloves, safety glasses, pipettes, centrifuges, heat blocks, and heal sealers, should be used in pre-amp and post-amp areas. |
| • | Separate sinks should be established for washing pre-amp and post-amp reservoirs. |
| • | Do not share a water purification system between the pre-amp and post-amp processes. |
| • | Supplies for Infinium protocols should always be stored in the pre-amp area and transferred to the post-amp area as needed. |
When following an Infinium protocol
| • | When adding or transferring samples, change tips between each well. |
| • | Use a unidirectional workflow when moving from pre-amp to post-amp areas. |
| • | To prevent amplification product or probe carryover, avoid returning to the pre-amp area after beginning work in the post-amp area. |
| • | When adding reagents, change tips between each well. |
| • | Change gloves if gloves come in contact with samples or probes. |
| • | Clean work surfaces and equipment thoroughly before and after the procedure with an RNase/DNase inhibiting cleaner. |
| • | Handling BeadChips |
| – | Touch the BeadChip at the barcode or along the edges only. Avoid the beadstripe area and sample inlets. |
| – | BeadChips are glass. Inspect them for broken edges before use and handle with care. |
| – | If using self-locking tweezers to hold the BeadChip, be careful to avoid scratching the BeadChip surface. |
| • | Before washing and coating BeadChips |
| – | Place wash dish covers on wash dishes when not in use. |
| – | Clean wash dishes with low-pressure air to remove particulates before use. |
| – | Wash tube racks and dishes thoroughly before and after use. Rinse with DI H2O. Place them upside down on wash rack to dry. |
| – | Prepare an additional clean tube rack that fits the internal dimensions of the vacuum desiccator. Allow one rack per eight BeadChips. |
Follow these instructions to calibrate the Signature High-Speed Microplate Shaker (VWR International, catalog # 13500-890).
| 1. | Set the digital stroboscope display speed to 1600 rpm. |
| 2. | Turn on the microplate shaker and adjust the speed until it reaches 1600 rpm. |
| 3. | Record the displayed speed and note that it represents an actual speed of 1600 rpm. |
| 4. | Use the same method to determine the displayed speed for the actual vortex speed of 1800 rpm. |
| 5. | Label the microplate shaker with the calibration information. |
|
Display Speed |
Actual Speed |
Calibration Date |
|---|---|---|
|
1450 rpm |
1600 rpm |
xx-xx-xx |
|
1625 rpm |
1800 rpm |
xx-xx-xx |
When centrifuging plates or tubes, place a balance plate or rack with tubes opposite each plate or tube rack being centrifuged. Make sure that the weights are as similar as possible.
Wear a lab coat, safety goggles, and gloves during this cleaning process.
Bleach is an irritant. Use caution when handling.
Perform this procedure in a fume hood or a lab space outside of the BeadChip production lab. Excessive bleach fumes can degrade the fluorescent dyes used in the Infinium Assay.
Establish a daily and weekly bleaching schedule for both the pre-amp and post-amp areas. Keep both areas clean. Once a week, thoroughly clean all laboratory surfaces and instruments in both areas. Mop floors with a 10% bleach solution.
You are responsible to train facility personnel to clean pre-amp and post-amp lab areas as described. Lab personnel should not move from the post-amp area to the pre-amp area.
Identify “hot spots” in each area that pose the highest risk of contamination, and clean these areas daily with a 10% bleach solution.
Typical hot spots include
| • | Bench space used to process DNA or amplified DNA |
| • | Vortexers |
| • | Centrifuges |
| • | Thermal cyclers |
| • | Instrument control panels |
| • | Door handles |
| • | Refrigerator/freezer door handles |
| • | Computer mice |
| • | Keyboards |
Follow these best practices for handling items that fall to the floor.
| • | Any items that fall to the floor are contaminated. |
| • | Wear lab gloves to touch any items that fall to the floor. |
| • | Immediately clean nondisposable items, such as pipettes or important sample containers, with a 10% bleach solution. |
| • | Use a 10% bleach solution to clean any lab surface in contact with the contaminated item. |
| • | Throw away your lab gloves and put on a new pair after handling items that have fallen to the floor. |
The glass back plates are used in the flow-through chambers during XStain to control the flow of reagent over the BeadChips. Clean the glass back plates when you open the package and after each use. In addition, perform a bleach cleaning according to the following assay-specific guidance. Disassemble glass back plates before cleaning. Inspect the glass back plates before each use.
Cleaning Glass Back Plates After Every Use for EX Assays
If using new glass back plates, proceed directly to Bleach Cleaning Glass Back Plates for EX Assays.
| 1. | Prepare a 1% Alconox solution. |
Use 2.5 g Alconox powder per 250 ml DI H2O.
| 2. | Submerge the plastic rack with glass back plates in a container filled with 1% Alconox. |
| 3. | Wipe each glass back plate with a Kimwipe and return to rack. Leave overnight. |
| 4. | Remove glass back plates from the 1% Alconox solution and thoroughly rinse the glass back plates with DI H2O. |
| 5. | After Alconox cleaning, the glass back plates can be stored following the instructions in the Recommended Racks for Glass Back Plate Cleaning, Bleaching, and Storage section. Before use, perform Bleach Cleaning Glass Back Plates for EX Assays |
Bleach Cleaning Glass Back Plates for EX Assays
Clean the XCG glass back plates as outlined in steps 1–5 with soaking taking place overnight or 1–2 hours before use.
For example, if using 100 ml of a bleach solution originally containing 8% sodium hypochlorite, adding 900 ml of DI H2O results in an acceptable final sodium hypochlorite concentration of 0.8% ([0.08 * 100 ml]/[100 ml + 900 ml] = 0.008).
| 2. | Submerge the plastic rack with glass back plates in a container filled with 1% bleach solution and agitate by dipping rack up and down 10 times (one dip per second), then soak for 1 hour or overnight. Ensure all glass back plates are fully submerged. |
| 3. | Remove glass back plates from the 1% bleach solution and thoroughly rinse the glass back plates with DI H2O. |
| 4. | Wipe the glass back plates with a Kimwipe soaked with 70% EtOH. |
| 5. | After bleach cleaning, the glass back plates can be placed in a rack in the interim period before use per instructions in Recommended Racks for Glass Back Plate Cleaning, Bleaching, and Storage. |
Cleaning Glass Back Plates After Every Use for Non-EX Assays
| 1. | Prepare a 1% Alconox solution. |
Use 2.5 g Alconox powder per 250 ml DI H2O.
| 2. | Submerge the plastic rack with glass back plates in a container filled with 1% Alconox. |
| 3. | Wipe each glass back plate with a Kimwipe and return to rack. |
| 4. | Remove the rack from the 1% Alconox solution and thoroughly rinse the glass back plates with DI H2O. |
| 5. | Allow the glass back plates to dry in the plastic rack. |
| 6. | After the glass back plates are clean and dry, wipe them with a Kimwipe soaked with 70% EtOH. |
| 7. | Store the glass back plates in the plastic rack in a dust-free area. |
| 8. | Use a can of compressed air or a laboratory air gun to remove any dust or lint on the glass back plates before use. |
Bleach Cleaning for Non-EX Assays
Clean the glass back plates with bleach after approximately every seven uses, or more frequently, depending on individual lab throughput. Use the following steps to clean the glass back plates:
| 1. | Make 10% bleach solution. |
Example: Add 100 ml of standard bleach (containing 5–10% sodium hypochlorite) to 900 ml DI H2O and mix thoroughly.
| 2. | Perform the following steps in the fume hood: |
| • | Fill a container with enough 10% bleach to cover both the rack and the glass back plates completely. |
| • | Place the plastic rack with the glass back plates into the container. |
| • | Soak for 1 hour. |
| 3. | Transfer the rack with glass back plates to a container filled with DI H2O. |
You can transfer the container and rack with glass back plates from the fume hood to a nearby sink with DI H2O.
| 4. | Dip the rack containing the glass back plates up and down 20 times. Be careful not to chip the glass back plates. |
| 5. | Remove the rack containing the glass back plates and rinse both with DI H2O. |
| 6. | Dispose of the DI H2O from the container. Rinse and refill the container with fresh DI H2O. |
| 7. | Return the rack containing the glass back plates to the container. |
| 8. | Dip the rack containing the glass back plates up and down 20 times and then soak for 5 min. Be careful not to chip the glass back plates. |
| 9. | Repeat steps 4–7 four times. |
| 10. | Dispose of the DI H2O. |
| 11. | Remove the rack containing the glass back plates and rinse with DI H2O. |
| 12. | Allow the glass back plates to dry in the plastic rack. |
| 13. | After the glass back plates are clean and dry, wipe them with a Kimwipe soaked with 70% EtOH. |
| 14. | Store the glass back plates in the plastic rack in a dust-free area. |
| 15. | Use a can of compressed air or a laboratory air gun to remove any dust or lint on the glass back plates before use. |
Disassemble Flow-Through Chambers
In the Infinium Assay procedure, the Flow-Through Chambers are disassembled following the XStain step. XStain reagents contain many components (for example, proteins, enzymes, antibodies) and best practice is to prevent remaining reagent from drying on the glass back plates. Immediately after disassembly, place the glass back plate diagonally in a plastic rack that is submerged in a container of DI H2O to prevent drying. After all Flow-Through Chambers are disassembled and placed in the submerged rack, proceed to cleaning steps.
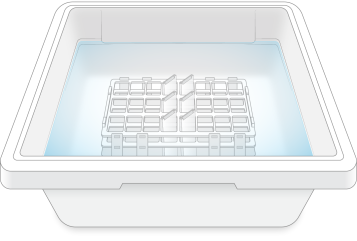
Plastic Rack Submerged in DI H2O
Inspecting the Glass Back Plates
Before each use, inspect the glass back plate to make sure it is in acceptable condition. If any of the following are observed, replace the glass back plate:
| • | Chip or damage in the reagent reservoir area. |
| • | Significant chips or damage on the surface facing the BeadChip in the flow-through chamber. |
| • | Cracks in the glass that may cause the glass to break during the assay. |
| • | Any chips or damage that may cause harm while handled, regardless of location. |
Recommended Racks for Glass Back Plate Cleaning, Bleaching, and Storage
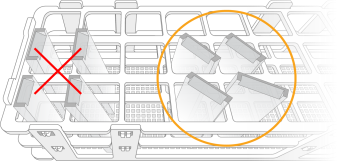
Polypropylene test tube racks (ie, plastic racks) are recommended for cleaning, bleaching, and storage of glass back plates. Place glass back plates diagonally in the racks to minimize contact between the glass and prevent damage.
Correct Placement of Glass Back Plates
| • | Stack no more than three chambers in the Illumina Hybridization Oven. |
| • | Keep the chamber lids and bases together. Adopt a labeling convention that pairs each chamber base with the original lid. |
| • | Regularly check lid-base pairs to make sure that they fit securely. Also check hinges for signs of abnormal wear or loose fittings. An airtight seal requires that the hinges have adequate clamping strength. |
| • | Record which hybridization chamber was used for each BeadChip. If sample evaporation or other processing anomalies occur, the appropriate hybridization chambers can be investigated. |
| • | When the hybridization chamber inserts contain BeadChips, keep them steady and level when lifting or moving. Avoid shaking, and always keep parallel to the lab bench. |
Infinium kits are configured to support various sample sizes with the assumption that the kit size corresponds to the batch size. For example, certain BeadChips are available in 48-sample, 288-sample, and 1152-sample kit configurations. When working with small batch sizes, order the smaller, 48-sample kits to make sure that the kit contains sufficient reagent volumes to process smaller batch sizes.
| • | To reduce pipetting errors, place plates on a surface with a contrasting color and mark the column after pipetting. |
| • | Make sure that pipettors are properly calibrated, clean, and decontaminated. |
| • | Dispense slowly and carefully to prevent turbulence in the plate wells and flow-through chambers. |
| • | Use a multichannel pipette whenever possible. |
| • | Always use the provided barcodes to track plates throughout the Infinium process. As a convention, apply barcode labels to the right side of the plate (the column 12 end). |
| • | Barcodes for full-skirt plates start with WG and end with PGX. |
| • | Barcodes for deep-well plates start with WG and end with either DNA (for the DNA plate) or WGA (for the WGA plate). |
| • | Apply barcodes to full-skirt plates and deep-well plates on the side next to column 12. |
| • | Load plates with the barcode facing right to enable automated scanning. |
| • | Review tips and techniques before starting the protocol, as many critical techniques are listed only here and are not repeated in the protocol. |
| • | Follow the protocol in the order described using the specified parameters. Any modification to the protocol could result in assay failure, suboptimal results, or an increase in indeterminate calls. |
| • | Unless a safe stopping point is specified in the protocol, proceed immediately to the next step. |
For optimal results, adhere to the following guidelines for preparation and storage of reagents:
| • | Infinium kits contain reagents in exact quantities needed for the assay. Measure reagents carefully to avoid shortages. |
| • | Use fresh reagents for each batch of plates, and empty reservoirs between batches. |
| • | After each protocol step, discard unused reagents per facility standards. |
| • | Make sure that the volume of each wash buffer is sufficient for one use. |
| • | When using PB20 |
| – | Store at room temperature. |
| – | Dilute PB20 to make 1x PB1 solution: |
| a. | Add 10 L DI H2O to the 20 L carboy. |
| b. | Pour the entire contents of PB20 (approximately 1 L) into the carboy. |
| c. | Fill to the 20 L line with DI H2O. Use a graduated cylinder or a gentle stream of DI H2O to avoid creating bubbles. |
| • | When using PB1 |
| – | Store at room temperature. |
| – | Keep for up to 3 months. |
| • | 0.1 N NaOH for EX assay or PGx assay |
| – | Prepare fresh 0.1 N NaOH and use immediately after preparation. |
| – | Use the 0.1 N NaOH the same day you open the tube, and discard any unused amounts. |
| – | Avoid exposing 0.1 N NaOH to open air. Open air exposure can form sodium bicarbonate over time, which can result in partial or complete failures of the DNA denaturation process. |
| – | Before using, confirm that pH is ≥ 13. |
| – | 0.1 N NaOH must be used within one hour of dispensing into trough. |
| • | 0.1 N NaOH for non-EX assays |
| – | Prepare fresh 0.1 N NaOH in large batches. |
| – | Divide batches into 15 ml or 50 ml sealed tubes. |
| – | Store sealed tubes for 6 months at 2°C to 8°C and use the stored 0.1 N NaOH as needed. |
| – | Use the 0.1 N NaOH the same day you open the tube, and discard any unused amounts. |
| • | 95% Formamide/1 mM EDTA for non-EX assays only |
| – | Prepare the 95% formamide/1 mM EDTA mixture in large batches to minimize errors. Divide batches into 15 ml or 50 ml sealed tubes. |
| – | Store the sealed tubes for up to 6 months at -25°C to -15°C and use the stored mixture as needed. |
| – | Use the mixture the same day you open the tube, and discard any unused amounts. |
| • | RA1 for non-EX assays only |
| – | Use fresh RA1 for each step in the assay where it is required. RA1 that has been stored properly and has not been dispensed for use in either the XStain or Resuspension step is considered fresh RA1. After RA1 has been exposed to room temperature air for extended periods of time, it is no longer fresh. |
| – | To make best use of RA1, pour only the amount needed for the current step. If you plan to perform additional assay steps requiring RA1 the same day, leave the remaining thawed reagent in the original, closed bottle at room temperature until it is needed. Follow the standard RA1 storage procedures described in this guide for next-day processing and prolonged storage conditions. |
| • | IHX for EX assays |
| – | Thaw IHX at 37°C for at least 30 minutes prior to use. |
| • | XC4 |
| – | Store undiluted XC4 and XC4 that has been diluted with ethanol at room temperature. |
| – | The XC4 reagent bottle displays the expiration date of the undiluted reagent. Illumina supports its products within the expiration date. |
| – | Diluted XC4 can be reused up to six times over a two-week period for a maximum of 48 BeadChips. |
| – | Clearly mark the XC4 bottle after ethanol has been added to avoid confusion with undiluted XC4 bottles. |
| • | Always seal plates before the following steps in the protocol |
| – | Shaking steps |
| – | Vortexing steps |
| – | Centrifuge steps |
| – | Thermal cycling steps |
| • | Apply the adhesive seal to cover the plate and seal thoroughly with a rubber roller or plate scraper. |
| • | Apply a new seal every time you cover a plate. |
| • | Use Microseal 'B' adhesive seals for shaking, centrifuging, and long-term storage. The seals are effective at -40°C to 110°C and suitable for skirted or semiskirted PCR plates. |
| • | If you observe droplets hanging from the inside of a sealed plate, centrifuge at 280 × g for 1 minute. |
| • | Orient sealing mats so that the A1 on a cap matches the A1 on the plate. |
| – | Make sure that all 96 caps are securely seated in the wells to prevent evaporation and spills, which introduce variability and cross-contamination. |
| – | Remove sealing mats slowly and carefully to prevent splashing, and then set aside upside-down in a safe location. |
| – | When returning a sealing mat to a plate, make sure that the orientation is correct. |
| • | When using a heat sealer |
| – | If you are using a programmable heat sealer, set it to 165°C and 5 seconds. After the sealer has reached the desired temperature, hold down firmly and press evenly for 2.5 seconds. Use a roller immediately afterward to ensure an effective seal. |
| – | If you are using a manual heat sealer, set to 165°C for at least 20 minutes before use. After the sealer has reached the desired temperature, hold down firmly and evenly for 5 seconds. Use a roller immediately afterward to ensure an effective seal. |
