Hybridize DNA to the BeadChip
This step dispenses the fragmented, resuspended DNA onto BeadChips. Incubation then hybridizes each DNA sample to a section of the BeadChip.
Before hybridizing DNA to the BeadChip make sure that the DMAP files have been downloaded for all BeadChips that will be used.
 About Reagents
|
•
|
Keep XC4 in the original bottle until you are ready to use it. |
|
•
|
Each XC4 bottle contains sufficient reagent to process up to 48 BeadChips. |
|
•
|
Use resuspended XC4 at room temperature. |
 Preparation
|
1.
|
If frozen, thaw the MSA4 plate at room temperature, and then pulse centrifuge at 280 × g. |
|
2.
|
Preheat the heat block to 95°C. |
|
3.
|
Preheat the Illumina Hybridization Oven to 48°C. |
Procedure
 Denature DNA
|
1.
|
Place the MSA4 plate at 95°C on the preheated heat block and incubate it for 20 minutes to denature the DNA. |
|
2.
|
Cool the MSA4 plate on the benchtop at room temperature for 30 minutes. |
|
3.
|
Pulse centrifuge at 280 × g. |
 Assemble the Hybridization Chambers
Assemble one chamber for every four BeadChips by following the steps in this section.
|
1.
|
Place the hybridization chambers, chamber gaskets, and chamber inserts on the benchtop. |
Hybridization Chamber Components
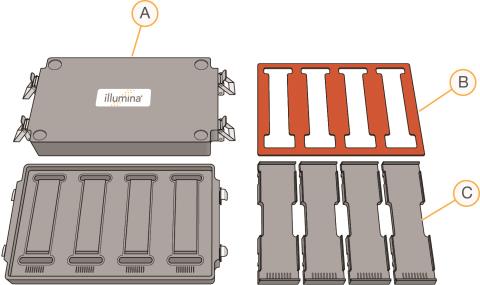
|
A.
|
Hybridization chambers |
|
B.
|
Hybridization chamber gaskets |
|
C.
|
Hybridization chamber inserts |
|
2.
|
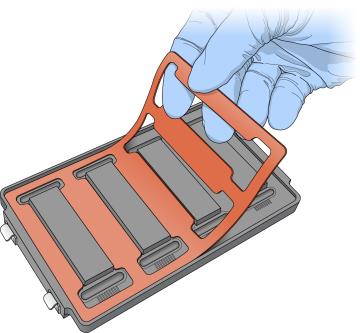
Align the wider edge of the gasket to the barcode ridges. |
Gasket and Hybridization Chamber Alignment Components

|
3.
|
Place the gasket into the hybridization chamber as follows. |
|
a.
|
Match the wider edge of the hybridization chamber gasket to the barcode-ridge side of
the hybridization chamber. |
|
b.
|
Press down on the edges of the gasket to make sure it is properly seated. |
Placing of Gaskets on Hybridization Chamber
|
4.
|
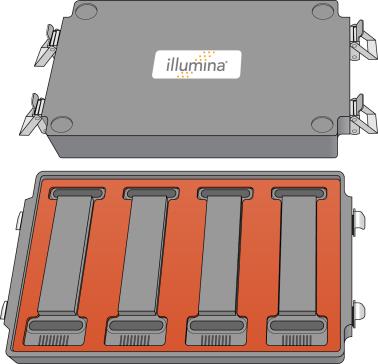
Make sure that the gaskets are properly placed and seated. |
Proper Gasket Placement on Hybridization Chamber
|
5.
|
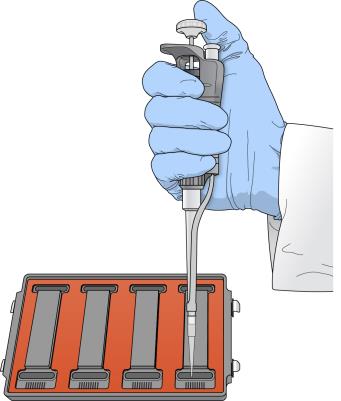
Add 400 µl PB2 into each of the eight humidifying buffer reservoirs in the hybridization chamber. |
PB2 Addition
|
6.
|
Immediately cover the chamber with the lid to prevent evaporation. |
|
7.
|
Leave the closed chambers on the benchtop at room temperature until the BeadChips are loaded with DNA (~1 hour). |
|
8.
|
[Illumina LIMS] In Illumina LIMS, select HD Methylation Assay | Confirm for Hyb. |
|
a.
|
Scan the barcode of each MSA4 plate you plan to hybridize. |
|
b.
|
Scan the BeadChip barcode on the package of each BeadChip you plan to hybridize. |
 Load DNA onto the BeadChip
|
1.
|
Remove the BeadChips from packaging. Hold BeadChips by the ends, away from the sample inlets. |
|
2.
|
Place each BeadChip into an insert so that the barcode ends align. |
BeadChip Placement in Insert

|
3.
|
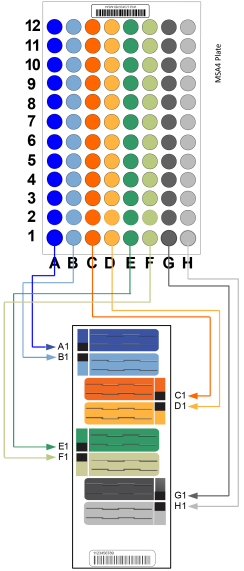
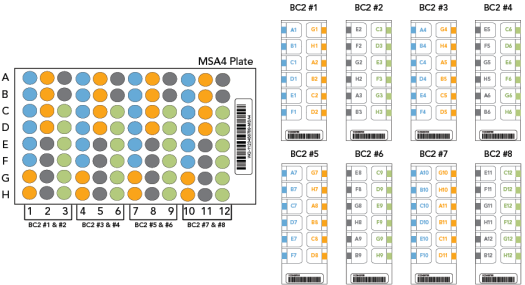
Transfer the appropriate volume of each sample from the MSA4 plate to the appropriate section of the BeadChip. |
Make sure that the pipette tip is in the sample inlet before dispensing.
|
•
|
8x1 BeadChips: 26 µl each sample |
|
•
|
12x1 BeadChips: 15 µl each sample |
|
•
|
Load A1–H1, as shown in the following graphic. |
|
•
|
Repeat for each column until all samples are loaded. |
MSA4 Plate Layout for 8x1 BeadChip
MSA4 Plate Layout for 12x1 BeadChip
|
4.
|
Wait for the DNA to disperse over the entire surface. |
|
5.
|
Inspect the loading port for excess liquid. |
Example Excess Liquid

|
6.
|
If excess liquid is not present, add leftover sample from the amplification plate to create a bolus around the loading port. Do not use RA1, which dilutes the sample. |
Excess liquid prevents evaporation and the creation of low-intensity areas.
|
7.
|
Store RA1 at -25°C to -15°C for use the next day. |
|
8.
|
Heat-seal any residual sample in the MSA4 plate with foil. |
SAFE STOPPING POINT
If you are stopping, seal the plate, and store at -80°C indefinitely.
[Optional] If you are not stopping, you can set aside the MSA4 plate for up to 1 hour before proceeding.
 Set Up BeadChips for Hybridization
To ensure accurate results, record and track each BeadChip and the hybridization chamber it is added to.
|
1.
|
Load the inserts containing BeadChips into the hybridization chamber. |
|
•
|
Position the barcode end over the ridges indicated on the chamber. |
|
•
|
Keep the inserts steady and level. |
Loading of Inserts into Chamber

|
2.
|
Place the back of the lid onto the chamber, and then slowly lower the front to avoid dislodging the inserts. |
Lowering of Chamber Lid

|
3.
|
Close all four clamps so that the lid is secure and sits evenly on the base without any gaps. |
Close the clamps in the following order: top-left, bottom-right, top-right, bottom-left.
|
4.
|
Place the chamber into the preheated Illumina Hybridization Oven so that the top logo faces you. |
You can stack up to three chambers per row for a total of six chambers. Make sure that the feet of the top chamber fit into the indents on the bottom chamber.
Chamber in Illumina Hybridization Oven

|
5.
|
Incubate at 48°C for 16–24 hours. |
|
6.
|
Store RA1 at -25°C to -15°C for use the next day. |
 Resuspend XC4
Resuspend XC4 to prepare for the Extend and Stain BeadChips step.
|
1.
|
Add 330 ml fresh 100% EtOH to the XC4 bottle. |
The resulting volume is ~350 ml.
|
2.
|
On the XC4 bottle label, record that the EtOH has been added. |
|
3.
|
Vigorously shake to resuspend. If needed, vortex at 1625 rpm to complete suspension. |
|
4.
|
Leave the bottle upright on the lab bench overnight. |
|
5.
|
[Optional] Store at 2°C to 8°C and use up to six times over a period of two weeks. |


