
Hybridize DNA to the BeadChip
This step dispenses the fragmented, resuspended DNA onto BeadChips. Incubation then hybridizes each DNA sample to a section of the BeadChip.
Before hybridizing DNA to the BeadChip ensure that the DMAP files have been downloaded for all BeadChips that will be used.
| • | PB2 |
| • | XC4 |
| • | DI H2O |
| • | 100% EtOH |
| 1. | If the MSA6 plate was frozen, prepare it as follows: |
| a. | Thaw the at room temperature. |
| b. | Centrifuge at 280 × g for 1 minute. |
| 2. | Remove BeadChips from storage, but do not unpackage. |
| 3. | Preheat the heat block to 95°C. |
| 4. | Preheat the Illumina Hybridization Oven to 48°C. |
| 1. | Make sure you have the correct robot tip alignment guide for the assay. |
Guide-F Robot Tip Alignment Guide
| 2. | Wash and dry the robot tip alignment guide. For washing instructions, refer to Wash Robot Tip Alignment Guide. |
| 1. |
|
| 2. | Cool |
| 3. | Pulse centrifuge at 1500 × g for 1 minute. |
Assemble one chamber for every four BeadChips by following the steps in this section.
BeadChip Hybridization Chamber Components
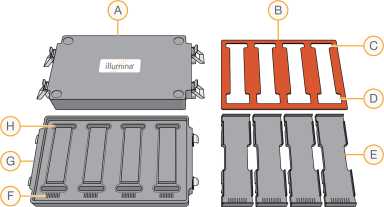
| A. | Top of BeadChip Hybridization Chamber |
| B. | Hybridization Chamber Gasket |
| C. | Narrower Edges |
| D. | Wider Edges |
| E. | Hybridization Chamber Inserts |
| F. | Barcode Ridges |
| G. | Bottom of BeadChip Hybridization Chamber |
| H. | Humidifying Buffer Reservoirs |
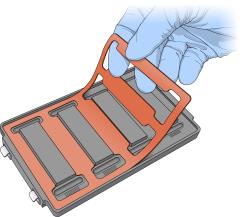
| 1. | Place the gasket into the hybridization chamber. |
| • | Match the wider edge of the hybridization chamber gasket to the barcode-ridge side of the hybridization chamber. |
| • | Press down on the edges of the gasket to make sure it is properly seated. |
Placing of Gaskets on Hybridization Chamber
| 2. | Add 400 µl PB2 into each |
| 3. | Place the hybridization chamber insert into the hybridization chamber. |
| 4. | Immediately cover the chamber with the lid |
| 5. | Leave |
| 6. | In Illumina LIMS, select Infinium LCG Assay | Confirm for Hyb. |
| a. | Scan the barcode of each MSA6 plate you plan to hybridize. |
| b. | Scan the BeadChip barcode on the package of each BeadChip you plan to hybridize. |
| c. | Select Verify. |
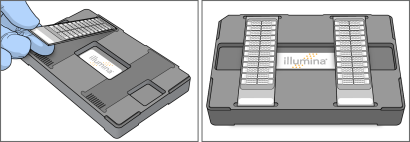
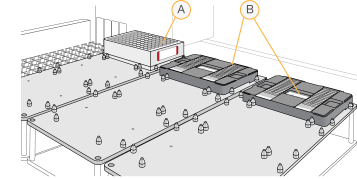
| 1. | Remove all BeadChips from packaging. |
| 2. | Place BeadChips into the robot BeadChip alignment fixtures. |
Placing BeadChips in Robot Alignment Fixtures
| 3. | Stack the robot BeadChip alignment fixtures and carry them to the robot. |
| 4. |
|
| a. |
|
| b. |
|
| 5. | Place the robot BeadChip alignment fixtures onto the robot deck |
| 6. | Pulse centrifuge the MSA6 plate at 280 × g for 1 minute. |
| 7. | Place the MSA6 plate onto the robot deck |
BeadChips must be transferred to hybridization chambers immediately at the end of the next procedure Start the Robot. Do not let the beadchips dry out. Do not begin Start the Robot if you cannot immediately transfer the BeadChips.
| 1. | At the robot PC, select Run. |
| • | The robot scans the barcode on the BeadChips to confirm the correct BeadChips are loaded. |
| 2. | Place each robot tip alignment guide on top of each robot BeadChip alignment fixture. |
| 3. |
|
| • | The robot scans the barcode on the robot tip alignment guide to confirm that the correct tip guide is being used. |
| • | The robot dispenses DNA sample to the BeadChips. |
| • | When the process is complete, the robot PC sounds an alert and opens a message box. |
| 4. |
|
| 5. | Remove the robot BeadChip alignment fixtures |
BeadChips must be removed from the robot deck immediately to prevent excess sample evaporation. Proceed to the next section Set Up and Incubate BeadChips immediately.
| 1. | Make sure that the Illumina Hybridization Oven is set to 48°C. |
Keep hybridization chambers at room temperature when you load the BeadChips. Do not place the hybridization chamber in the Illumina Hybridization Oven when loading the BeadChips.
| 2. |
|
Orient the barcode end so that it matches the barcode symbol on the insert.
BeadChip Placement in Insert
![]()
| 3. | Make sure that hybridization chamber inserts are seated properly in the hybridization chambers. |
| 4. | Apply the back side of the hybridization chamber lid first, and then slowly bring down the front end to avoid dislodging the hybridization chamber inserts. |
Lowering of Chamber Lid
![]()
| 5. | Close the hybridization chamber clamps in this order: top‑left, bottom‑right, top‑right, and then bottom‑left. Make sure that the lid is secure and even on the base (no gaps). |
To avoid disturbing the sample bolus, keep the hybridization chamber steady and level when moving it or transferring it to the Illumina Hybridization Oven.
| 6. | Illumina [LIMS] Select Infinium LCG Assay | Prepare Hyb Chamber. |
| a. | Scan the barcode of the PB2 bottles. |
| b. | Scan the BeadChip barcode on each BeadChip package. |
| c. | Select Verify, and then select Save. |
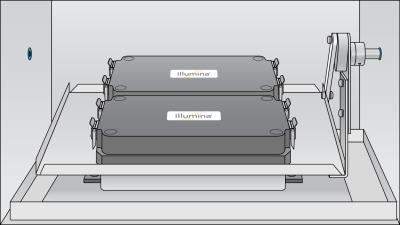
| 7. | Place the hybridization chamber in the preheated Illumina Hybridization Oven with the clamps of the hybridization chamber facing the front and back of the oven. |
If you are stacking multiple hybridization chambers in the Illumina Hybridization Oven, fit the feet of each hybridization chamber into the matching indents on the lid of the hybridization chamber below it. You can stack up to three hybridization chambers in two rows, for a maximum of six total hybridization chambers in the Illumina Hybridization Oven.
Chamber in Illumina Hybridization Oven
Overnight Incubation
Incubate at 48°C for 16–24 hours.
| 1. | Add 330 ml fresh 100% EtOH to the XC4 bottle. |
The resulting volume is ~ 350 ml. Each XC4 bottle can process up to 48 BeadChips.
| 2. | Vigorously shake to resuspend. |
| 3. | Leave the bottle upright on the lab bench overnight. |
If XC4 was not left to resuspend overnight, you can still proceed with the assay.
| 1. | Soak the robot tip alignment guides in 1% aqueous Alconox solution (1 part Alconox to 99 parts water) for 5 minutes. Do not use bleach or ethanol to clean robot tip guide inserts. |
| 2. |
|
| 3. | Dry the robot tip alignment guides. Make sure that the robot tip alignment guides are free of any residual contaminates before next use. |
