
Quantify DNA (Optional)
This step uses the PicoGreen dsDNA quantification reagent to quantify doubl e-stranded DNA samples. Quantify up to 6 plates, each containing up to 96 samples.
| • | PicoGreen dsDNA quantification reagent |
| • | 1X TE |
| • | Lambda DNA |
| • | 96-well 0.65 ml microplates |
| • | FLUOTRAC 200 96-well flat-bottom plate (1 per standard DNA plate/1 per sample DNA plate) |
| • | Do not use glass containers with PicoGreen. The reagent degrades quickly in the presence of light and can adhere to glass, which lowers its effective concentration in solution and affects the upper response range accuracy. |
| 1. | Prepare the following consumable: |
|
Item |
Storage |
Instructions |
|---|---|---|
|
PicoGreen dsDNA quantification reagent |
2° to 8°C |
Thaw at room temperature for 60 minutes in a light-impermeable container. |
| 2. | Label the 96-well microplate Standard DNA. |
| 3. | Label the FLUOTRAC plates Standard QDNA and Sample QDNA. |
The Sample QDNA plate is for the quantified DNA.
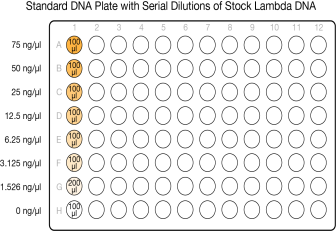
This step creates a Standard DNA plate with serial dilutions of stock Lambda DNA in the wells of column 1.
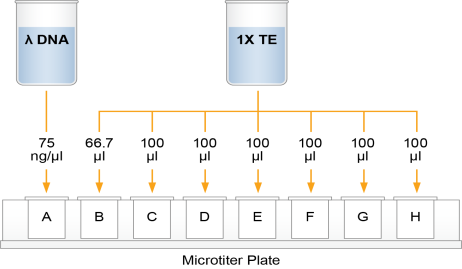
| 1. | Add stock Lambda DNA to well A1 in the Standard DNA plate and dilute to 75 ng/µl in a final volume of 233.3 µl. Pipette up and down several times to mix. |
| • | Use the following formula to calculate the amount of stock Lambda DNA: |

| • | Dilute the stock DNA in well A1 using the following formula: |

| 2. | Add 66.7 µl 1X TE to well B1. |
| 3. | Add 100 µl 1X TE to the remaining wells of column 1. |
Dilution of Stock Lambda DNA Standard
| 4. | Transfer 133.3 µl Lambda DNA from well A1 to well B1. Pipette up and down several times to mix. |
| 5. | Transfer 100 µl from well B1 to well C1. Pipette up and down several times to mix. |
| 6. | Repeat the sequential transfer of 100 µl for wells D1, E1, F1, and G1. |
Do not transfer from well G1 to H1. Well H1 serves as the blank 0 ng/µl Lambda DNA.
|
Row-Column |
Concentration (ng/µl) |
Final Volume in Well (µl) |
|---|---|---|
|
A1 |
75 |
100 |
|
B1 |
50 |
100 |
|
C1 |
25 |
100 |
|
D1 |
12.5 |
100 |
|
E1 |
6.25 |
100 |
|
F1 |
3.125 |
100 |
|
G1 |
1.5262 |
200 |
|
H1 |
0 |
100 |
Serial Dilutions of Lambda DNA
| 7. | Cover the Standard DNA plate with a cap mat. |
In this step, PicoGreen is diluted for use in the subsequent Create Standard and Sample QDNA Plates procedure.
| 1. | Prepare a 1:200 dilution of PicoGreen to 1X TE using a sealable 100 ml or 250 ml Nalgene bottle wrapped in aluminum foil. |
Use the following table to determine the volumes needed for 96-well QDNA plates.
|
Number of QDNA Plates |
PicoGreen (µl) |
1X TE (ml) |
|---|---|---|
|
1 |
115 |
23 |
|
2 |
215 |
43 |
|
3 |
315 |
63 |
| 2. | Cap the foil-wrapped bottle and vortex to mix. |
This step transfers the PicoGreen/1X TE dilution to Standard QDNA and Sample QDNA plates, and adds DNA from the respective DNA plates.
Do not run any other programs or applications while using the robot. Running multiple programs can cause the computer and the robot to lock up and stop a run.
| 1. | At the robot PC, select DNA Quant | Make Quant. |
| 2. | Select the DNA plate type. |
| 3. | In the Basic Run Parameters pane, enter the Number of DNA/QDNA plates (1, 2, or 3 pairs) and the Number of DNA Samples. |
| 4. | Vortex DNA Sample plate at 1450 rpm for 1 minute. |
| 5. | Centrifuge at 280 × g for 1 minute. |
| 6. | Vortex the Standard QDNA plate at 1450 rpm for 1 minute. |
| 7. | Centrifuge at 280 × g for 1 minute. |
| 8. | Place the plates on robot bed according to the robot bed map. Remove plate seals. |
| 9. | Transfer PicoGreen/1X TE dilution to half reservoir A and place it on the robot bed. |
| 10. | Clear the Use Barcodes checkbox. |
| 11. | Select Run. |
| 12. | When the process completes, select OK. |
| 13. | When the robot finishes, immediately seal all plates. |
| 14. | Store DNA and Standard DNA plates at 2° to 8°C or -25°C to -15°C. |
| 15. | Centrifuge Sample QDNA plate and Standard QDNA plate to 280 × g for 1 minute. |
This step compares the Sample QDNA plate data to the standard curve to obtain the concentration of sample DNA. For best performance, use a minimum concentration of 50 ng/µl.
| 1. | Turn on the spectrofluorometer. |
| 2. | Start the Illumina Fluorometry Analysis program. |
| 3. | Select Reader Tasks | Read Quant. |
| 4. | Select Read. |
| 5. | When prompted to read a new Standard plate, select Yes. |
| 6. | Remove plate seal and load Standard QDNA plate into the fluorometry tray. Select OK. |
| 7. | Review generated data. Either accept it and continue to the next step, or reject it. |
Rejecting the data stops the Read Quant process.
| 8. | Remove Standard QDNA plate from the spectrofluorometer tray. |
| 9. | When prompted, enter the number of plates you want to read (1, 2, or 3). Do not include the Standard QDNA plate in this number. Select OK. |
| 10. | When prompted, hand-scan Sample QDNA plate barcode. Select OK. |
| 11. | When prompted, remove plate seal from Sample QDNA plate and load plate into the spectrofluorometer tray, with well A1 at the upper left corner. Select OK. |
| 12. | When the spectrofluorometer is finished reading the data, remove plate from tray. |
| 13. | When prompted, select Yes to review raw Sample QDNA plate data. |
| 14. | Microsoft Excel shows the quantification data for the Sample QDNA plate. There are 3 tabs in the file: |
| • | SQDNA_STD—Generates the standard curve by plotting Relative Fluorescence (RF) values measured in the Standard QDNA plate against assumed concentrations in the Standard DNA plate. |
| • | QDNA—Plots the concentration (ng/μl) of each well of the Sample QDNA plate as derived from the standard curve. |
| • | Data—Raw data values for Standard QDNA plate and Sample QDNA plate. |
| 15. | The Illumina Fluorometry Analysis software prompts you to indicate whether you wish to save the QDNA data shown in an Excel file. Select an option: |
| • | Select Yes to save. |
[Illumina LIMS] The data is sent to Illumina LIMS where the QDNA plate moves into the Make Single-Use DNA (SUD) Plate (Pre-PCR) queue.
| • | Select No to delete the data. You can read the same plate repeatedly. |
| 16. | If you selected to read more than one Sample QDNA plate, repeat the above steps for each additional plate. |
SAFE STOPPING POINT
If you are stopping, store the plate(s) at 2°C to 8°C for up to 30 days.
