
Extend and Stain BeadChips
This step washes unhybridized and nonspecifically hybridized DNA samples from the BeadChips, adds labeled nucleotides to extend primers hybridized to the sample, and stains the primers. After the flow-through chambers are disassembled, the BeadChips are coated for protection.
| • | 70% EtOH (Ethanol) |
| • | 95% formamide/1 mM EDTA ( |
| • | 1%aqueous Alconox solution |
| • | ATM (1 tube/4 BeadChips) |
| • | EML (1 tube/4 BeadChips) |
| • | PB1 (310 ml for 1–8 BeadChips |
| • | RA1 (10 ml for 1–8 BeadChips |
| • | SML (1 tube/4 BeadChips) |
| • | LX1 (1 tube/4 BeadChips) |
| • | LX2 (1 tube/4 BeadChips) |
| • | XC3 ( |
| • | Resuspended XC4 (310 ml for 1–8 BeadChips, 285 ml for 9–24 BeadChips) |
| • | Make sure that the label of each SML tube indicates the same stain temperature. |
| • | Decant only the necessary volume of reagent. |
| • | Use fresh RA1 for each step that requires it. Properly stored RA1 that has not been dispensed for the previous resuspension step or this extend and stain step is considered fresh. |
| • | RA1 might form visible precipitate or crystals. Before each use, hold in front of a light and inspect. Invert several times to redissolve the solution as needed. |
| • | The XC4 coat is slippery and makes the BeadChips difficult to hold. Self-locking tweezers grip the BeadChip firmly and help prevent damage. |
This set of reagents contains potentially hazardous chemicals. Personal injury can occur through inhalation, ingestion, skin contact, and eye contact. Wear protective equipment, including eye protection, gloves, and laboratory coat appropriate for risk of exposure. Handle used reagents as chemical waste and discard in accordance with applicable regional, national, and local laws and regulations. For additional environmental, health, and safety information, see the SDS at support.illumina.com/sds.html.
| 1. | Prepare the following consumable: |
|
Item |
Storage |
Instructions |
|---|---|---|
|
RA1 |
-25°C to -15°C |
Thaw at room temperature. |
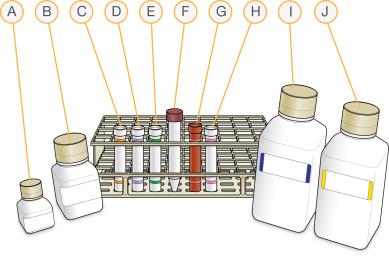
| 2. | Place reagent tubes in a rack in the order of use: |
| • | LX1 |
| • | LX2 |
| • | EML |
| • | 95% Formamide /1 mM EDTA |
| • | SML |
| • | ATM |
Placement of Reagent Tubes in Rack
- RA1
- XC3
- LX1
- LX2
- EML
- 95% Formamide / 1 mM EDTA
- SML
- ATM
- PB1
- XC4
| 1. |
|
| 2. |
|
| a. | In the Action section drop-down list, select Set Target Temperature. |
| b. | In the field below Set Target Temperature, enter 44. |
| c. | Select the Execute button. |
Chamber Rack Setup
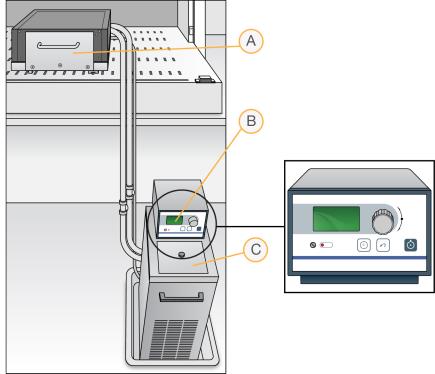
- Chamber rack
- Water circulator with programmable temperature controls
- Reservoir cover
| 3. | Remove bubbles trapped in the chamber rack. |
| a. | Separate the heat exchanger from the reagent pan. |
| b. | Lift the heat exchanger upright and away from you with the tubing at the bottom, and turn 90° counter clockwise. |
| c. | Return the heat exchanger to a horizontal position. |
| d. | Repeat steps b and c 3 times for a total of 4 rotations or until all bubbles are removed. |
| e. | Using Kimwipes dampened with laboratory-grade water, clean all surfaces between the heat exchanger and reagent pan. Discard Kimwipes with formamide waste. |
| f. | Place the Te-Flow back on the reagent pan. Using the two guide pins in the reagent pan, make sure that the Te-Flow is flush. |
| 4. | Using the Illumina temperature probe, test at least three locations on the chamber rack. |
| a. | For accurate measurements, make sure that the temperature probe touches the base of the chamber rack. |
| b. | Make sure that all locations are at 44°C ± 0.5°C. |
| c. | If the temperature is not within ± 0.5°C, adjust the water circulator control knob to reach 44°C ± 0.5°C. |
| d. | Do not leave the temperature probe in the first three rows of the chamber rack. Reserve these rows for BeadChips. |
Temperature Probe in Chamber Rack
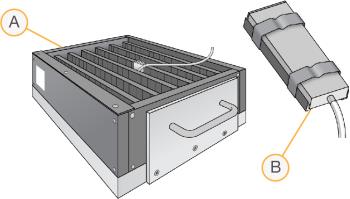
- Chamber rack with temperature probe
- Temperature probe
The following steps must be performed without interruption.
| 1. | At the robot PC, select XStain Tasks | XStain LCG BeadChip. |
| 2. | If |
| 3. |
|
|
Reagent |
# BeadChips |
Volume |
|---|---|---|
|
95% formamide/1 mM EDTA |
1–8 |
15 ml |
|
9–16 |
17 ml |
|
|
17–24 |
25 ml |
|
|
RA1 |
1–8 |
10 ml |
|
9–16 |
20 ml |
|
|
17–24 |
30 ml |
|
|
XC3 |
1–8 |
50 ml |
|
9–16 |
100 ml |
|
|
17–24 |
150 ml |
| 4. | Invert the LX1, LX2, EML, SML, and ATM tubes to mix. Remove the caps, and place on the robot deck |
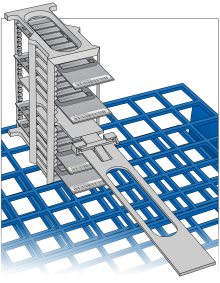
Robot Setup for Single-Base Extension and Stain
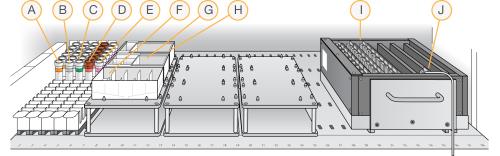
- LX1 Tubes
- LX2 Tubes
- EML Tubes
- SML Tubes
- ATM Tubes
- XC3 in Full Reservoir
- RA1 in Half Reservoir
- 95% Formamide/1 mM EDTA in Quarter Reservoir
- 24 BeadChips in Chamber Rack
- Temperature Probe
| 5. | In the Basic Run Parameters pane, enter the number of BeadChips, up to 24. |
| 6. | Select Run. |
| 7. |
|
| 8. |
|
Start the robot immediately to prevent BeadChips from drying.
| 9. |
|
| 10. |
|
| 1. | Gather the following equipment: |
| • | Kimwipes, large |
| • | Staining rack |
| • | Self-locking tweezers |
| • | Tube rack |
| • | Vacuum desiccator |
| • | Vacuum hose |
| • | Wash dishes (2) |
| 2. | During the procedure, prevent dust or lint from entering the wash dishes. |
| • | Clean wash dishes with low-pressure air before use. |
| • | Cover wash dishes with wash dish covers when not in use. |
| 3. | Wash the tube racks and wash dishes thoroughly after each use. |
| • | Rinse with deionized water. |
| • | Dry racks and wash dishes upside down on a wash rack. |
| 4. | Place a clean tube rack on top of several layers of Kimwipes or an absorbent pad. |
After the staining rack containing BeadChips is removed from the XC4 wash dish, it is placed on this rack.
| 5. | Prepare another clean tube rack that fits the internal dimensions of vacuum desiccator for removal of the BeadChips. Allow one rack per eight BeadChips. |
Kimwipes are not needed under this tube rack.
| 6. | Set up two top-loading wash dishes labeled PB1 and XC4. |
| 7. | To indicate fill volume of each wash dish: |
| a. | Add 310 ml water. |
| b. | Mark the water level on the side. |
| c. | Empty the water. |
Indicating fill volume before adding reagents allows reagents to be added directly from the bottles, minimizing contamination.
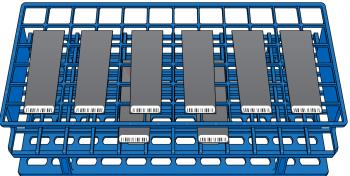
Wash Dish Setup
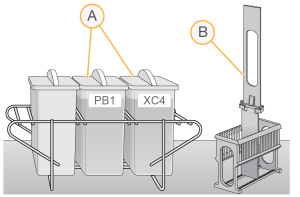
- Labeled and filled wash dishes
- Staining rack
| 8. | Add 310 ml PB1 to the PB1 wash dish. |
| 9. | Submerge the staining rack in the wash dish |
This orientation ensures that you can safely remove the BeadChips.
Staining Rack Components
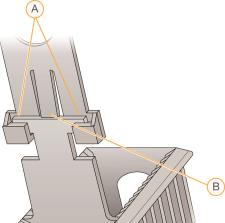
- Locking arms
- Tab
| 10. | Leave the staining rack in the wash dish |
| 11. | Using the dismantling tool, remove the two metal clamps from a flow-through chamber. |
The dismantling tool prevents chipping the glass back plates.
Using Dismantling Tool to Remove Metal Clamps
| 12. | Lift the glass back plate straight up to remove. |
Sliding the glass along the BeadChip can damage the BeadChip.
| 13. | Pull out the spacer |
| 14. | Remove the BeadChip from the black frame. |
| 15. | Repeat steps 11–14 to disassemble each flow-through chamber |
| 16. | Place the BeadChips into the submerged staining rack. |
Submerge each BeadChip as quickly as possible to prevent drying.
| 17. | If necessary to seat a BeadChip, briefly lift the staining rack from the wash dish and seat the BeadChip. |
| 18. | Make sure that the BeadChips are submerged. |
| 19. | Slowly lift the staining rack |
Free circulation of PB1 between BeadChips is important to reduce background staining and make sure the BeadChip surfaces are thoroughly washed and any residual staining materials can diffuse away.
Submerging of BeadChips with Staining Rack
| 20. | Soak for 5 minutes. |
| 21. | Vigorously shake the XC4 bottle |
| 22. | Add 310 ml XC4 to the XC4 wash dish. |
| • | Cover to prevent lint or dust from entering. |
| • | Do not let sit for more than 10 minutes. |
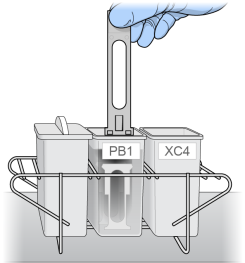
| 23. | Transfer the staining rack from the PB1 |
Transfer of Staining Rack to XC4 Wash Dish
![]()
| 24. | Slowly lift the staining rack |
| 25. | Soak for 5 minutes. |
| 26. | Remove the staining rack |
Removal of Staining Rack

| 27. | Make sure that the staining rack is in the center of the tube rack to ensure uniform coating. Avoid the raised edges. |
Staining Rack in Tube Rack Center
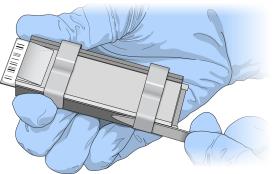
| 28. | [Optional] Remove the staining rack handle to facilitate BeadChip removal: |
| a. | Holding the top of the staining rack in position, grasp the handle between your thumb and forefinger. |
| b. | Push up the tab with your thumb and push the handle away from you, unlocking the handle. |
| c. | Pull up the handle and remove. |
| 29. |
|
| a. |
|
| b. | Place |
Placement of BeadChips on Tube Rack
Proper BeadChip placement prevents wicking, uneven drying, and pooled dye protectant.
| 30. | Place the tube rack into the vacuum desiccator. |
Each desiccator can hold one tube rack (eight BeadChips).
| 31. | Make sure that the vacuum valve is seated tightly and securely, and remove the red plug from the three-way valve. |
| 32. | Gently lift the vacuum desiccator lid to ensure proper sealing. Make sure that the lid does not lift off the desiccator base. |
| 33. | Dry the BeadChips |
Drying times can vary according to room temperature and humidity.
| 34. | Release the vacuum by turning the handle slowly. |
Make sure that air enters the desiccator very slowly to avoid disturbing the contents. Improper use of the vacuum desiccator can result in damage to the BeadChips, especially if you remove the valve plug while a vacuum is applied. For detailed vacuum desiccator instructions , refer to the documentation included with the desiccator.
| 35. | Return the desiccator to storage. Store with the red valve plug in the three-way valve of the desiccator to prevent dust and lint from accumulating in the valve port. |
| 36. | Touch the BeadChip borders (not the stripes) to make sure that the barcode sides of the BeadChips are dry to the touch. |
| 37. | Clean the back of each BeadChip using a Kimwipe sprayed with 70% EtOH |
| a. | Hold the BeadChip at a downward angle to prevent excess EtOH from dripping onto the stripes. |
| b. | Without touching the stripes, wipe the underside of the BeadChip until XC4 is removed (5–6 times). |
| 38. | Image the BeadChips immediately, or store them, protected from light. |
| 39. | [LIMS]
|
| a. | Scan the barcode of the reagent bottles. |
| b. | Scan each BeadChip barcode. |
Scan the BeadChip barcode from either the BeadChip or the BeadChip package.
| a. | Select Verify, and then select Save. |
