
Images
Review images of the scanned BeadChips in the iScan Control Software before closing the software.
After selecting Done on the Review screen, you are returned to the Welcome screen and are no longer able to view the images in the iCS.
| 1. | In the BeadChip carrier schematic in the upper left of the screen, select a BeadChip. |
| 2. | In the full size image of the BeadChip, select a scanned stripe in the BeadChip. |
The highlighted section appears in the main part of the screen.
Some BeadChip stripes are imaged using two or three smaller stripes, known as swaths.
| • | Two swaths—Swath 1 is shown on the upper portion of the screen and is the image for the upper half of the imaged stripe. Swath 2 is shown in the lower portion of the screen and is the image for the lower half of the imaged stripe. The two swaths slightly overlap each other along their common edge to create the image for the entire stripe. |
| • | Three swaths—Shows the swaths in the upper, middle, and lower portions of the screen, with the swaths slightly overlapping each other along their common edges. |
For BeadChips whose stripes are not scanned using two or three swaths, images appear only in the upper window.
| 3. | If the images appear dark, select Auto Contrast on the Image toolbar to optimize image settings and make both green and red channels more visible. |
If both red and green channels are enabled, select Overlay Channels in the iCS workspace to generate a composite of both laser channels. This composite is a virtual file that does not require disk storage and cannot be saved.
Use the Image toolbar controls for the following functions.


When viewing an image that is larger than the Image window, use the scroll bars on the Image window, or pan to show undisplayed areas.
To pan an image, select and hold the image, and then drag until the desired section is shown.
To zoom on an image, use the following methods:
| • | Use the zoom controls on the Image toolbar. |
| • | Select the desired area of the image, and then use the scroll wheel on the mouse to zoom in or out. |
Use the image controls (  and
and ![]() ) to toggle the display of the image adjustment control bars in the main window. The Color control bar is available in both control bar views.
) to toggle the display of the image adjustment control bars in the main window. The Color control bar is available in both control bar views.
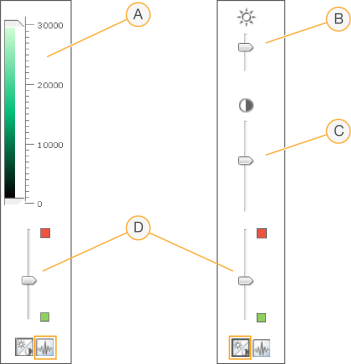
- Pixel Intensity control bar
- Image Brightness control bar
- Image Contrast control bar
- Color control bars
To set pixel intensity:
| 1. | Select the image control icon to show the Pixel Intensity control bar. |
| 2. | Pull the sliders together to sharpen the contrast for pixels within that range. |
| • | Pixels with a brightness above the top slider are set to full brightness. |
| • | Pixels whose brightness falls between the sliders are displayed with enhanced contrast. |
| • | Pixels with a brightness below the bottom slider are set to black. |
To adjust brightness:
| 1. | Select the image control to show the Brightness control bar. |
| 2. | Move the Brightness slider up to increase image brightness or down to decrease image brightness. |
To adjust contrast:
| 1. | Select the image control to show the Contrast control bar. |
| 2. | Move the Contrast slider up to increase the image contrast or down to decrease the contrast. |
To adjust color:
| 1. | Move the Color control bar slider up to adjust the color toward red. |
| 2. | Move the slider down to adjust the color toward green. |
