
Load BeadChips
This snippet causes dropdowns to open on page load. This text/paragraph does not appear in the output.
If using the AutoLoader to automate BeadChip loading, refer to the AutoLoader 2.x User Guide (document # 15015394) for the available menu options.
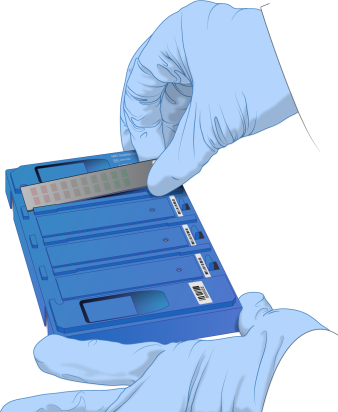
Only handle BeadChips by the edges. Always inspect BeadChips for damage or imperfections before loading them onto the carrier. Always load BeadChips onto the carrier before placing the carrier into the iScan Reader tray to avoid putting pressure on the tray.
Before placing BeadChips on the carrier, always wipe off excess protective coating and residue from the back side of the BeadChip.
| 1. | Using an alcohol wipe (70% isopropyl) or a lint-free tissue moistened with ethanol (90%) or isopropanol (70%), carefully wipe the back side of the BeadChip. |
| 2. | Let the surface air dry before loading the BeadChip onto a carrier. |
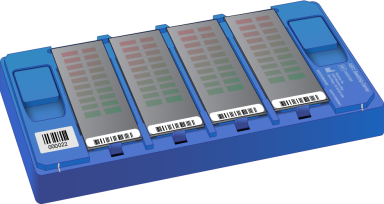
BeadChip carriers hold the BeadChips in place during the scan process.
| 1. | Hold the BeadChip by the barcode end. |
| 2. | Place the BeadChip in a slot so that the end of the BeadChip without the barcode presses up against the raised stop on the carrier. |
| 3. | Place up to four BeadChips onto the carrier, each in its own slot, as follows. |
| a. | Gently press either of the two Lift buttons to open the latches and raise the pins beneath the BeadChips. |
| b. | Release the Lift button. |
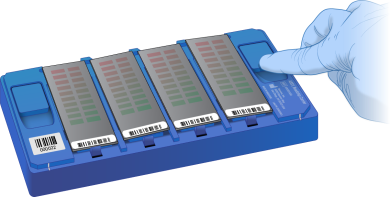
| c. | If any BeadChips remain uneven, press and release the Lift button again. If further adjustment is required, manually adjust the BeadChips. |
| 4. | To prevent scanning errors, make sure that the BeadChips are settled down firmly into the slots and are perfectly flat |
When loading a BeadChip carrier, make sure to orient it properly in the iScan Reader tray.
| 1. | If the iScan Reader tray is not already open, open it using one of the following methods: |
Make sure that nothing is blocking the tray of the iScan before you open it.
| • | From the yellow arrow icon in the upper left corner of iScan Control Software, select Scanner, and then select Open Tray. |
| • | Press the Open/Close Tray button on the front of the iScan Reader, below the status LEDs. |

If a BeadChip carrier is already in the iScan Reader tray, lift the carrier straight up and out of the tray to remove the carrier.
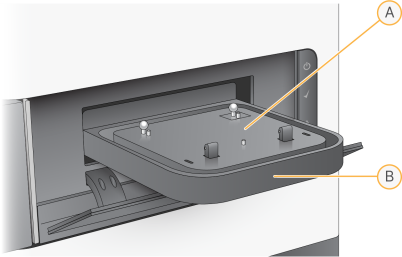
- Adapter plate
- iScan Reader tray
The adapter plate is specific to each individual iScan Reader. Do not switch adapter plates between iScan Readers.
| 2. | Line up the notches on the carrier with the silver beads on the adapter plate in the iScan Reader tray. |
When loading the BeadChip carrier, make sure to orient it properly in the tray.
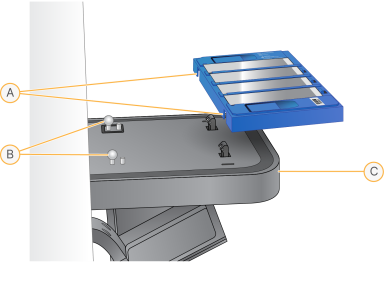
- Carrier notches
- Silver alignment beads
- Front of tray
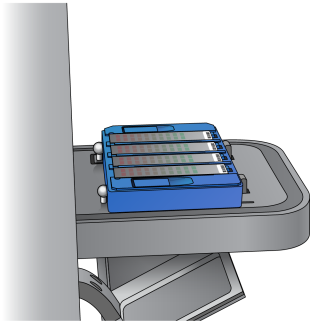
When transferring the carrier to the tray, handle the carrier by the edges to prevent dislocating the BeadChips.
| 3. | Lower the carrier gently onto the tray with the BeadChip barcode ends near the front of tray, making sure that the carrier fits securely. Avoid pressing down on the iScan Reader tray. |
| 4. | Select Next to close the iScan Reader tray. |
Keep hands away from the tray when it is closing.
When the barcodes have been recorded, the iCS Setup screen displays. The BeadChips are shown on screen in the locations that correspond to their positions in the carrier.
If the barcode scanner finds an empty slot barcode, the iCS identifies that slot with the word EMPTY. Other BeadChips loaded in the carrier are processed normally.
If the barcode scanner does not find an empty slot barcode or a BeadChip barcode on the first scan attempt, the iCS attempts to rescan the barcode. If the scanner does not successfully find the barcode after a second scan, nothing appears in the Barcode box on the display for the missed BeadChip position. During an automated scan, an error is generated for the carrier, and the carrier is moved to the error stack. You can then verify manually if the position was empty or contained a BeadChip.
You can rescan barcodes from the iCS Setup screen.
| • | From the menu in the upper left corner of the screen, select Scanner, and then select Scan Barcodes. |
You can manually enter the barcodes into the position that corresponds to the BeadChip location in the carrier. You can also manually delete barcodes to remove BeadChips from a scan.
