
BeadChip and Scan Errors
When the barcode error dialog box appears, select from the following options:
| • | Select Rescan. The software attempts to read the barcode again. |
| • | Select text field and enter the numeric barcode as shown in the image. Depending on the BeadChip, barcode numbers have up to 12 digits. Select Save. The barcode image is stored in the output folder. |
| • | Select Cancel. The imaging compartment door opens to unload the BeadChip adapter. |
Images are registered after they are scanned. Registration identifies beads by correlating locations on the scanned image with information provided in the bead map, or DMAP folder.
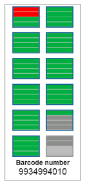
Sections that fail registration are indicated in red on the BeadChip image.
BeadChip Showing Failed Sections
After the scan is complete and scanning data are written to the output folder, the Rescan button becomes active.
When Rescan is selected, the software performs the following steps:
| • | Rescans samples that contain failed sections using an increased tile-to-tile overlap. |
| • | Generates output files in the original output folder. |
| • | Overwrites previous output files for failed sections. |
| • | Increments the scan counter by one for each rescan, but does so in the background. The software does not rename the output folder. |
| 1. | Select Rescan to scan samples that contain failed sections. |
| 2. | If the scan continues to fail, end the scan. |
| 3. | Remove the BeadChip and adapter and inspect the BeadChip for dust or debris. Use canned air or other compressed dusting method to clear the debris. |
| 4. | Reload the BeadChip and start a new scan. |
When a new scan is started, the software performs the following steps:
| • | Scans the entire BeadChip. |
| • | Generates output files in a new output folder. |
| • | Increments the scan counter by one based on the scan count of the last rescan. |
| 1. | Go to the Illumina support page for the BeadChip that you are using, and click the Downloads tab. |
| 2. | Download the files to be replaced or updated, and copy the files to your preferred network location. |
Make sure that you select manifest and cluster files that are compatible with the NextSeq 550 system. Compatible files include NS550 in the file name.
| 3. | Only if the location has changed, update the location on the BeadChip Scan Configuration screen, as follows: |
| a. | From the NCS Home screen, select Manage Instrument. |
| b. | Select System Configuration. |
| c. | Select BeadChip Scan Configuration. |
| 4. | Select Browse and navigate to the location of the replaced or updated files. |
