
Prepare Consumables
CAUTION
Using hot water for thawing reagents might cause reduced data quality or run failure.
| 1. | If a sequencing run is in progress, make sure that both sides of the instrument are available when the thaw is complete. |
| 2. | Remove the SBS and cluster cartridges from -25°C to -15°C storage. |
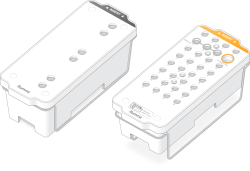
| 3. | Place each cartridge into a wire thaw rack. |
The racks are provided with the instrument and prevent capsizing in the water bath.
Cartridges in Wire Thaw Racks
| 4. | Use the following table to determine thaw duration. |
Thaw SBS and cluster cartridges in a room temperature (19°C to 25°C) water bath as follows. Submerge cartridges approximately halfway.
|
Cartridge |
Duration of Thaw |
|---|---|
|
S2 SBS cartridge |
4 hours |
|
S2 cluster cartridge |
Up to 2 hours |
|
S4 SBS cartridge |
4 hours |
|
S4 cluster cartridge |
Up to 4 hours |
CAUTION
Failure to start sequencing within four hours of thawing reagent cartridges can result in reduced data quality.
| 5. | Thoroughly dry the cartridge bases using paper towels. Dry between the wells so that all water is removed. |
| 6. | Inspect the foil seals for water. If water is present, blot dry with a lint-free tissue. |
| 7. | Inspect the underside of each cartridge to make sure that the reservoirs are free of ice, which indicates that the reagents are thawed. |
| 8. | Invert each cartridge 10 times to mix reagents. |
CAUTION
Failure to thoroughly invert the cartridges can result in reduced data quality.
| 9. | Gently tap the bottom of each cartridge on the bench to reduce air bubbles. |
| 1. | Without disturbing the library at the bottom, insert the uncapped library tube containing the denatured and diluted library pool into the Library Tube position (#8) of the cluster cartridge. |
| 2. | Insert the library tube into position #8 of the cluster cartridge. |
Uncapped Library Tube Loaded Into Position #8

Use the following instructions to empty the used reagent bottles with every sequencing run. If your system is configured to route used reagents externally, the small bottle collects used reagents and must be emptied for each sequencing run. The large bottle must be in place.
| 1. | Remove and empty the small used reagent bottle as follows. |
| a. | Raise the lever and remove the small used reagent bottle from the alcove. Grasp the bottle by the sides. |
| b. | Remove the threaded cap from the cap holder on the front of the bottle. |
| c. | Seal the bottle opening with the cap to prevent spills. |
| d. | Keeping the contents separate from the contents of the other bottle, discard in accordance with applicable standards for your region. |
| e. | Return the uncapped bottle to the alcove, and then lower the lever. Store the cap on the cap holder. |
| 2. | Remove and empty the large used reagent bottle as follows. |
| a. | Using the top handle, remove the large used reagent bottle from the left side of the buffer drawer. |
| b. | Remove the threaded cap from the cap holder on the front of the bottle. |
| c. | Seal the bottle opening with the cap to prevent spills. |
| d. | Discard the contents in accordance with applicable standards for your region. Grip both handles when emptying. |
| e. | Return the uncapped bottle to the buffer drawer. Store the cap on the cap holder. |
Returning the Empty Bottle
![]()
| 3. | Put on a new pair of powder-free gloves. |
CAUTION
Always put on a new pair of gloves after handling the used reagent bottle.
| 4. | Close the buffer drawer, and then close the liquid compartment doors. |
CAUTION
Failure to empty the used reagent bottles can result in a terminated run and overflow, which damages the instrument and poses a safety risk.
| 1. | Remove a new boxed flow cell package from 2°C to 8°C storage. |
| 2. | Set the sealed flow cell package aside at ambient temperature (19°C to 25°C) for 10–15 minutes. |
Use the flow cell within 12 hours of removing it from the package.
