
Instrument Workflow Checklist
This document is not a replacement for the NovaSeq 6000 System Guide (document # 1000000019358). Use the most recent versions of the system guide and NovaSeq Control Software.
Using hot water for thawing reagents may cause reduced data quality or run failure.
| 1. | Thaw SBS and cluster (CPE) cartridges in room temperature water as follows. |
|
Cartridge |
Duration of Thaw |
|---|---|
|
SP, S1, and S2 SBS cartridge |
4 hours |
|
SP, S1, and S2 cluster cartridge |
Up to 2 hours |
|
S4 SBS cartridge |
4 hours |
|
S4 cluster cartridge |
Up to 4 hours |
| 2. | Thoroughly dry the cartridge bases. |
| 3. | Blot the foil seals dry if needed. |
| 4. | Invert each cartridge 10 times. |
| 5. | Gently tap the bottom of each cartridge on the bench. |
| 6. | [Optional] Store thawed reagents at 2°C to 8°C for up to 24 hours. |
| 1. | Complete the post-run wash. |
Start the sequencing run immediately after loading libraries onto the flow cell, preferably within 30 minutes.
| 2. | Empty used reagent bottles and return them to the buffer drawer. |
Check the flow cell vacuum as follows.
| 1. | From the Main Menu, select Tools. |
| 2. | Select Flow Cell Vacuum. |
| 3. | Select the applicable side(s) that the flow cell(s) will be loaded on (Side A, Side B, or Both). |
| 4. | Select Open. |
The vacuum pressure state displays Fail on both side A and side B when first opening the flow cell vacuum tool. This is normal when a flow cell is not present or when a flow cell is loaded prior to the flow cell vacuum tool.
| 5. | Remove a new flow cell package from 2°C to 8°C storage, and thaw at room temperature for 10–15 minutes. |
| 6. | Remove the flow cell from the packaging as follows. |
| a. | Put on a new pair of powder-free gloves. |
| b. |
|
| c. | Remove the clear plastic retainer covering the flow cell. |
| d. | Remove the flow cell from the package. |
| e. |
|
| f. | Discard the package appropriately. |
Some scratches and other minor cosmetic defects on the flow cell are normal and not expected to compromise data quality and yield. Illumina recommends using these flow cells as per normal.
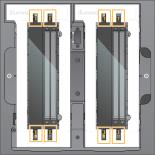
| 7. | Align the flow cell over the four raised clamps and place it on the flow cell stage. |
Loaded Flow Cells Aligned Over Clamps
| 8. | Select Close. |
The flow cell door closes, the RFID and vacuum pressure are checked, and the flow cell descriptor, flow cell ID, and flow cell vacuum pressure state appear on the screen.
| 9. | If the flow cell vacuum pressure state displays as Pass, select Open to open the flow cell door and proceed. If the flow cell vacuum pressure state displays as Fail: |
| a. | Select Open to open the flow cell door. |
| b. | Remove the flow cell from the stage. |
| c. | Inspect that both the flow cell and the flow cell stage are free from particulates. |
| d. | Reload the flow cell by aligning the flow cell over the four raised clamps and place it on the flow cell stage. |
| e. | Select Close to close the flow cell door. |
| f. | If the flow cell vacuum pressure continues to fail, contact Illumina Technical Support. |
| 1. | Make sure to bring the flow cell package to room temperature for at least 10 minutes. |
Use the flow cell within 12 hours of removing it from the package.
| 2. | Thaw DPX1/JPX1, DPX2/JPX2, and DPX3, and then place on ice. |
If you must refreeze unopened ExAmp reagents, do so immediately after thawing. ExAmp reagents can be refrozen one time only. Residual reagents cannot be frozen or combined.
| 3. | Pool libraries to the desired plexity. |
|
Mode |
Total Volume of Pool Per Lane (µl) |
|---|---|
|
SP/S1 |
18 |
|
S2 |
22 |
|
S4 |
30 |
Use the following instructions to normalize libraries to the appropriate concentration and then pool. Libraries sequenced on the same lane must be combined into a single pool.
For the Xp workflow, the data output is obtained for each lane, as opposed to all the lanes in aggregate for the Standard workflow. As a result, library pools for the Xp Workflow contain fewer libraries compared to the Standard workflow.
The optimal DNA loading concentration depends on the library type and insert size. The following table provides DNA loading concentrations that are recommended based on Illumina libraries with insert sizes that are ≤ 450 bp. Load libraries with smaller insert sizes at the lower end of the recommended range. For libraries > 450 bp, higher loading concentrations might be necessary.
| 4. | Dilute library to final loading concentration as follows. |
|
Library Type |
Final Loading Concentration (pM) |
Pooled Loading Concentration (nM) |
|---|---|---|
|
DNA PCR-free library pool |
115–235 |
0.575–1.175 |
|
DNA PCR-amplified library pool |
200–400 |
1.0–2.0 |
|
Single Cell |
175–275 |
.875–1.375 |
If you have optimized the loading concentration for HiSeq™ X, HiSeq® 4000, or HiSeq® 3000, use about the same concentration for the NovaSeq Xp workflow. If you have optimized the loading concentration for the NovaSeq Standard workflow, use about 1/3 less for the NovaSeq Xp workflow.
Libraries might need to be titrated to obtain optimal seeding concentration. When the optimal loading concentration is determined, it is applicable for identical library types.
Prepare a fresh dilution of 0.2 N NaOH to denature libraries for sequencing. To minimize pipetting errors that could affect the final NaOH concentration, prepare at least 30 µl diluted NaOH per flow cell. For a dual flow cell run, prepare 60 µl diluted NaOH.
Freshly diluted 0.2 N NaOH is essential to the denaturation process. Improper denaturation can reduce yield.
| 1. | Prepare 0.2 N NaOH by diluting stock NaOH with laboratory-grade water. |
For example, for a six-plex library pool and S4 mode, combine 5 µl of each library that has been normalized to the same concentration.
| 2. | [Optional] Spike-in 1% nondenatured PhiX as follows. |
| a. | Dilute 10 nM PhiX to 0.25 nM using 10 mM Tris-HCl, pH 8.5. |
| b. |
|
|
Mode |
Nondenatured 0.25 nM PhiX (µl) |
Nondenatured Library Pool (µl) |
|---|---|---|
|
SP/S1 |
0.7 |
18 |
|
S2 |
0.8 |
22 |
|
S4 |
1.1 |
30 |
When spiking in PhiX, 1% is the recommended amount for well-balanced libraries. Low-diversity libraries can require more. To use a PhiX control with low-diversity libraries, contact Illumina Technical Support for guidance.
| 4. | Cap and then vortex briefly. |
| 5. | Incubate at room temperature for 8 minutes. |
| 6. |
|
|
Mode |
400 mM Tris-HCl, pH 8.0 (µl) |
Resulting Volume |
|---|---|---|
|
SP/S1 |
5.0 |
27.0 µl, or 27.7 µl with PhiX |
|
S2 |
6.0 |
33.0 µl, or 33.8 µl with PhiX |
|
S4 |
8.0 |
45.0 µl, or 46.1 µl with PhiX |
| 7. | Cap and then vortex briefly. |
| 8. | Place on ice until use. |
Store denatured library pools only if necessary. Long-term storage can increase duplicates, which decrease yield.
Safe stopping point
If you cannot immediately proceed, cap the tube and store at -25°C to -15°C for up to three weeks.
Flow Cell Placement
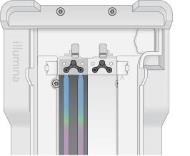
NovaSeq Xp Manifold Placement

- NovaSeq Xp manifold wells facing up
- NovaSeq Xp manifold arms placed in dock cutouts
| 1. | Place flow cell onto the flow cell dock and place the manifold over the flow cell. |
| 2. | Close the clamp. |
When preparing ExAmp master mix, use a microcentrifuge tube that holds at least twice the required volume:
The most common causes of variation in results when manually mixing ExAmp reagents are inaccurate delivery of volumes and insufficient mixing. Do not undermix.
The DPX1 and DPX2 consumables may be labeled as JPX1 and JPX2. Either are compatible with v1.0 or v1.5 reagent kits.
| 3. | Invert or vortex briefly to mix DPX1/JPX1 and DPX2/JPX2. |
| 4. | Briefly vortex DPX3 to mix. |
ExAmp reagents might have separated in storage. They are viscous, especially DPX2/JPX2 and DPX3. DPX3 does not mix easily when inverted due to its high viscosity.
| 5. | Briefly centrifuge DPX1/JPX1, DPX2/JPX2, and DPX3. |
| 6. |
|
|
Addition Order |
Reagent* |
Volume for Two-Lane Flow Cell (SP/S1/S2) (µl) |
Volume for Four-Lane Flow Cell (S4) (µl) |
|---|---|---|---|
|
1 |
DPX1/JPX1 |
126 |
315 |
|
2 |
DPX2/JPX2 |
18 |
45 |
|
3 |
DPX3 |
66 |
165 |
*DPX/JPX reagent tube caps may be color coded (red, yellow, and blue for DPX1/JPX1, DPX2/JPX2, and DPX3, respectively). Make sure that color coding is preserved when replacing tube caps.
| 7. | These volumes result in 210 µl ExAmp master mix for SP, S1, or S2 mode, or 525 µl Master Mix for S4 mode. |
These volumes result in 210 µl ExAmp master mix for SP, S1, or S2 mode, or 525 µl Master Mix for S4 mode. These volumes are sufficient for the applicable mode. Extra volume is included to account for pipetting errors when loading libraries onto the flow cell.
| 8. | Pipette and dispense slowly to avoid bubbles. |
| 9. | Vortex for 20–30 seconds. |
The ExAmp master mix is stable to vortexing.
| 10. | Centrifuge at up to 280 × g for up to 1 minute. |
| 11. | For the best sequencing performance, immediately proceed to the next step. If necessary, ideal storage of the master mix is up to 1 hour on ice. Use within 30 minutes if storing at room temperature. |
| 1. |
|
If using tube strips, pipette to mix until homogenous.
|
Mode |
Denatured Library Pool (µl) |
ExAmp Master Mix (µl) |
Resulting Volume (µl) |
|---|---|---|---|
|
SP/S1 |
27 |
63 |
90 |
|
S2 |
33 |
77 |
110 |
|
S4 |
45 |
105 |
150 |
| 2. | If using tube strips, pipette to mix until homogenous. |
| 3. | Centrifuge at up to 280 × g for up to 1 minute. |
| 4. | Add the appropriate volume of library/ExAmp mixture to each manifold well. |
Do not tilt the flow cell when trying to determine fill or see the bubble. Tilting can cause the ExAmp/library mixture to leak.
If a lane does not fill completely, do not attempt to correct it. Continue filling remaining lanes. Data yield from the partially filled lane will be reduced proportionally to the size of the unfilled area. Do not remove sample from the flow cell.
It is not necessary to wait for a lane to fill completely before adding mixture to the remaining manifold wells.
|
Mode |
Library/ExAmp Mixture per Well (µl) |
|---|---|
|
SP/S1 |
80 |
|
S2 |
95 |
|
S4 |
130 |
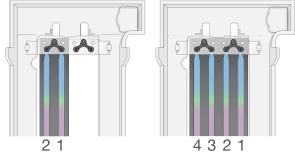
The numbered NovaSeq Xp manifold wells match the number of the flow cell lane. When the flow cell is inverted, the lane numbering is reversed.
Inverted Lane Numbering
| 5. | After adding the ExAmp/library mixture to all manifold wells, wait approximately 2 minutes for the mixture to reach the opposite end of each lane. |
| 6. | Start the sequencing run within 30 minutes of loading libraries onto the flow cell. |
A small air bubble at the outlet end of the lane is normal. A small volume of the mixture may remain in the manifold wells after the lane is filled.
Do not tilt the flow cell when trying to determine if lanes are filled or bubbles are present. Tilting can cause the ExAmp/library mixture to leak from the flow cell. If a lane does not fill completely, do not attempt to correct it. Data yield from the partially filled lane might be reduced. Do not attempt to retrieve the sample from the flow cell.
Do not tilt the flow cell when transporting it.
Illumina recommends that you remain logged in while the CS is running and while a sequencing run is in progress.
Staggered start of new runs is supported. The staggered start timer indicates when a staggered run can be started. For more information, refer to Staggered Start of Runs.
| 1. | From the Home screen, select Sequence, and then select a single or dual flow cell run: |
| • | A+B—Set up a dual flow cell run. |
| • | A—Set up a single flow cell run on side A. |
| • | B—Set up a single flow cell run on side B. |
The software initiates the series of run setup screens, starting with Load.
Flow Cell Stage

Some scratches and other minor cosmetic defects on the flow cell are normal and not expected to compromise data quality and yield. Illumina recommends using these flow cells as per normal.
| 2. | Remove flow cell from the flow cell dock: |
| a. | Open the clamp that secures the flow cell and manifold. |
| b. | Carefully remove and discard the manifold. |
| c. | Grasp the sides of the flow cell and remove it from the dock. |
| 3. | Load flow cell onto the instrument: |
| a. | Invert the flow cell around the long axis. |
| b. | Place the flow cell on the flow cell stage, and then select Close Flow Cell Door. |
Loaded Flow Cells Aligned Over Clamps
The flow cell door closes, the sensors and RFID are checked, and the flow cell ID appears on the screen.
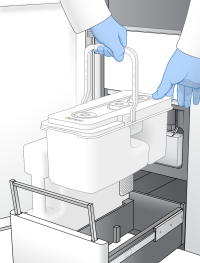
| 1. | Place an empty library tube into position #8 of the cluster cartridge. |
For the NovaSeq Xp Workflow, before loading the cluster cartridge, make sure the empty, uncapped library tube is loaded into the cartridge.
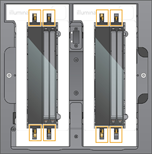
| 2. | Remove the used SBS and cluster cartridges. |
The used cartridges have pierced foil seals.
| 3. | Load the |
Loaded Reagent Cartridges
The sensors and RFIDs are checked. The IDs for the library tube and the two cartridges appear on the screen.
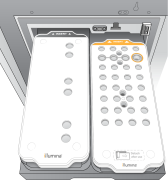
| 4. | Remove the used buffer cartridge. |
The used buffer cartridge has pierced foil seals.
| 5. | Place a new buffer cartridge into the buffer drawer. |
When properly loaded, the buffer cartridge is evenly seated and the drawer can close.
Load the Buffer Cartridge
Failure to empty the used reagent bottles can result in a terminated run and overflow, which damages the instrument and poses a safety risk.
When you open CS, your default workgroup from BaseSpace Sequence Hub is selected as your workgroup. If you did not specify a default, your personal workgroup is selected.
| 1. | [Optional] Sign in to BaseSpace Sequence Hub. |
| 2. | Select Run Setup, and then NovaSeq Xp. |
| 3. | Enter the required parameters and settings. |
| 4. | Select Start Run. |
The pre-run checks are started automatically.