
Troubleshooting
This section provides additional information to resolve issues that may occur during iSeq 100 operation.
After a run starts, you can cancel it to end the run, eject the cartridge, and return to the Sequence screen.
Canceling a run is final. The software cannot resume the run and consumables cannot be reused after the instrument check portion of pre-run checks.
| 1. | Select Stop Run, and then select Yes, cancel. |
The Sequencing Canceled screen appears with timestamps for the date and time the run stopped.
| 2. | Select Eject Cartridge to open the door and eject the tray. |
| 3. | Remove the cartridge from the tray. |
| 4. | Store or dispose of the cartridge, depending on when the cancellation occurred: |
|
Circumstance |
Instruction |
||||||
|---|---|---|---|---|---|---|---|
|
You canceled before or during the instrument check and want to reuse consumables. |
Leave the flow cell and library inside the cartridge, and set aside at room temperature for up to 1 hour. |
||||||
|
All other circumstances. |
Remove the flow cell from the cartridge. Dispose of both components in accordance with applicable regional standards.
|
| 5. | Select Close Door to reload the tray and return to the Sequencing screen. |
Sensors confirm cartridge removal.
Power cycling the instrument safely shuts down and restarts the system to restore a lost connection, align a specification, or resolve an initialization failure. Software messages indicate when to power cycle to resolve an error or warning.
| 1. | From the control software menu, select Shut Down Instrument. |
| 2. | If the system does not shut down, hold the power button on the left side of the instrument until the lights fade. |
| 3. | When the power button pulses, press the power off (Ο) side of the toggle switch on the rear panel. |
The power button might continue to pulse after the power is turned off.
Rear Panel Components
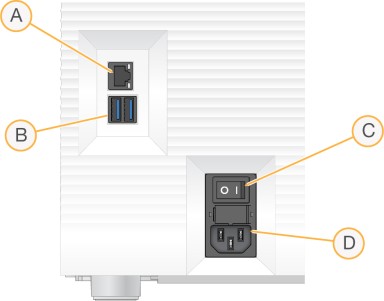
- Ethernet port—Optional Ethernet cable connection.
- USB ports—Two ports for connecting auxiliary components.
- Toggle switch—Turns instrument power on and off.
- AC power inlet—Power cord connection.
| 4. | Wait 30 seconds. |
| 5. | Press the power on (I) side of the toggle switch. |
| 6. | When the power button pulses, press it. |
| 7. | Wait about 5 minutes for the operating system to load. When the operating system is loaded, log in to the system. |
The control software is launched and initializes the system. Wait about 5 minutes for system initialization. The Home screen appears when initialization is complete.
External System Components
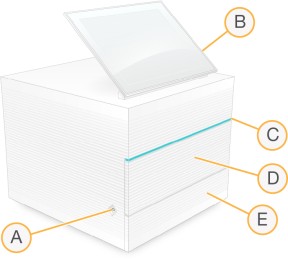
- Power button—Controls instrument power and indicates whether the system is on (glows), off (dark), or off but with AC power (pulses).
- Touch-screen monitor—Enables on-instrument configuration and setup using the iSeq 100 Control Software interface.
- Status bar—Indicates system status as ready to sequence (green), processing (blue), or needs attention (orange).
- Consumables compartment—Contains consumables during a run.
- Drip tray door—Provides access to the drip tray, which catches leaked fluids.
A system check takes about 45 minutes and uses the reusable test flow cell and reusable test cartridge to troubleshoot pre-run check errors and other issues. Four subsystem tests confirm whether components are properly aligned and functional.
Normal operation and maintenance do not require a system check.
| 1. | Remove the reusable test flow cell and reusable test cartridge from room temperature storage. |
| 2. | From the control software menu, select System Check. |
The System Check dialog box appears with the mechanical, thermal, optical, and sensor tests selected.
| 3. | Select Unload to open cartridge compartment door and eject the tray. |
| 4. | If present, remove the used cartridge from the tray. |
| 5. | Inspect the glass surface of the reusable flow cell for visible debris. If debris is present, clean as follows. |
| a. | Clean the glass surface with an alcohol wipe. |
| b. | Dry with a low-lint lab tissue. |
| c. | Make sure that the flow cell is free of lint or fibers. |
Under normal circumstances, the reusable test flow cell does not require cleaning.
| 6. | Hold the reusable test flow cell by the grip points with the label facing up. |
| 7. | Insert the reusable test flow cell into the slot on the front of the reusable test cartridge. |
An audible click indicates that the flow cell is in place. When properly loaded, the grip protrudes from the cartridge and the glass is visible from the access window.
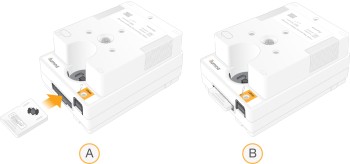
| a. | Loading the reusable test flow cell |
| b. | Loaded reusable test flow cell |
| 8. | Place the reusable test cartridge onto the tray so that the access window faces up and the flow cell is inside the instrument. |
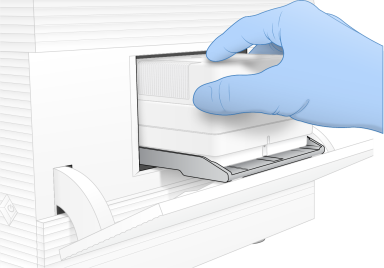
| 9. | Select Load to load the reusable test cartridge and close the door. |
| 10. | Select Start to begin the system check. |
During the system check, the software ejects and retracts the cartridge one time.
The reusable test flow cell and cartridge are valid for 130 uses or 5 years from the date of manufacture. The remaining number of uses are displayed onscreen.
| 11. | When the system check is complete, review whether each test passed or failed. |
|
Result |
Indication |
Action |
|---|---|---|
|
All four tests passed |
The instrument is functioning properly and the issue is likely consumable- or library-related. |
Set up a new run. If consumables from the previous run were stored, use them for the new run. |
|
At least one test failed |
The instrument might have a hardware issue. |
Contact Illumina Technical Support. |
| 12. | Select Unload to eject the reusable test cartridge. |
| 13. | Remove the reusable test cartridge from the tray. |
| 14. | Remove the reusable test flow cell from the cartridge. |
| 15. | Return the reusable test components to the original packaging and store at room temperature. |
| 16. | Close the System Check dialog box. |
Restore the system to factory defaults to downgrade the software, recover from an undesirable configuration, or clear user data before returning an instrument to Illumina. Restoring the system uninstalls control software and clears drive C.
| 1. | If the reference genomes repository for Local Run Manager resides on drive C: |
| a. | Move the repository to D:\Illumina\Genomes or other local or network folder not on drive C. |
| b. | In Local Run Manager, reset the repository path to D:\Illumina\Genomes or other local or network folder not on drive C. For instructions, refer to the Local Run Manager v4 Software Guide (200036672) on the Illumina support center. |
| 2. | Restart Windows. |
| 3. | When prompted to choose an operating system, select Restore to Factory Settings. |
The operating system options appear briefly before automatically proceeding with iSeq 100 Control Software.
| 4. | Wait about 30 minutes for the restoration to complete. |
The restoration can include several reboots. When complete, the system reboots with the original factory settings, without the control software.
| 5. | Install the control software: |
| a. | Download the software installer from the iSeq 100 Sequencing System support pages. Save the installer to a network location or portable USB drive. |
| b. | Copy the installer to C:\Illumina. |
| c. | Open iSeqSuiteInstaller.exe, and then follow the prompts to perform the install. |
| d. | When the update is complete, select Finish. |
| e. | Power cycle the instrument. For instructions, refer to Power Cycle the Instrument. |
| 6. | Follow the onscreen prompts to perform first time setup, including the system check with the reusable test cartridge and reusable test flow cell. |
| 7. | Install any Local Run Manager analysis modules: |
| a. | Switch to the sbsadmin operating system account. |
| b. | Download the software installers from the Local Run Manager support pages. Save the installers to a network location or portable USB drive. |
| c. | Copy the installer to C:\Illumina. |
| d. | Open the installer (*.exe), and then follow the prompts to perform the install. |
| e. | When the update is complete, select Finish. |
