
Sample Prep (Automated)
Before beginning this procedure, review the IPPAS safety and compliance information and safety hazards. Refer to the Illumina Protein Prep Automation System Product Documentation.
This step prepares a dilution series and prepares SOMAmer-Bead dilution plates for binding. The binding step takes 3.5 hours to complete.
| • | Assay Buffer (AB) |
| • | Plasma/Serum Diluent (D-P/D-S) |
| • | SOMAmer-Bead Plate 11k (Dilution 1) |
| • | SOMAmer-Bead Plate 11k (Dilution 2) |
| • | SOMAmer-Bead Plate 11k (Dilution 3) |
| • | 0.8 ml deep-well Abgene plate (1) |
| • | 96-well Nunc round bottom plates (5) |
| • | Microseal 'B' adhesive seal (1) |
| • | Microseal 'F' PCR plate seals (3) |
| • | Nested tips, 200 µl (2 stacks) |
| • | Pipette tips, 1000 µl (1 box) |
| • | Thermal adapters for Abgene plates (3) |
For instructions on loading and unloading thermal adapters, refer to the Illumina Protein Prep Automation System Product Documentation.
| • | The following barcode labels: |
| – | SPB1, SPB2, SPB3 |
| – | One of the following labels: |
| – | [Plasma samples] PLASMADIL |
| – | [Serum samples] SERUMDIL |
Avoid processing plasma and serum samples together in the same plate. Processing plasma and serum in the same plate results in erroneous data.
| • | The following IPPAS cleanup consumables: |
| – | Bleach disinfectant |
| – | Deionized water |
Determine the appropriate disinfectant for IPPAS cleaning procedures, in accordance with your applicable regional, national, and local laws and regulations.
| • | Retain all reagent bottles until the reagent scanning portion of the ILASS automation procedure is complete. |
| • | SOMAmer-Bead dilution plates |
| – | Do not centrifuge or vortex. |
If the beads are not at the bottom of the plate or are adhered to the foil seal, contact Illumina Technical Support. Return the samples to the freezer until ready to proceed. If there is only buffer adhered to the seal, you can proceed with the protocol.
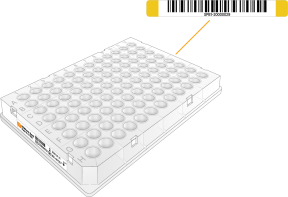
Barcode Application
Apply the barcode labels to labware as follows. Align the lower edge of the label with the upper edge of the plate skirt.
|
Barcode Label |
Labware Type |
Label Position |
||||||||||||||||||
|---|---|---|---|---|---|---|---|---|---|---|---|---|---|---|---|---|---|---|---|---|
|
PLASMADIL or SERUMDIL |
0.8 ml deep-well Abgene plate (1) |
|
||||||||||||||||||
|
|
The SOMAmer-Bead dilution plates are prebarcoded on the left side. Apply the barcode labels to the right side of the plate.
|
Sample and Reagent Preparation
| 1. | Fill the reusable trough system bottle with 1 L Assay Buffer. Make sure that the lid is secured. |
| 2. | Retrieve the sample matrix tube rack containing samples and controls. |
| 3. | Turn on the rack thawing station. |
| 4. | Remove the lid from the sample matrix rack and place the rack onto the thawing station. |
Leave the rack on the thawing station for 15 minutes.
The maximum thaw time is 1 hour. Exceeding 1 hour can affect the assay results.
| 5. | Invert the Plasma/Serum Diluent 5 times to mix. |
| 6. | Using a 1000 μl multichannel pipette, pipette 315 µl into the first six columns of the PLASMADIL/SERUMDIL plate. |
| 7. | Seal the plate with a Microseal 'B' plate seal, and then centrifuge at 280 × g for 15 seconds. |
| 8. | After the sample matrix rack has thawed, centrifuge the rack at 1000 × g for 1 minute. |
| 9. | Using a decapper, remove the caps from all tubes in the sample matrix rack. |
You might be required to perform this step in a biosafety cabinet. Follow the applicable governing regulations for your region.
| 10. | Place the SOMAmer-Bead dilution plates into thermal adapters. Remove the plate seals before securing the adapter clips. |
The assay fails if the SOMAmer-Bead dilution plates are not in thermal adapters. Failure to remove the plate seals can affect the assay results.
Sample Prep
| 1. | Return to the Sample Prep workflow in the ILASS and follow the prompts to set up the reusable trough components as follows. |
| a. | Make sure that the tubing is secure. |
| b. | Make sure that the assay buffer is flowing through the tubing with no air gaps. |
| c. | Make sure that the trough is filling. |
| 2. | When prompted, hand scan or type the lot information for the reagents and for the controls in the sample matrix rack. |
| 3. | When prompted, place the sample matrix rack, SOMAmer-Bead dilution plates, and other consumables onto the instrument deck. |
The 96-well Nunc round bottom plates (5) are loaded empty.
| 4. | When prompted, do as follows. |
| a. | Make sure that the sample matrix rack is correctly positioned on the deck. |
| b. | Make sure that there are no lids or seals on the consumables on deck. |
| 5. | When prompted, close the instrument door, and then select Next to initiate deck loading and barcode scanning. |
| 6. | If prompted with a plate detection or barcode error, make sure that the reagents and labware are placed in the correct positions on the instrument deck. |
| • | If there are misplaced items, reposition them and repeat the autoscan. |
| • | If all items are placed correctly, hand-scan or type the barcode and select Submit. |
| • | Select Continue to proceed. |
| 7. | Start the run. |
| 8. | When prompted, make sure that the samples have aspirated evenly. |
| 9. | During pipetting, watch for abnormalities such as short volume transfers, bubbles, and bead aspiration. Document your observations. |
The Sample Prep script runs for ~35 minutes
Observe the IPPAS during the automated steps. Monitor the ILASS interface for prompts and operator instructions.
Binding
| 1. | When prompted, remove the SOMAmer-Bead dilution plates from the instrument deck. |
| 2. | Remove the plates from the thermal adapters. |
| 3. | Seal each plate with a Microseal 'F' plate seal. |
If a plate fits tightly in the thermal adapter, seal the plate before removing it from the thermal adapter to prevent spillage. For instructions, refer to the Illumina Protein Prep Automation System Product Documentation.
| 4. | Place the sealed plates into the binding shaker and run the following program: |
| • | 3 h 30 min |
| • | 28°C |
| • | 850 rpm |
Record the start time.
This set of reagents contains potentially hazardous chemicals. Personal injury can occur through inhalation, ingestion, skin contact, and eye contact. Ventilation should be appropriate for handling of hazardous materials in reagents. Wear protective equipment, including eye protection, gloves, and laboratory coat appropriate for risk of exposure. Handle used reagents as chemical waste and discard in accordance with applicable regional, national, and local laws and regulations. For additional environmental, health, and safety information, refer to the SDS at support.illumina.com/sds.html.
| 1. | Remove the sample matrix rack from the instrument deck. |
Discard the racks and tubes in accordance with applicable standards for your region. Alternatively, you can cap and refreeze the sample matrix rack if > 55 µl volume remains.
| 2. | Remove the remaining tips from the instrument deck. |
| 3. | Save the remaining tips and restack them in columns of eight wafers per stack. |
Avoid touching the tips with your gloves. Handle the tips by the black wafer to prevent contamination.
| 4. | Leave the reusable trough system on the instrument deck. |
| 5. | Remove the biohazard liquid waste wafer from the liquid waste trough. |
| 6. | Decontaminate the wafer as follows. |
| a. | Spray with or immerse in bleach disinfectant. Refer to the manufacturer instructions for contact time. |
| b. | Rinse with deionized water. |
| c. | Leave to air dry. |
| 7. | Rinse the liquid waste trough with deionized water. |
| 8. | Place the dry wafer back on the liquid waste trough. |
| 9. | Discard the biohazard waste and used deionized water according to applicable standards for chemical waste for your region. |
| 10. | If spillage has occurred, wipe down the deck and ring magnet as follows. |
| • | Wipe down the deck with a bleach disinfectant. Wipe down the ring magnet with 70% EtOH. |
For detailed deck and magnet cleaning procedures, refer to the Illumina Protein Prep Automation System Product Documentation.
| • | Discard the waste according to applicable standards for chemical waste for your region. |
