|
1.
|
Using a wide-bore 200 µl pipette tip, slowly pipette the cell or nuclei suspension 10 times to mix. |
|
2.
|
Add 5 μl cell or nuclei suspension at 3,400 cells/µl (17,000 total) directly into the PIPs layer in each PIP tube. |
|
3.
|
Add 40 units RNase Inhibitor directly into the PIPs layer. |
Dispense slowly to avoid forming bubbles.
|
4.
|
Using a standard-bore 200 µl pipette tip, slowly pipette 10 times at the 75 μl stroke to mix. |
When removing the pipette, dispense along the side wall of the tube to avoid excessive foam.
Generating excessive foam requires additional mixing steps that can cause stress on the cells and lead to poor assay results.
To mix multiple PIP tubes at once, use a pipette tip on every other channel of a 200 µl multichannel pipette in an alternating configuration.
|
5.
|
If excessive foam forms, centrifuge briefly and then slowly pipette 10 times at the 75 μl stroke. |
|
6.
|
Using a 1000 µl pipette tip, add 320 μl PAR down the side wall of the PIP tube. |
|
7.
|
Tightly cap tubes and place in the vortex adapter head in the horizontal tube position. Ensure the tubes are fully inserted into the adapter. |
|
8.
|
Vortex at 3000 rpm and manually stop the program after 15 seconds. |
|
9.
|
Rotate the vortex adapter into the vertical tube position, and then vortex at 3000 rpm for 2 minutes. |
|
10.
|
Place tubes in the 0.5 ml side of the combination tube stand and wait until the emulsion separates into two distinct layers (~30 seconds). |
The top layer contains PIPs and cells. The bottom layer contains PAR.
|
11.
|
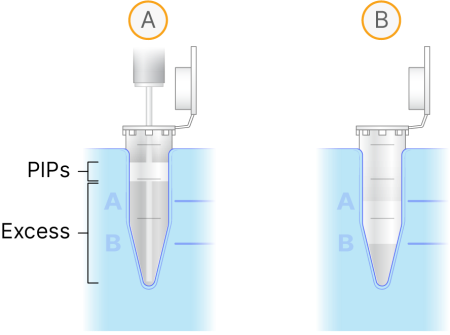
Using a G22 blunt bottom syringe needle on a 1 ml syringe, remove and discard the PAR waste (bottom phase) as follows. |
|
a.
|
Slowly lower the syringe tip through the PIPs emulsion (figure A) to the bottom of the tube. |
|
c.
|
Aspirate the bottom phase until the bottom of the PIPs emulsion is even with the B stand mark (figure B). Be careful not to aspirate any emulsion. |
|
d.
|
While removing the tip, wipe it on the inside of the tube. |
Do not place the PIP tubes on ice for the remainder of the Capture and Lysis steps to avoid precipitation of the lysis reagents.
|
12.
|
Combine the following volumes per reaction in the CLB3 tube to prepare the Chemical Lysis Emulsion: |
Do not prepare the Chemical Lysis Emulsion in bulk. Prepare each sample aliquot individually.
|
13.
|
Vortex the Chemical Lysis Emulsion for 10 seconds, and then use a 1000 µl low retention tip to immediately transfer the entire volume of one CLB3 tube to each PIP tube. |
Mixing CLB3 with PAR before transferring is critical to form the emulsion.
|
14.
|
Invert 10–15 times to mix. |
|
15.
|
Place on the preheated dry bath. Select Skip, and then select Yes to run the applicable lysis program. |
If you are immediately proceeding to Isolate mRNA, prepare reagents while the lysis program is running.
SAFE STOPPING POINT
If you are stopping, leave the tube on the dry bath at 20°C for up to 96 hours. Do not refrigerate or freeze samples.