Break Emulsions
|
1.
|
Remove PIP tubes from the dry bath and place into the tube stand. |
If condensation appears on the tubes, invert the sample 3 times. Do not centrifuge the emulsion.
|
2.
|
Remove and discard the remaining Partitioning Reagent as follows. |
|
a.
|
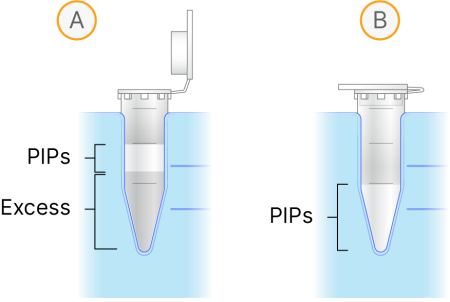
Slowly lower the tip through the emulsion (A) to the bottom of the tube. |
|
c.
|
Aspirate the bottom phase until the top of the emulsion is below the upper marker (~130 µl) (B). |
Do not discard any of the PIP layer.
|
d.
|
While removing the tip, wipe it on the inside of the tube. |
Remove as much of the bottom phase as possible. To minimize sample loss, follow best practices for working with PIPs.
|
3.
|
Add 200 µl Breaking Buffer (clear) to each sample, along the side wall of the tube. |
|
4.
|
Add 40 µl Departitioning Reagent (pink) to each sample, along the side wall of the tube. |
|
5.
|
Securely close the tube, then fully invert the tube 10–20 times to break the emulsion. |
|
6.
|
Centrifuge for 10 seconds. |
|
7.
|
Ensure that the emulsion is completely broken by visually confirming a distinct interface between the pink bottom phase and the upper homogeneous aqueous layer containing the PIPs. |
|
8.
|
Check for any inhomogeneity in the opaque upper phase, which is a sign of an unbroken emulsion. |
|
9.
|
If an unbroken emulsion is observed, add 4 µl additional Departitioning Reagent and repeat steps 5 and 6. |
|
10.
|
If the unbroken emulsion still remains, add 20 µl additional Departitioning Reagent and repeat steps 5 and 6. |
|
11.
|
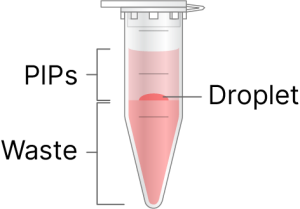
If a red droplet is observed, use a pipette to remove the droplet. |
|
12.
|
Using a 200 µl pipette, remove all of the pink-colored bottom phase. |
|
13.
|
Centrifuge for 10 seconds. |
|
14.
|
Using a 20 µl pipette, remove residual pink-colored bottom phase. |
It is critical to ensure all of the pink bottom phase is removed. It is acceptable to remove a small amount of the clear aqueous to ensure complete removal. If there are unbroken emulsions or pink waste remaining, it can inhibit reverse transcription and cause lower cDNA yield and fragment sizes.
|
15.
|
Place the tubes on ice, and then proceed immediately to the next step. |
Do not allow the PIP tubes to freeze. This negatively impacts assay performance.
Wash PIPs
|
1.
|
Using a 200 µl low-retention tip, slowly transfer the PIPs from the PIP tube to the chilled Wash 1 tube. |
When transferring PIPs, ensure no PIPs are left in the pipette tip by mixing up and down at least 3 times in the Wash 1 tube.
|
2.
|
Briefly centrifuge the PIP tube to collect remaining PIPs. |
|
3.
|
Transfer all remaining PIPs from the PIP tube to the corresponding Wash 1 tube. |
|
4.
|
Place the Wash 1 tubes into the stand. |
|
5.
|
Vortex mix by holding the stand horizontally on a flat-head vortex mixer for ~3 seconds. |
|
6.
|
Centrifuge for 1 minute and then return tubes to the stand. |
|
7.
|
Without disturbing the pellet, remove supernatant to the 4 volume mark on the stand. |
The pellet is translucent at this step. Removing excess volume can result in loss of PIPs.
|
8.
|
Perform an additional wash as follows. |
|
a.
|
Add 1 ml 1X Washing Buffer to each tube. |
|
b.
|
Vortex mix by holding the stand horizontally on a flat-head vortex mixer for ~3 seconds. |
|
c.
|
Centrifuge the tubes for 1 minute, and then return tubes to the stand. |
|
d.
|
Without disturbing the pellet, remove supernatant to the 4 volume mark on the stand. |
|
9.
|
Wash PIPs a third time. |
|
10.
|
Wash PIPs a fourth time. |