
Add and Configure Automations
You can create
| • | Step automations—Actions that are triggered when running samples through a step. Configure them to be triggered automatically (at the start/end of the step, or when a particular screen is entered or exited), or manually (when selecting a button on the Record Details screen). The automations are enabled on the master step, but the trigger points are configured at the master step or step level. |
| • | Project automations—Actions that users can run on submitted samples, directly from the Projects & Samples screen. For example, you might configure an automation that gives the ability to assign the samples to a workflow. |
| • | Derived sample automations—Actions that users can run on derived samples, directly from the Projects dashboard. For example, you could configure an automation that gives the ability to queue selected samples for a new workflow. In this case, the automation would trigger a custom script created for this purpose. |
| • | Step automations are reusable. After you have created an automation, you can enable it on multiple master steps. |
| • | If you intend the automation to be triggered manually, the name you choose for the automation is used to name the button that initiates it from the LIMS interface. |
| • | Two step automations can have the same name as long as they are unique in some other way. For example: |
| – | channel name is unique, or |
| – | command line is unique, or |
| – | run-program-per-event values are unique (available in the API only) |
Attached files and associated master steps are ignored in these comparisons.
| • | Two project automations cannot have the same name, regardless of the uniqueness of channel name and command line. |
| • | You cannot enable multiple automations with the same name on a master step, even if the automations are configured differently. |
| 1. | On the main menu, select Configuration. |
| 2. | On the configuration screen, select the Automation tab. |
| 3. | On the Step Automation tab, select New Automation. |
| 4. | In the Automation Details area, complete the required fields: |
| • | Type a name for the new automation. |
| • | In the Channel Name field, enter the channel to be used for this automation (for more information, refer to Automation Channels in the Clarity LIMS API documentation section). |
| • | In the Command Line field, enter the command line to be run when the automation is triggered. Copy/paste tokens from the Tokens list, as required. For details, refer to Step Automation Tokens in the Clarity LIMS API documentation section. |
| 5. | [Optional] Enable automation on steps: |
| • | In the Automation Use section, select inside the Enable on these Master Steps field and select the master step on which to enable the automation. (Note that this configuration is bidirectional—when configuring a master step, you can select automations to associate with that master step.) |
If necessary, you can:
| • | Repeat this process to enable the automation on multiple steps. |
| • | Select the X button to remove a step from the field. |
| 6. | Select Save. |
The new step automation is now available to be configured on the selected master steps.
The Automations configuration screen includes a Template Files section that allows for the upload of a template file to an automation. Reference the file in the automation command line and use it to generate a file that is attached to the step—typically a sample sheet file that can be used to start the instrument run.
A token for the template file is automatically added to the Tokens list. When included in the command line, the token is replaced with the absolute path of the template file at run time.
Downloadable sample sheet template files are available for several Illumina instrument integrations. For details on modifying the example template for the needs of your lab, refer to the Lab Instrument Tool Kit section of the Clarity LIMS Integrations and Tool Kits documentation.
To attach a template file:
| 1. | In the Template Files section, select Upload File. |
| 2. | In the Upload File dialog, select Choose File, and then browse to and select the appropriate template file. |
| 3. | Select Upload. The file is attached to the automation and listed in the Template Files section. |
When upload is complete, a new dynamic token is added to the Tokens list.
| 4. | In the Command Line field: |
| • | Include a script that generates the output file. |
| • | Provide the template file token as a script parameter. You can copy and paste the token directly from the Tokens list. At run time, the token is replaced with the absolute path of the file. |
| 5. | Select Save. |
In the Step Automation list, an icon indicates that a file is attached.
If necessary, you can:
| • | Repeat this process to attach additional files to the automation. |
| • | Select the X button to remove the file from the automation. |
You can also attach template files to automations via the API, using the files endpoint. For details, refer to the Clarity LIMS API documentation.
| 1. | On the Derived Sample Automation tab, select New Automation. |
| 2. | In the Automation Details area, complete the required fields: |
| • | Type a name for the new automation. |
| • | In the Channel Name field, enter the channel to be used for this automation (for more information, refer to Automation Channels in the Clarity LIMS API documentation section). |
| • | In the Command Line field, enter the command line to be run when the automation is triggered. Copy/paste tokens from the Tokens list, as required. For details, refer to Derived Sample Automation Tokens in the Clarity LIMS API documentation section. |
| • | Select Save. |
The new derived sample automation is added to the Derived Sample Automations list, and is now available to be run on derived samples from the Projects dashboard.
The following examples show how derived sample automations can be used in the lab.
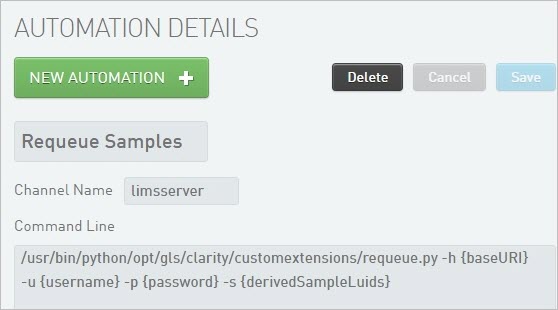
In this example, when the Requeue Samples automation is run, the following occurs:
| • | The custom script, requeue.py, is initiated. (This script is used for illustrative purposes only and is not provided with Clarity LIMS.) |
| • | The command-line parameters are interpreted by the automation worker node, and their values are provided to the script. |
| • | The selected samples are requeued. |
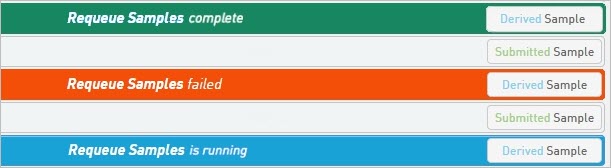
| 1. | On the Projects dashboard, run the automation on selected derived samples. |
| 2. | As the script runs, the status is reported back. |
Refer also to The Projects Dashboard, Run Automations on Derived Samples.
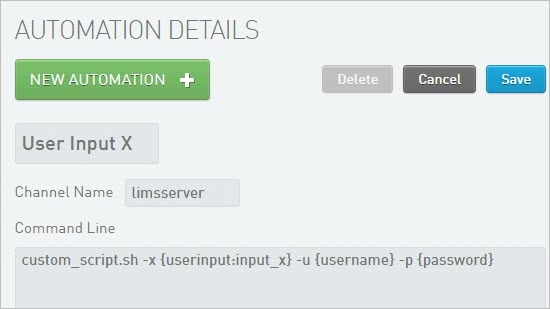
This example shows the configuration of an automation named User Input X, which includes a {user input} token in the command line. (For details, refer to Step Automation Tokens in the Clarity LIMS API documentation section.
| 1. | On the Projects dashboard, run the automation on selected derived samples. |
| 2. | A custom script called custom_script.sh is initiated. |
| 3. | The script prompts for a value to be entered for the input_x parameter. |
| 4. | The command-line parameters are interpreted by the automation worker node, and their values—along with the user-supplied input_x value—are provided to the script. |
| 5. | The script runs. |
| 1. | On the Project Automation tab, select New Automation. |
| 2. | In the Automation Details area, complete the required fields: |
| • | Type a name for the new automation. |
| • | In the Channel Name field, enter the channel to be used for this automation (for more information, refer to Automation Channels in the Clarity LIMS API documentation section). |
| • | In the Command Line field, enter the command line to be run when the automation is triggered. Copy/paste tokens from the Tokens list, as required. For details, refer to Project Automation Tokens in the Clarity LIMS API documentation section. |
| • | Select Save. |
The new project automation is added to the Project Automations list, and is now available to be run on submitted samples from the Projects & Samples screen.
| 1. | On the Automation Configuration screen, select one of the following tabs: |
| • | Step Automation |
| • | Project Automation |
| • | Derived Sample Automation |
| 2. | In the list of automations on the left, select the automation to edit. |
| 3. | Make your changes and select Save. |
When editing step automations, keep the following in mind:
| • | Changes you make to a step automation are reflected on all future steps on which that automation is enabled. |
| • | Steps that have already been run are not affected by changes you make to a step automation. |
| 1. | On the Automation configuration screen, select one of the following tabs: |
| • | Step Automation |
| • | Project Automation |
| • | Derived Sample Automation |
| 2. | In the list of automations on the left, select the automation to delete. |
| 3. | Select Delete. |
Information about deleted automations is saved in the Clarity LIMS database for historical purposes. However, there is no way to restore a deleted automation for use in Clarity LIMS.
