
Illumina MiSeqDx Integration v1.5 User and Configuration Guide
Compatibility: See Release Notes
Contents
The Illumina MiSeqDx Integration Package supports the integration between BaseSpace Clarity LIMS and Illumina MiSeqDx instruments.
The integration allows for automated tracking of an Illumina sequencing run in the LIMS. This includes tracking instrument run status, generating run report, capturing and parsing run statistics, and uploading variant call files to the LIMS. In addition, this integration provides automated generation of a sample sheet file for use with the MiSeq Operating Software (MOS).
| • | This guide describes the integration between LIMS and the IlluminaMiSeqDx system. It includes information about protocols and automations, configuration options, installed components, and rules and constraints. |
| • | For instructions on validating and troubleshooting the Illumina MiSeqDxIntegration Package, see the Illumina MiSeqDx Integration v1.5 Validation and Troubleshooting Guide. |
| • | For overview information about how the Illumina – LIMS interface works, and which events are monitored, see How the Illumina Instrument and LIMS Software Interact. |
This Illumina MiSeqDx integration includes:
| • | A MiSeqDx RPM that supports Diagnostic (Dx) mode. |
| • | A MiSeq RPM that supports Research (RUO) mode. |
| • | Preconfigured LIMS protocols that map to library prep and sequencing lab protocols and instrument runs. |
| • | Preconfigured protocols that allow for validation of the sample sheet generation and index placement functionality. |
| • | Automatic generation of the following: |
| – | A sample sheet file for use with the MOS (Diagnostic mode) instrument software |
| – | A run report, which includes the current run’s statistics |
| • | Automated tracking in the LIMS of the following: |
| – | Progress and metrics of a MiSeqDx sequencing run |
| – | Per-instrument sequencing runs |
| – | Sequencing run parameters |
| – | Real Time Analysis (RTA) run directory location and other run specific information |
| • | Ability to directly monitor run status (cycle number) across multiple instruments from within the LIMS. |
| • | Ability to attach Variant Call Format (VCF) files to the LIMS. |
Information on these features is provided in this guide.
The following out-of-the-box protocols are included in the Illumina MiSeqDx Integration Package:
| • | CF 139-Variant Assay Library Prep 1.0 |
| • | CF Clinical Sequencing Assay Library Prep 1.0 |
| • | Universal Kit Library Prep 1.0 |
| • | Illumina SBS MiSeqDx (CF 139-Variant Assay) 1.0 |
| • | Illumina SBS MiSeqDx (CF Clinical Sequencing Assay) 1.0 |
| • | Illumina SBS MiSeqDx (Universal Kit) 1.0 |
The following validation protocols are installed; each is included in a workflow of the same name:
| • | MiSeqDx Validation (CF 139-Variant Assay) 1.0 |
| • | MiSeqDx Validation (CF Clinical Sequencing Assay) 1.0 |
| • | MiSeqDx Validation (Universal Kit) 1.0 |
Figures 1 - 7 show the protocols, and the steps each includes, as displayed to the lab scientist working in the LIMS Lab View.
|
|

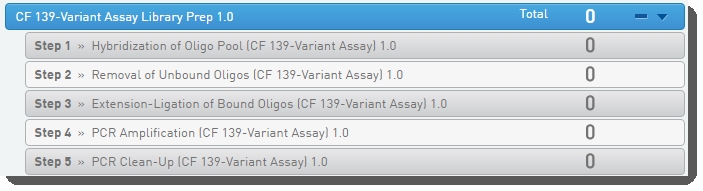 Figure 1: CF 139-Variant Assay Library Prep 1.0 protocol and steps
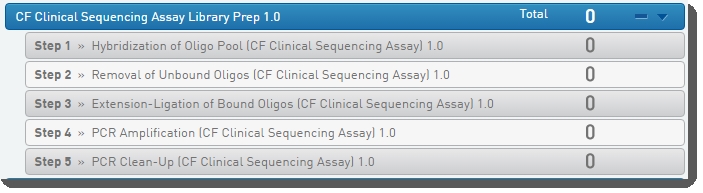 Figure 2: CF Clinical Sequencing Assay Library Prep 1.0 protocol and steps
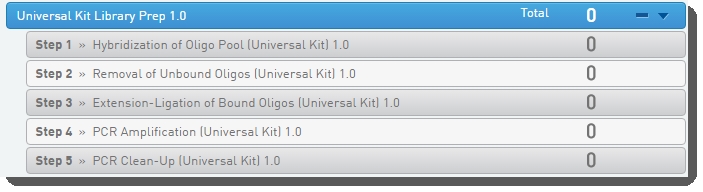 Figure 3: Universal Kit Library Prep 1.0 protocol and steps
Figure 4: Illumina SBS MiSeqDx (CF 139-Variant Assay) 1.0 protocol and steps
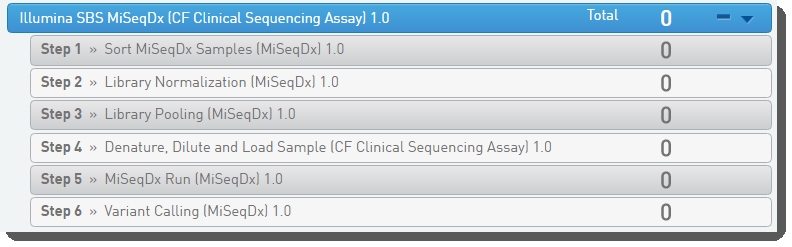 Figure 5: Illumina SBS MiSeqDx (CF Clinical Sequencing Assay) 1.0 protocol and steps
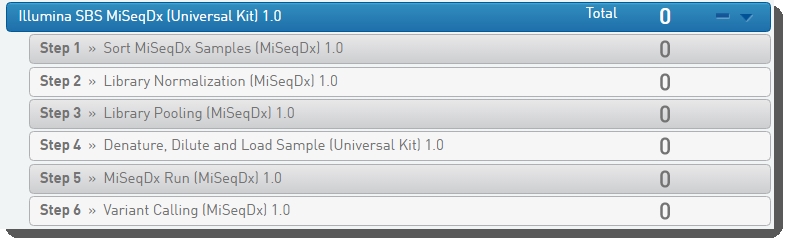 Figure 6: Illumina SBS MiSeqDx (Universal Kit) 1.0 protocol and steps
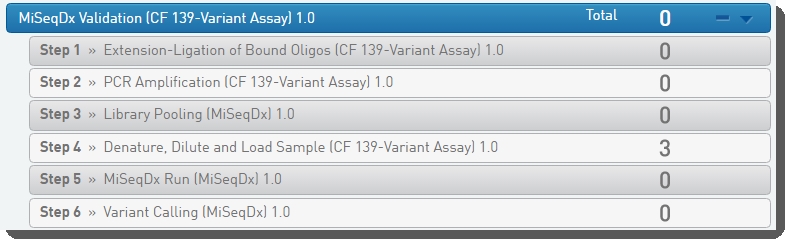 Figure 7:MiSeqDx Validation (CF 139-Variant Assay) 1.0 protocol and steps
Note that there are three Validation protocols (only the MiSeqDx Validation (CF 139-Variant Assay) 1.0 protocol is shown above in Figure 7). Each includes the following steps from the related Library Prep and Illumina SBS MiSeqDx protocols.
| 1. | Extension-Ligation of Bound Oligos – Library Prep step |
| 2. | PCR Amplification – Library Prep step |
| 3. | Library Pooling (MiSeqDx) – Illumina SBS MiSeqDx step |
| 4. | Denature, Dilute and Load Sample – Illumina SBS MiSeqDx step |
| 5. | MiSeqDx Run (MiSeqDx) – Illumina SBS MiSeqDx step |
| 6. | Variant Calling (MiSeqDx) – Illumina SBS MiSeqDx step |
For instructions on using the MiSeqDx Validation (CF 139-Variant Assay) 1.0 protocol to validate automated sample sheet generation, see the Illumina MiSeqDx Integration v1.5 Validation and Troubleshooting Guide.
Automations
Table 1 lists the automations included in this integration, and the protocol steps on which they are configured. Additional details are provided in the sections following the table.
Table 1: Illumina MiSeqDx Integration out-of-the-box protocols and automations
|
Protocol |
Automations |
||||||||||||||||||||||||
|
On PCR Amplification (CF 139-Variant Assay / Universal Kit) 1.0 step:
|
||||||||||||||||||||||||
|
On Library Normalization (MiSeqDx) 1.0 step:
|
||||||||||||||||||||||||
|
On Denature, Dilute and Load Sample (CF 139-Variant Assay / CF Clinical Sequencing Assay / Universal Kit) 1.0 step:
|
||||||||||||||||||||||||
|
On MiSeqDx Run (MiSeqDx) 1.0 step:
|
The following sections describe how these automations work, and how the lab scientist interacts with them in the lab.
|
Note: As of BaseSpace Clarity LIMS v5.0, the term user-defined field (UDF) has been replaced with custom field in the user interface (the API resource is still called udf). There are two types of custom fields:
|
Library Prep protocols
This section discusses the index placement and validation automations (configured on PCR Amplification 1.0 Library Prep step), and describes the user interaction involved in running samples through Library Prep steps.
The example workflow below uses the CF 139-Variant Assay Library Prep 1.0 protocol. However, important considerations related to the Universal Kit Library Prep 1.0 and CF Clinical Sequencing Assay Library Prep 1.0 protocols are noted.
A list of reagents installed with this configuration is provided in the Components installed with this integration section of this article.
|
Good laboratory practices mandate that a positive control DNA sample and a negative (no-template) control sample are included in every run. See sub-step 2 of Step 1. Hybridization of Oligo Pool (CF 139-Variant Assay) 1.0 section below. The positive control DNA sample should be a well-characterized sample with a known CFTR mutation. |
Auto-placement of reagent indexes
By default, in the CF 139-Variant Assay Library Prep 1.0 and the Universal Kit Library Prep 1.0 protocols, the PCR Amplification 1.0 step includes two automations (both of which invoke the place_indexes script with different options):
| • | Auto Place Indexes is automatically invoked on entry to the Add Reagents screen. |
| • | Validate Index Placement is automatically invoked on exit from the Add Reagents screen. |
Figures 8 and 9 show these automations configured on the PCR Amplification 1.0 step, in LIMS v4.x and v5.x.
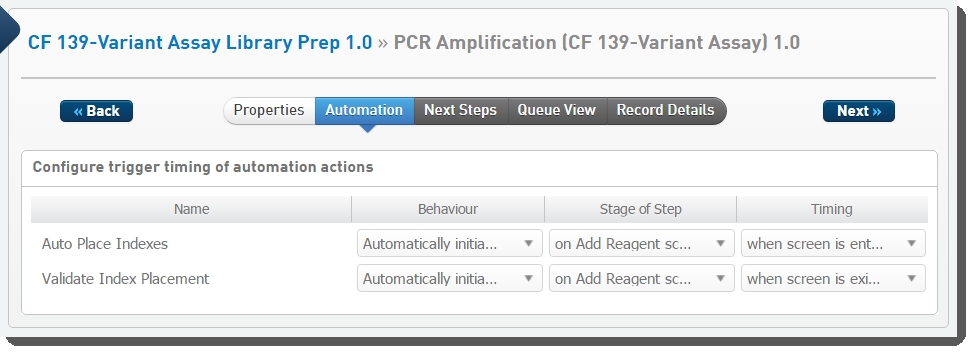 Figure 8: Configuration screen showing automations configured on PCR Amplification (CF 139-Variant Assay) 1.0 step in LIMS v4.x
 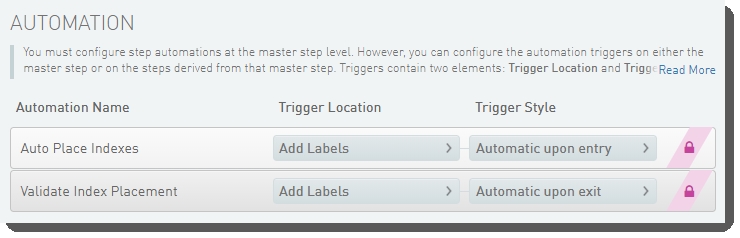 Figure 9: Configuration screen showing automations configured on PCR Amplification (CF 139-Variant Assay) 1.0 step in LIMS v5.x
On entry to the Add Reagents screen, the Auto Place Indexes automation is invoked. This in turn invokes the place_indexes script, which places reagent indexes into the container based on the pattern defined in a specified index placement pattern file (Table 2 shows the pattern file names and their location).
| 1. | Reagent indexes are assigned to each sample in the destination container according to the specified index placement pattern file. Note the following: The automatic index placement pattern for Universal Kit may be modified. |
| • | The automatic index placement pattern for CF 139-Variant Assay should not be modified. |
| • | If an 8-sample reagent category / label group is selected (see step 1 of User interaction section below), index placement must be performed manually. |
|
Note: Index placement must be performed manually for the CF Clinical Sequencing Assay Library Prep 1.0 protocol, which only uses 8-sample reagent categories / label groups. |
| • | Upon completion of the reagent index placement, a success message displays. User clicks OK to close the message. Indexes with the pattern specified in the placement file are then assigned to the samples. |
| 2. | On exit from the Add Reagents screen, the Validate Index Placement automation invokes the place_indexes script once again, this time to validate the index placement: |
| – | If the index placement is user-modifiable (Universal Kit only), any changes made by the user are preserved. |
| – | If the index placement cannot be modified (CF 139-Variant Assay), any changes made by the user are disregarded and the automatic index placement is restored. |
Table 2 shows the commands configured on the Auto Place Indexes and Validate Index Placement automations.
Table 2: PCR Amplification 1.0 step automation details
|
PCR Amplification (CF 139-Variant Assay) 1.0 step: |
||
|
Automation |
Trigger |
Command |
|
Auto Place Indexes |
On entry to Add Reagentsscreen |
bash -l -c "/opt/gls/clarity/bin/java -cp /opt/gls/clarity/extensions/ngs-common/v5/EPP/PlacementHelper.jar place_indexes -i {stepURI:v2} -u {username} -p {password} -f /opt/gls/clarity/extensions/conf/miseqdx/placementpatterns/placement_pattern_index_cf139_01.tsv -ic 'CF 139-Variant Assay 8-Sample Indexes' -locked true" |
|
Validate Index Placement |
On exit from Add Reagentsscreen |
bash -l -c "/opt/gls/clarity/bin/java -cp /opt/gls/clarity/extensions/ngs-common/v5/EPP/PlacementHelper.jar place_indexes -i {stepURI:v2} -u {username} -p {password} -f /opt/gls/clarity/extensions/conf/miseqdx/placementpatterns/placement_pattern_index_cf139_01.tsv -ic 'CF 139-Variant Assay 8-Sample Indexes' -locked true -fc true" |
|
PCR Amplification (Universal Kit) 1.0 step: |
||
|
Automation |
Trigger |
Command |
|
Auto Place Indexes |
On entry to Add Reagentsscreen |
bash -l -c "/opt/gls/clarity/bin/java -cp /opt/gls/clarity/extensions/ngs-common/v5/EPP/PlacementHelper.jar place_indexes -i {stepURI:v2} -u {username} -p {password} -f /opt/gls/clarity/extensions/conf/miseqdx/placementpatterns/placement_pattern_index_universal_01.tsv -ic 'Universal Kit 8-Sample Indexes'" |
|
Validate Index Placement |
On exit from Add Reagentsscreen |
bash -l -c "/opt/gls/clarity/bin/java -cp /opt/gls/clarity/extensions/ngs-common/v5/EPP/PlacementHelper.jar place_indexes -i {stepURI:v2} -u {username} -p {password} -f /opt/gls/clarity/extensions/conf/miseqdx/placementpatterns/placement_pattern_index_universal_01.tsv -ic 'Universal Kit 8-Sample Indexes' -fc true" |
| 1. | Run the PCR Amplification (CF 139-Variant Assay) 1.0 step, add samples to the Ice Bucket and select Reagent Label Options : For manual placement of indexes, select CF 139-Variant Assay 8-Sample Indexes.- or - |
| • | For automatic placement of indexes, select CF 139-Variant Assay Indexes. |
| • | If you are working with 8 or less samples: |
| • | If you are working with more than 8 samples, select CF 139-Variant Assay Indexes for automatic placement of indexes. |
| 2. | Click Begin Work. |
| 3. | On the Record Details screen, click Add Reagents. |
| 4. | A message box displays, notifying you that a custom script is in progress. Upon script completion, a success message displays. Click OK to proceed. |
| 5. | Indexes with the pattern specified in the placement file are assigned to samples and displayed. |
| • | If running the Universal Kit protocol, you may modify the index placement. |
| • | If running the CF 139-Variant Assay protocol, index placement is not modifiable. If you attempt to modify the placement pattern, your changes will be reverted on exit from the Add Reagents screen and the automatic placement will be restored. |
| 6. | Click Next Steps. |
| 7. | The LIMS does the following: |
| • | Validates the index placement. |
| • | In the CF 139-Variant Assay protocol, reverts any changes made to index placement. |
| • | Displays a success message. Click OK to proceed. |
Step 1 - Hybridization of Oligo Pool (CF 139-Variant Assay) 1.0
| 1. | Add samples to Ice Bucket. |
| 2. | Add Negative Control and Positive Control samples to Ice Bucket (seeBest Practices Noteabove). 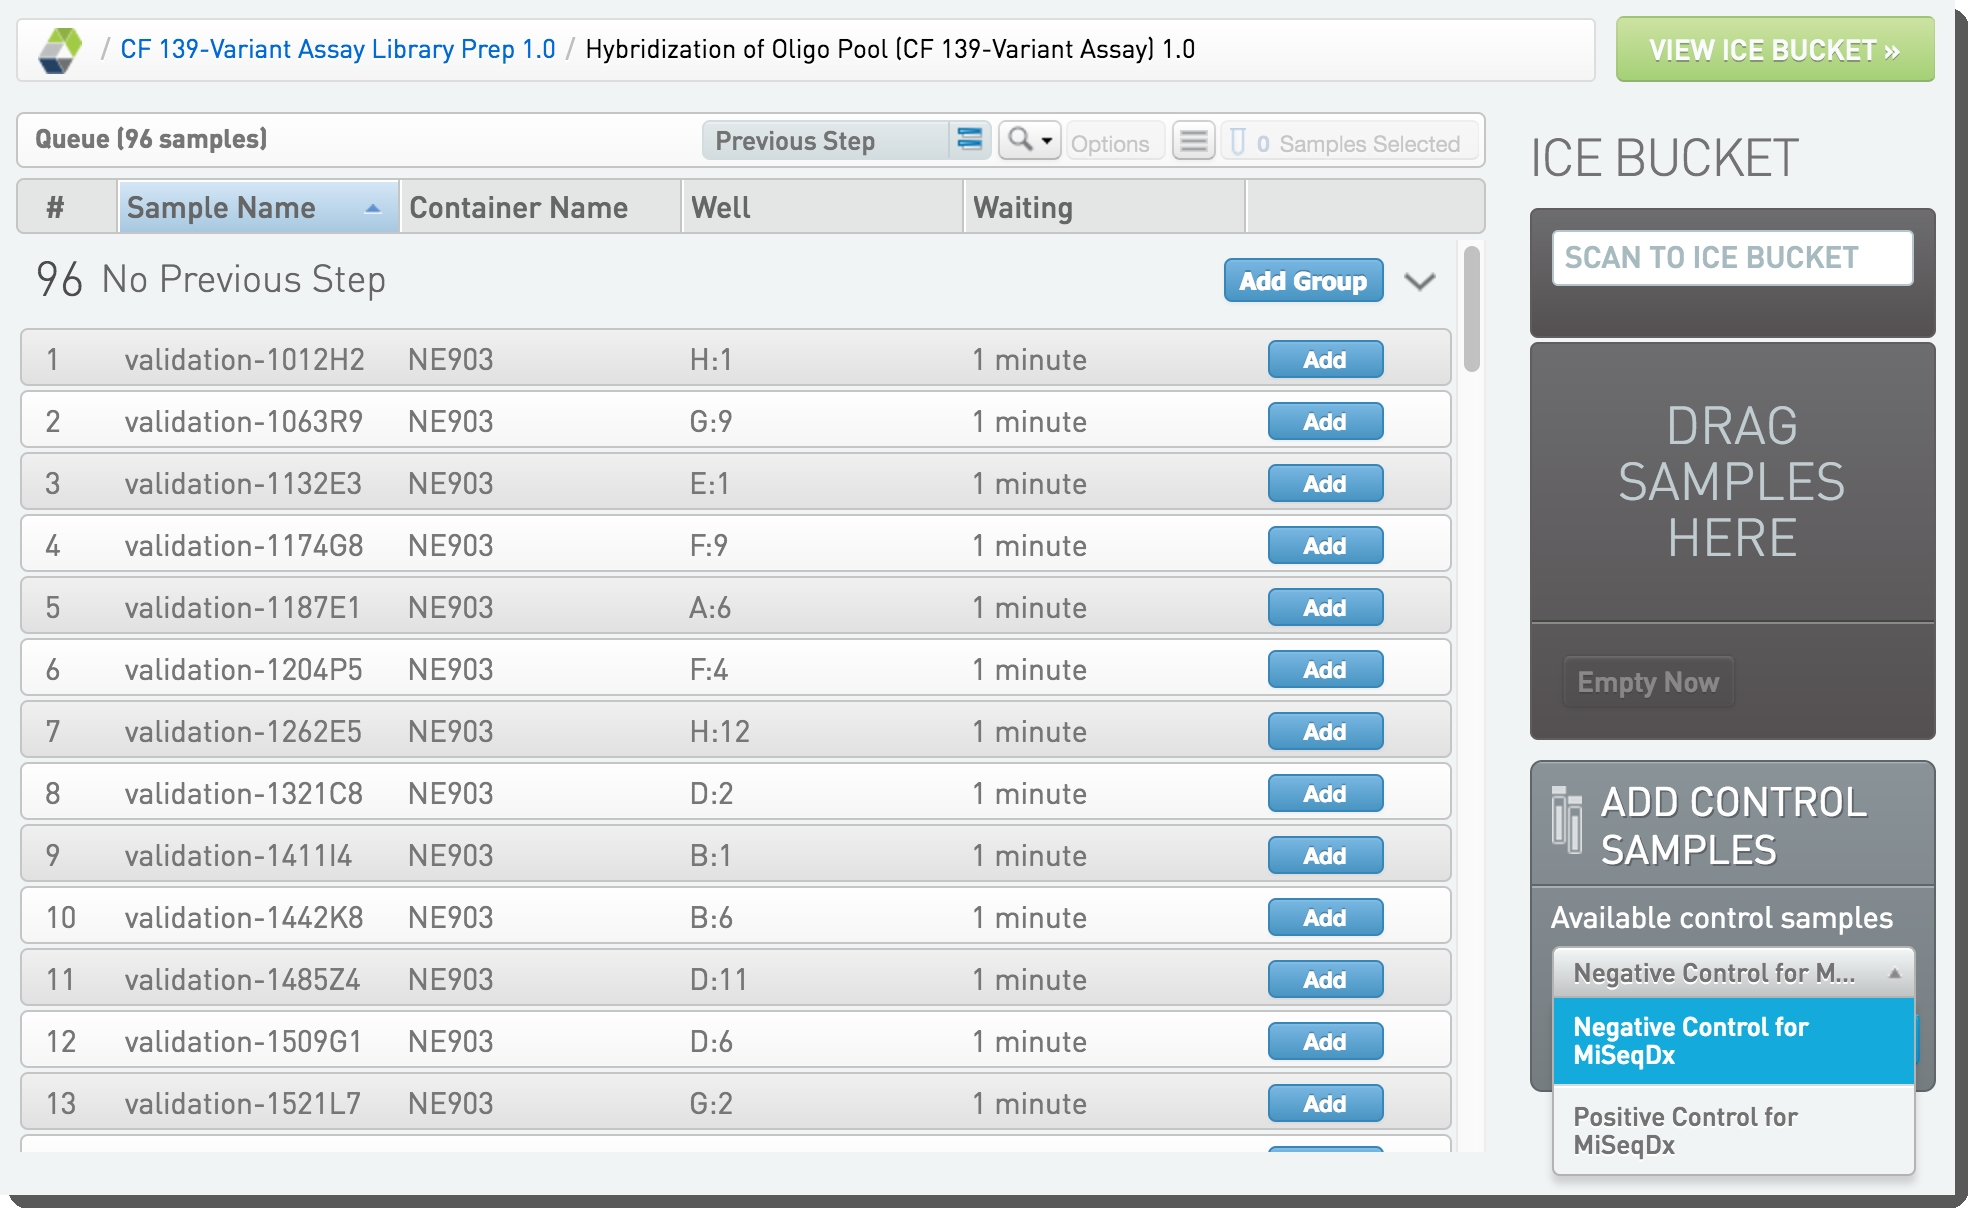 Figure 10: Adding control samples to the Ice Bucket Figure 10: Adding control samples to the Ice Bucket |
| 3. | Click Begin Work. |
| 4. | On the Placement screen, select all samples and place in container. Click Record Details. |
| 5. | On the Record Details screen, under Reagent Lot Tracking :gDNA Concentration (ng/uL): 50 ng/ul |
| • | gDNA Volume (uL): 5 uL |
| • | Select the reagent lots for CF 139-Variant Assay-Oligo Pool and Hybridization Buffer. 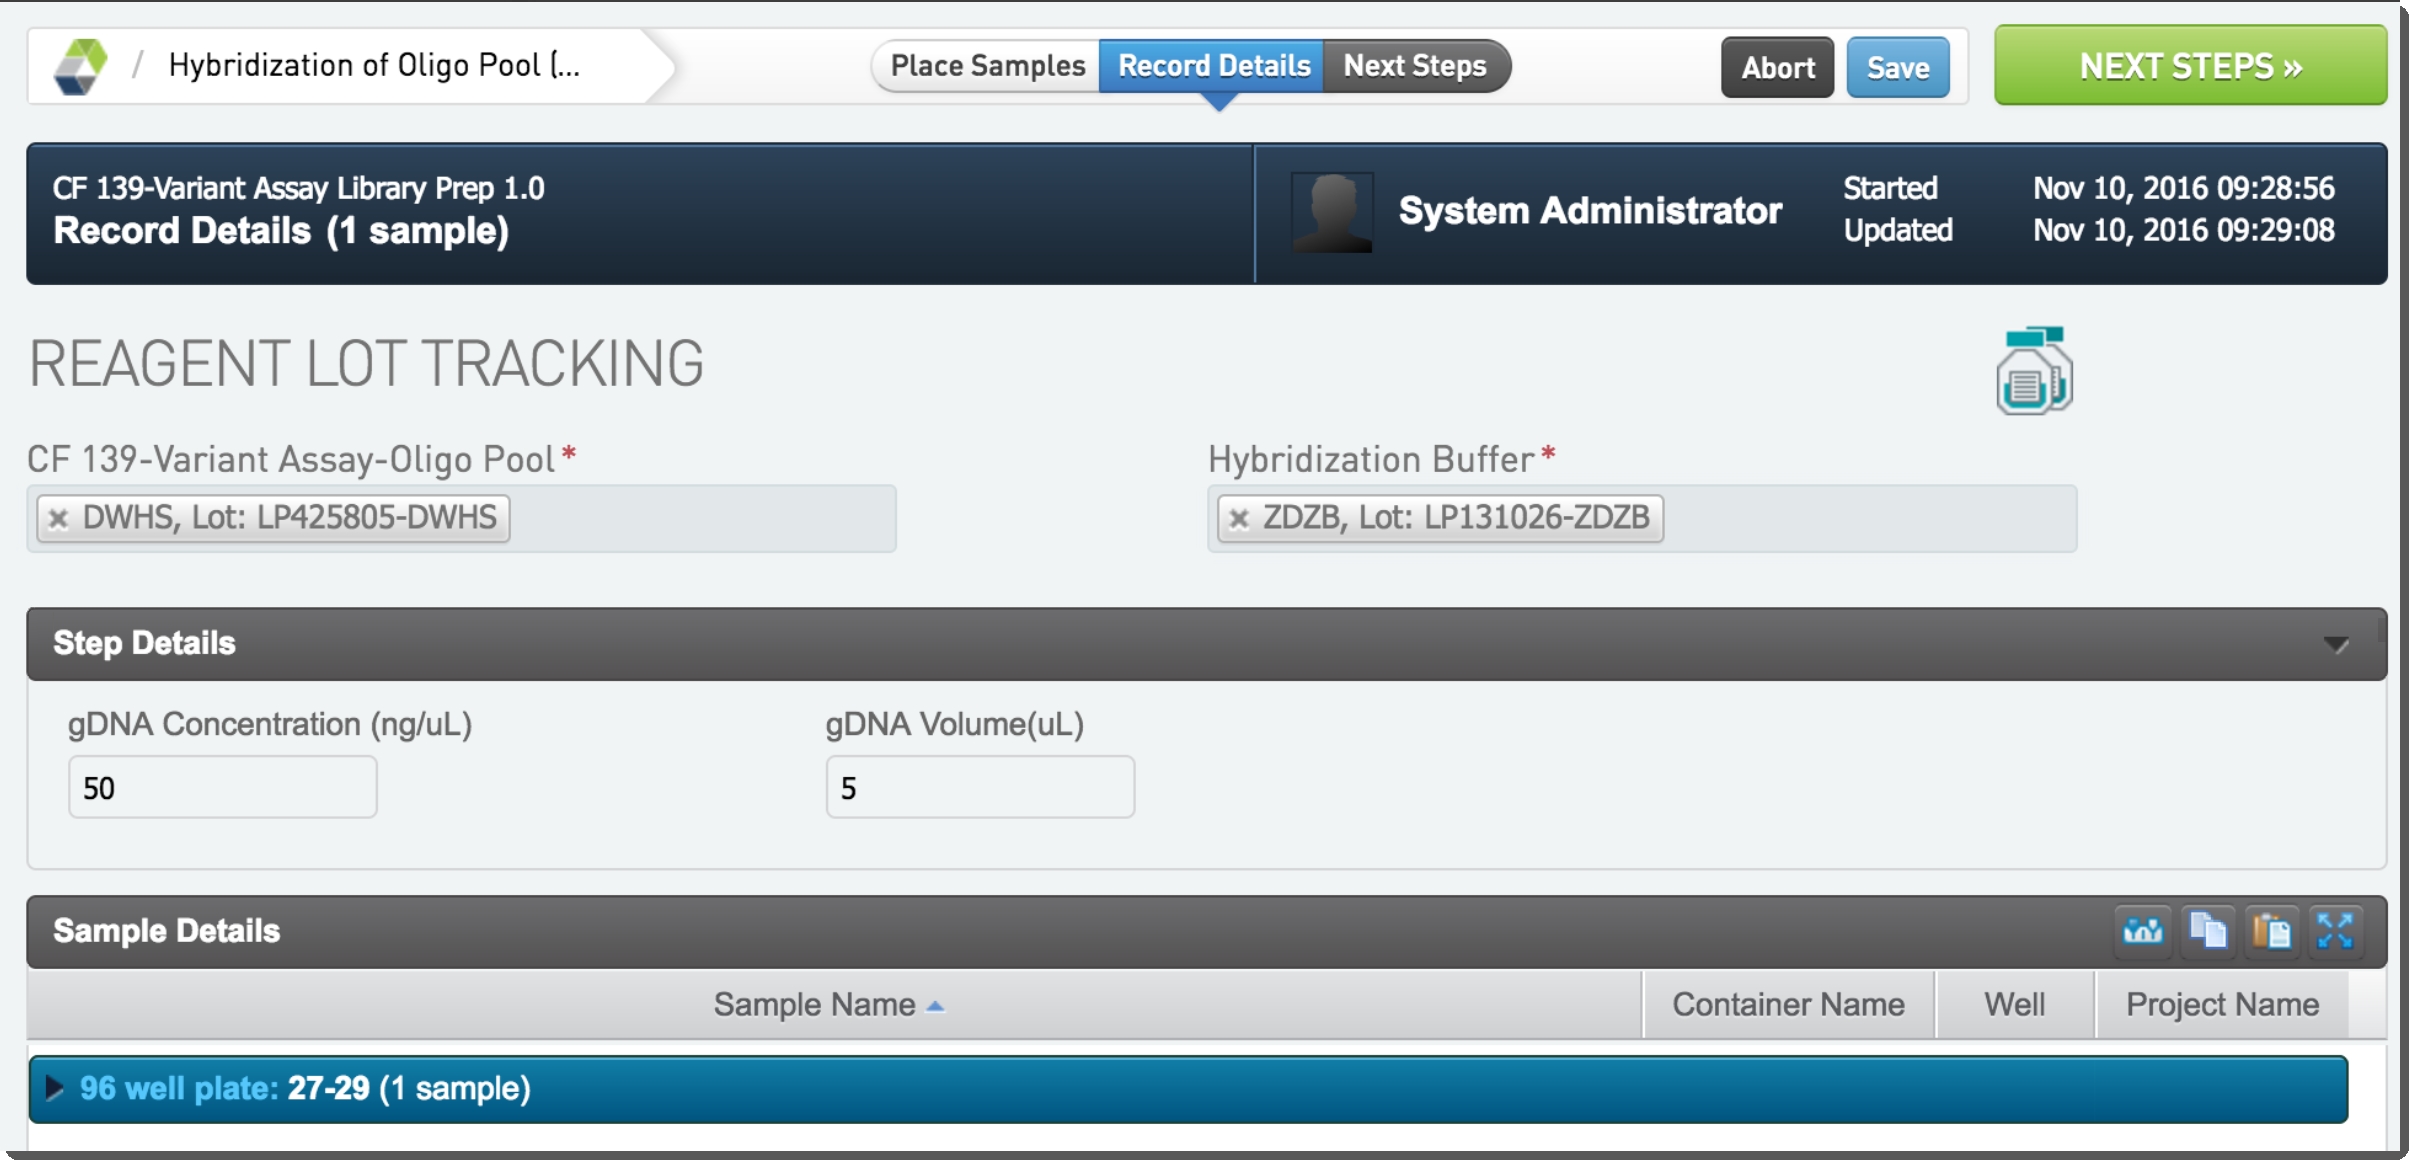 Figure 11: Adding reagents in Hybridization of Oligo Pool (CF 139-Variant Assay) 1.0 step Figure 11: Adding reagents in Hybridization of Oligo Pool (CF 139-Variant Assay) 1.0 step |
| • | Note that the following default values are set automatically: |
| • | Click Next Steps. |
| 6. | Select Removal of Unbound Oligos (CF 139-Variant Assay) 1.0 as the next step. Click Apply. |
| 7. | Click Finish Step. |
Step 2 - Removal of Unbound Oligos (CF 139-Variant Assay) 1.0
| 1. | Add samples to Ice Bucket. Click Begin Work. |
| 2. | On the Placement screen, select all samples and place in container. |
| 3. | Click Record Details. |
| 4. | On the Record Details screen, under Reagent Lot Tracking, select the reagent lots for Stringent Wash Buffer and Universal Wash Buffer. 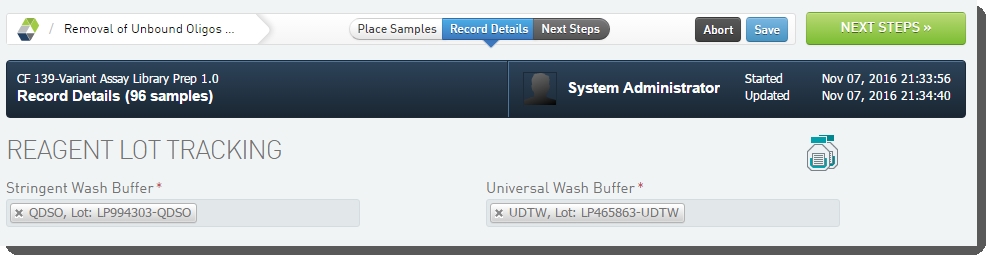 Figure 12: Adding reagents in Removal of Unbound Oligos (CF 139-Variant Assay) 1.0 step Figure 12: Adding reagents in Removal of Unbound Oligos (CF 139-Variant Assay) 1.0 step |
| 5. | Click Next Steps. |
| 6. | Select Extension-Ligation of Bound Oligos (CF 139-Variant Assay) 1.0 as the next step. Click Apply. |
| 7. | Click Finish Step. |
Step 3 - Extension-Ligation of Bound Oligos (CF 139-Variant Assay) 1.0
| 1. | Add samples to Ice Bucket. Click Begin Work. |
| 2. | On the Placement screen, select all samples and place in container. |
| 3. | Click Record Details. |
| 4. | On the Record Details screen, under Reagent Lot Tracking, select the reagent lots for Extension-Ligation Mix. 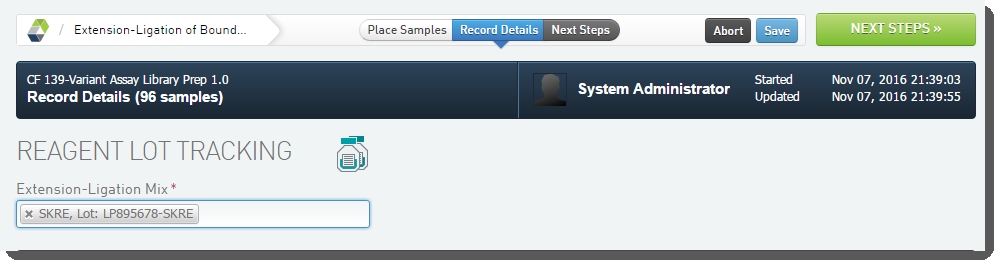 Figure 13: Adding reagents in Extension-Ligation of Bound Oligos (CF 139-Variant Assay) 1.0 step Figure 13: Adding reagents in Extension-Ligation of Bound Oligos (CF 139-Variant Assay) 1.0 step |
| 5. | Click Next Steps. |
| 6. | Select PCR Amplification (CF 139-Variant Assay) 1.0 as the next step. Click Apply. |
| 7. | Click Finish Step. |
Step 4 - PCR Amplification (CF 139-Variant Assay) 1.0
| 1. | Add samples to Ice Bucket. |
| 2. | Select Reagent Label Options: |
| • | If you are working with 8 or less samples, select CF 139-Variant Assay 8-Sample Indexes. |
| • | If you are working with more than 8 samples, select CF 139-Variant Assay Indexes. 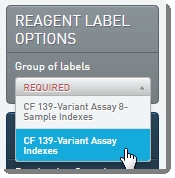 Figure 14: Selecting Reagent Label Options Figure 14: Selecting Reagent Label Options |
| • | Click Begin Work. |
| 3. | On the Placement screen, select all samples and place in container. Click Add Reagents. |
| 4. | On entry to the Add Reagents screen, the Auto Place Indexes automation is invoked and the reagents are placed on the samples. |
| 5. | Once placement is complete, a message displays, indicating that the index pattern has been applied successfully. Click OK. 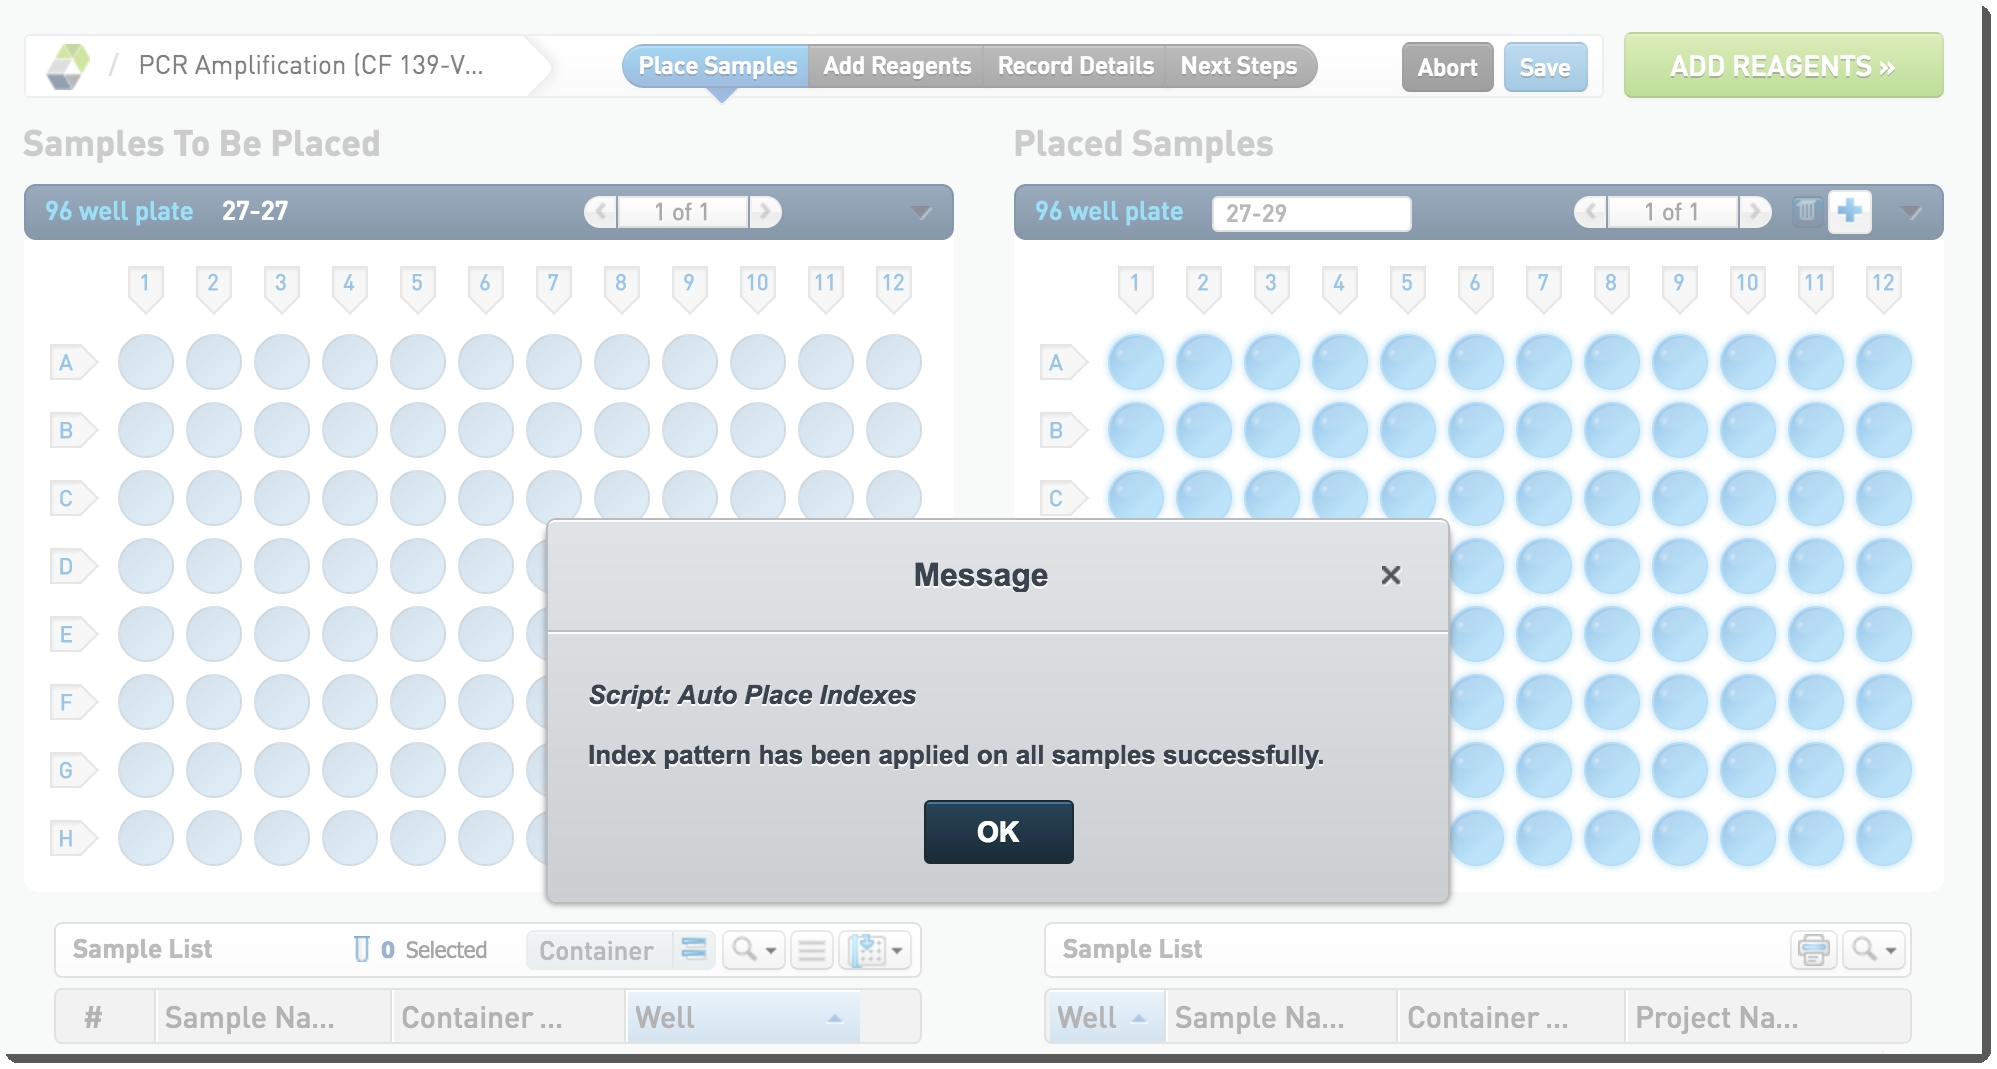 Figure 15: Index pattern placement success message in PCR Amplification (CF 139-Variant Assay) 1.0 step Figure 15: Index pattern placement success message in PCR Amplification (CF 139-Variant Assay) 1.0 step |
| 6. | On Add Reagents screen, reagents are already placed. Click Record Details. 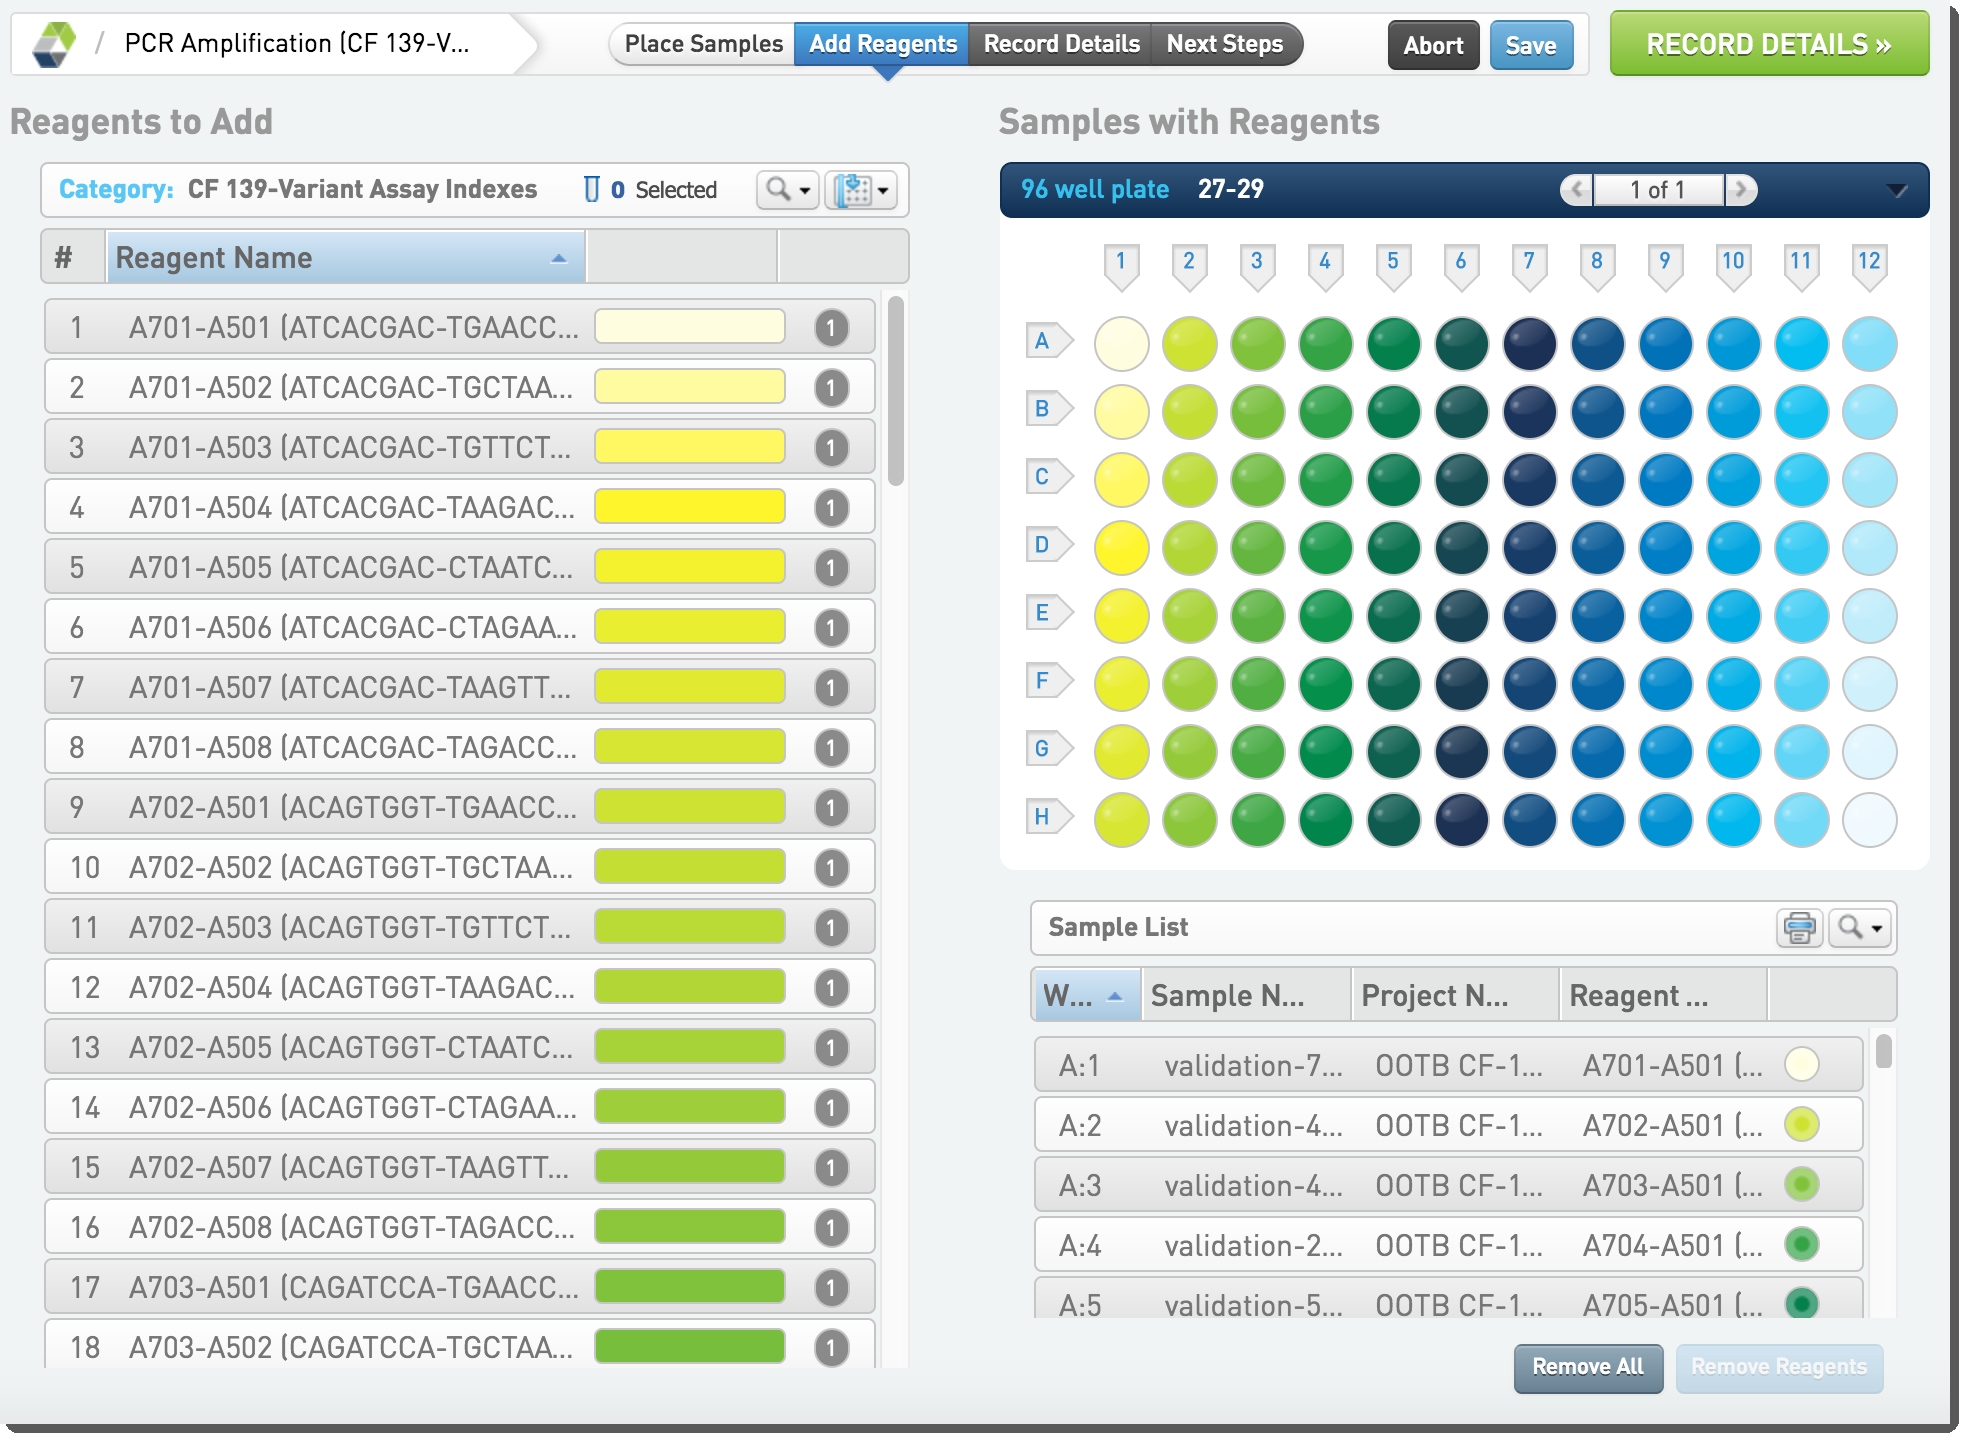 Figure 16: Reagents are automatically placed in PCR Amplification (CF 139-Variant Assay) 1.0 step Figure 16: Reagents are automatically placed in PCR Amplification (CF 139-Variant Assay) 1.0 step |
| 7. | Click Record Details. |
| 8. | On exit from the Add Reagents screen, the index placement is validated. Once validation is complete, a message displays, indicating that the index pattern has been validated on all samples successfully. Click OK. |
| 9. | On the Record Details screen, under Reagent Lot Tracking, enter the lots for Index Primers, NaOH, PCR Master Mix, and PCR Polymerase. 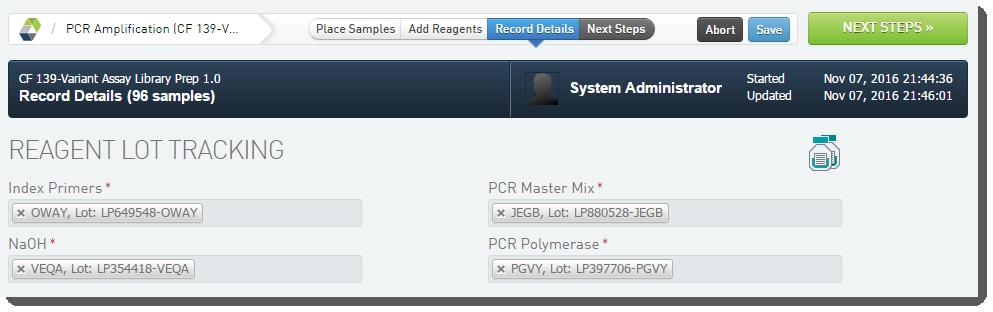 Figure 17: Adding reagents in PCR Amplification (CF 139-Variant Assay) 1.0 step Figure 17: Adding reagents in PCR Amplification (CF 139-Variant Assay) 1.0 step |
| 10. | Click Next Steps. |
| 11. | Select PCR Clean-Up (CF 139-Variant Assay) 1.0 as the next step. Click Apply. |
| 12. | Click Finish Step. |
Step 5 - PCR Clean-Up (CF 139-Variant Assay) 1.0
| 1. | Add samples to Ice Bucket. Click Begin Work. |
| 2. | On the Placement screen, select all samples and place in container. Click Record Details. |
| 3. | On the Record Details screen, under Reagent Lot Tracking, select the reagent lots for Elution Buffer, EtOH and PCR Clean-up Beads. 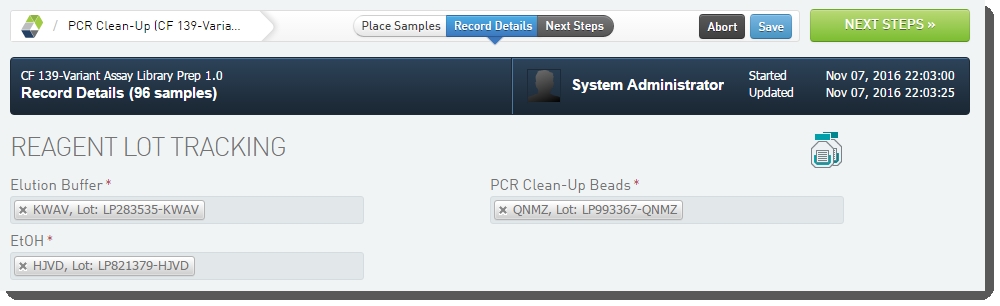 Figure 18: Adding Reagents in PCR Clean-Up (CF 139-Variant Assay) 1.0 step Figure 18: Adding Reagents in PCR Clean-Up (CF 139-Variant Assay) 1.0 step |
| 4. | Click Next Steps. |
| 5. | Select Mark protocol as complete as the next step. Click Apply. |
| 6. | Click Finish Step. |
Illumina SBS MiSeqDx protocols
The sections below describe the following key features of the llumina SBS MiSeqDx protocols, and the user interaction involved at those points in the workflow:
| • | Library normalization CSV file generation |
| • | Reagent cartridge name validation |
| • | MiSeqDx sample sheet generation |
| • | Primary analysis (sequencing) results parsing, which includes generation of the run report |
| • | Secondary analysis results parsing |
Library normalization file generation
In each of the Illumina SBS MiSeqDx protocols, the Library Normalization (MiSeqDx) 1.0 step includes automated calculation of normalization buffer volumes. The results are provided in auto-generated comma-separated file that is attached to the step.
Buffer volumes are calculated by the normalizationBufferVolumes script. The script is invoked by the Create Normalization CSV automation when the user clicks a button on the Record Details screen.
For details on the normalizationBufferVolumes script, see Normalization Buffer Volumes.
On the Record Details screen of the Library Normalization (MiSeqDx) 1.0 step:
| 1. | Enter values for each of the following: |
| • | Library volume (uL) transferred to destination plate |
| • | Normalized conc (nM) |
| • | Maximum destination container volume (uL) |
| • | Any other required custom fields / UDFs |
| 2. | Click Create Normalization CSVto invoke the automation. 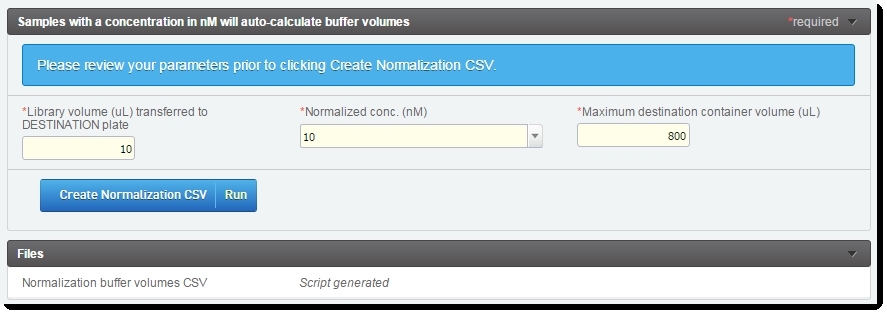 Figure 19: Record Details screen of Library Normalization (MiSeqDx) 1.0 step Once the normalizationBufferVolumes script has completed, the Normalization buffer volumes CSV file is generated and attached to the step – in the Files area of the Record Details screen. Figure 19: Record Details screen of Library Normalization (MiSeqDx) 1.0 step Once the normalizationBufferVolumes script has completed, the Normalization buffer volumes CSV file is generated and attached to the step – in the Files area of the Record Details screen. |
Reagent cartridge name validation
In each of the Illumina SBS MiSeqDx and Validation protocols, the Denature, Dilute and Load Sample 1.0 step includes automated validation of the MiSeqDx reagent cartridge name.
Automatically initiated on exit from the Placement screen of the step, the Validate Container Name automation validates the reagent cartridge name to ensure:
| • | The reagent cartridge Container Name has been renamed and is not the same as its LIMS ID. |
| • | The Container Name contains only letters and numbers, and no special characters, and is in the format AB#######-XYZ (e.g., RG1234567-ABC). |
Figures 20 and 21 show the Validate Container Name automation configured on the Denature, Dilute and Load Sample (CF 139-Variant Assay) 1.0 step, in LIMS v4.x and v5.x.
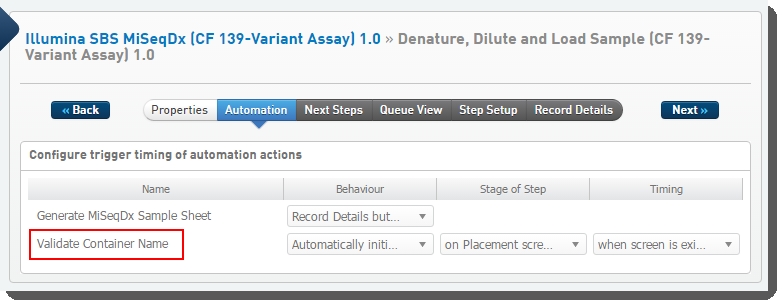 Figure 20: Configuration screen showing Validate Container Name automation configured on Denature, Dilute and Load Sample 1.0 step in LIMS v4.x
 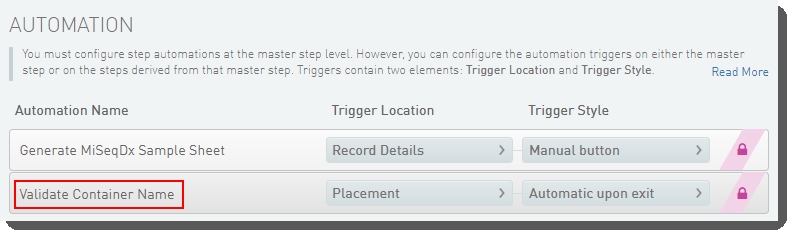 Figure 21: Configuration screen showing Validate Container Name automation configured on Denature, Dilute and Load Sample 1.0 step in LIMS v5.x
| 1. | On the Placement screen of the Denature, Dilute and Load Sample 1.0 step: |
| • | Scan the RFID of the MiSeqDx reagent cartridge into the Container Name field, using an RFID scanner. |
| • | Place the pool of samples into the reagent cartridge. |
| • | Click Record Details. |
| 2. | On exit from the Placement screen, the automation is automatically triggered and validates the Container Name. |
In each of the Illumina SBS MiSeqDx and Validation protocols, automated sample sheet generation is configured on the Record Details screen of the Denature, Dilute and Load Sample 1.0 step – this is when the samples are loaded onto the container that will be placed in the instrument.
The integration allows for generation of a sample sheet designed to be used with the MOS (Diagnostic mode) instrument software.
By default, one MiSeqDx instrument sample sheet is created for the reagent cartridge loaded during the step.
Table 3: Placeholders and sample sheet files generated by Denature, Dilute and Load Sample 1.0step
|
Item |
Description |
|||
|
Lab Tracking Formplaceholder |
This placeholder allows the user to manually attach a lab-specific tracking form to the step. |
|||
|
MiSeqDxSample Sheet file |
This CSV file is automatically generated by the LIMS for use with the MOS or MCS software.
|
|||
|
MiSeqDx Sample Sheet Generation Log |
Automatically generated by the LIMS, this log file captures any errors encountered when generating the MiSeqDx sample sheet (MOS). |
The sample sheet generation automation is configured on the Record Details screen of the Denature, Dilute and Load Sample 1.0 step.
This automation:
| • | Is triggered by a button on the Record Details screen. |
| • | Invokes a script that generates the sample sheet – a comma-separated text file containing the required columns. |
|
Note: To maintain unique values in the Sample_Name column of the sample sheet, the sample sheet generation automation script has the useSampleLimsID parameter set to true: useSampleLimsID = true Note also that the appendLimsID parameter must not be set to true. |
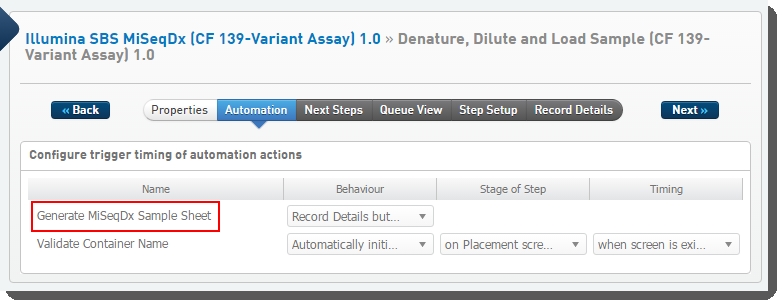
Figure 22: Configuration screen showing Generate MiSeqDx Sample Sheet automation configured on Denature, Dilute and Load Sample 1.0 step in LIMS v4.x
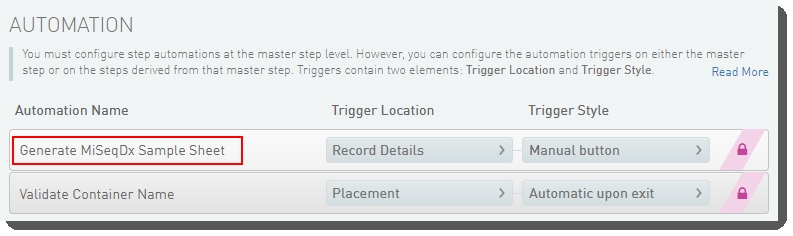
Figure 23: Configuration screen showing Generate MiSeqDx Sample Sheet automation configured on Denature, Dilute and Load Sample 1.0 step in LIMS v4.x
Supporting documentation
For more information on sample sheet generation, including details on file format and contents, master step fields / step UDFs and submitted sample global fields / sample UDFs, script parameters, and configuration options, see the following articles:
| • | For details on the Diagnostic mode sample sheet designed for use with MOS software, see MiSeqDx 1.x Sample Sheet Generation. |
| • | For details on the Research mode sample sheet designed for use with MCS software, see MiSeq Sample Sheet Generation. |
| 1. | On the Record Details screen of the Denature, Dilute and Load Sample 1.0 step: |
| • | All read-only fields are auto-populated. |
| • | GenomeFolder is a required field. Enter the folder path containing the Reference Genomes that will be used for secondary analysis here. |
| • | In the Reagent Lot Tracking section, select the reagent lots used in the step. Enter the lots for MiSeqDx Flow Cell - CF 139-Variant Assay and MiSeqDx SBS Solution (PR2) - CF 139-Variant Assay. |
| • | In the Step Details section, review the step parameters: |
| • | Click Generate MiSeqDx Sample Sheet to generate the sample sheet to be uploaded to the MiSeqDx instrument. |
| • | Once the automation has completed, the MiSeqDx sample sheet and log file are generated and attached to the step. |
| • | Download the sample sheet and upload it to the MiSeqDx instrument to start a run. 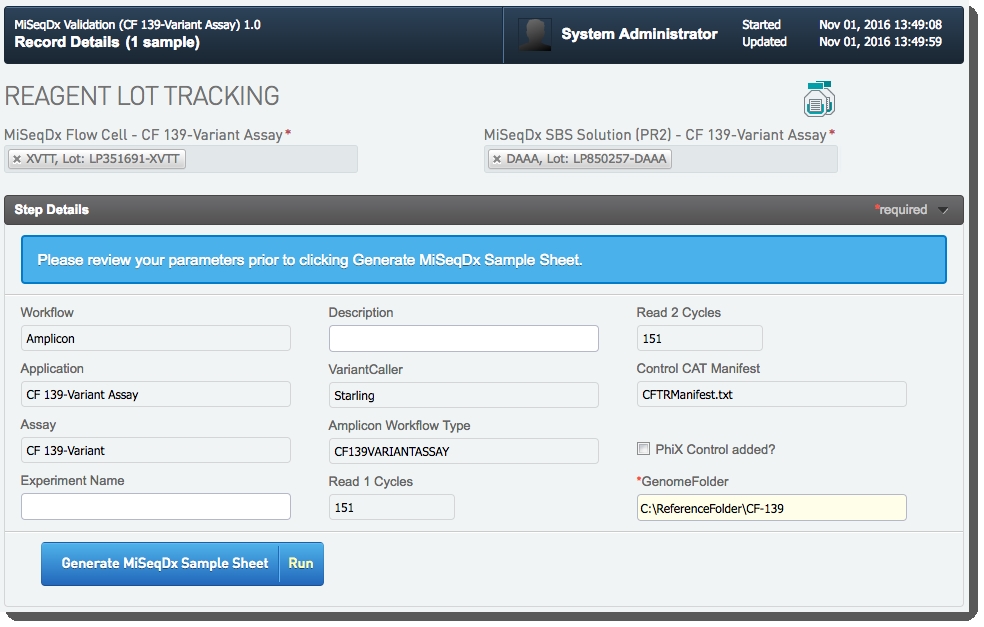 Figure 24: Record Details screen of Denature, Dilute and Load Sample 1.0 step Figure 24: Record Details screen of Denature, Dilute and Load Sample 1.0 step |
| • | (Optional) In theFiles section, upload the Lab Tracking Formto the appropriate placeholder. 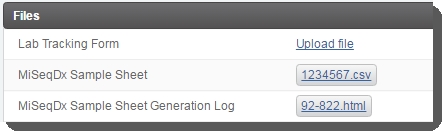 Figure 25: Files section of Record Details screen showing attached MiSeqDx Sample Sheet and Sample Sheet Generation Log files and Lab Tracking Form placeholder Figure 25: Files section of Record Details screen showing attached MiSeqDx Sample Sheet and Sample Sheet Generation Log files and Lab Tracking Form placeholder |
| • | Click Next Steps. |
| 2. | On the Assign Next Steps screen, assign the samples to the MiSeqDx Run (MiSeqDx) 1.0 and click Finish Step. 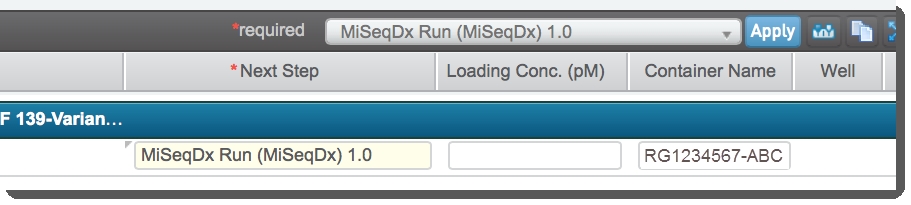 Figure 26: Assigning samples to the MiSeqDx Run (MiSeqDx) 1.0 step Figure 26: Assigning samples to the MiSeqDx Run (MiSeqDx) 1.0 step |
Primary analysis (sequencing) results parsing
The MiSeqDx Run (MiSeqDX) step records information for each lane of the flow cell and generates a report summarizing the results. In addition, run parameters, run info, and a link to the run folder are automatically captured.
Table 4 describes the run information files, reports, placeholders, and links that the LIMS automatically generates or captures during a sequencing run.
Table 4: Run information generated or captured by MiSeqDx Run (MiSeqDX)1.0 step
|
Item |
Description |
|
Run Info Run Parameters |
These XML files are automatically captured by the LIMS from the instrument's run folder. They include the key run parameters, many of which are parsed out into key master step fields / step UDFs. |
|
Link to Run Folder |
Automatically generated by the LIMS, this is a link to the network run folder where the data that was captured from the instrument during the run is stored. |
|
Illumina Run Report |
Automatically generated by the LIMS, this report provides key information about the run and the samples on the flow cell. Information includes the flow cell ID, run directory location, instrument name, as well as primary analysis metrics for the instrument – summarized per flow cell lane for the entire run, and individual reads in the case of paired-end runs. These metrics are compared against the instrument's per lane averages, calculated using metrics from the last 5 sequencing runs. Any values outside of 1 standard deviation are highlighted. Note: The run report calculations assume that the flow cell has eight lanes. If you are using a two-lane rapid run flow cell, the calculated values will be incorrect. |
|
Lab Tracking Formplaceholder |
This placeholder in the LIMS allows the user to manually attach a lab-specific tracking form to the step. |
| • | Date Run* – run start date |
| • | Instrument Run ID – sequencer instrument name |
| • | Control Lane – PhiX control lane (blank or 1-8) |
| • | Experiment Name – entered in software |
| • | Finish Date* – run completion date |
| • | Flow Cell ID |
| • | Flow Cell Position – A or B |
| • | Flow Cell Version |
| • | Output Folder – run folder root |
| • | Index 1 Read Cycles – intended Index cycles |
| • | Index 2 Read Cycles – intended Index cycles |
| • | Run ID – the unique run ID |
| • | Run Type – Diagnostic or Research mode |
| • | Status – current status of the sequencing run on the instrument |
| • | SBS Kit Lot # |
| • | SBS Kit Type |
|
Finish Date is populated as follows:
|
Table 5 lists the Real Time Analysis (RTA) primary analysis metrics the LIMS automatically captures and records, per read, for samples in each flow cell lane. These metrics are captured upon run completion.
Table 5: RTA primary analysis metrics captured by MiSeqDx Run (MiSeqDX)step
|
RTA Primary Analysis Metrics |
Corresponding LIMS custom fields / UDFs |
|
Raw Yield (Gb) |
Yield PF (Gb) R1 Yield PF (Gb) R2 |
|
% Bases >Q30 |
% Bases >=Q30 R1 % Bases >=Q30 R2 |
|
Cluster Density (K/mm^2) |
Cluster Density (K/mm^2) R1 Cluster Density (K/mm^2) R2 |
|
Clusters Raw |
Clusters Raw R1 Clusters Raw R2 |
|
Clusters PF |
Clusters PF R1 Clusters PF R2 |
|
%PF |
%PF R1 %PF R2 |
|
Intensity Cycle 1 |
Intensity Cycle 1 R1 Intensity Cycle 1 R2 |
|
% Intensity Cycle 20 |
% Intensity Cycle 20 R1 % Intensity Cycle 20 R2 |
|
% Phasing |
% Phasing R1 % Phasing R2 |
|
% Prephasing |
% Prephasing R1 % Prephasing R2 |
|
% Aligned |
% Aligned R1 % Aligned R2 |
|
% Error Rate |
% Error Rate R1 % Error Rate R2 |
| 1. | The sequencing service may run on the LIMS server in an on-premise environment or on a remote server in a SaaS environment. The service detects event files that the instrument software (RTA) is producing as the run progresses; this in turn lets the service know where to find the run data. |
| 2. | As the run data is written out and the events come in (Begin Run, Cycle Complete, End Run): |
| • | The data is matched to the step based on the reagent cartridge ID, which was entered by the user as the Container Name on the Denature, Dilute and Load Sample 1.0 step. |
| • | Read-only field values on the Record Detailsscreen are populated accordingly (Figure 27). |
| 3. | Run report generation: |
| • | Run report generation is completely asynchronous; the sequencing service does not wait for the report generation to complete before processing the next event file. |
| • | The report is generated by an automation script - AUTOMATED - Run Report Generation, configured on the MiSeqDx Run (MiSeqDx) 1.0 step. |
| • | The script is configured to be invoked by a button on the Record Details screen; however, it is automatically invoked by the sequencing service when it has finished processing the end run event. |
|
|
| – | An additional shared result file placeholder is configured on the step. This is for a new log file - Illumina Run Report Log File - that is generated and attached to the step when the report runs (Figure 28). |
| – | The run report generation script is part of the BaseSpaceLIMS-miseqdx-extensions package. |
| – | The run report may be successfully generated in a hosted deployment of the LIMS, where the sequencing service is running on a remote server on the customer network. |
Figure 28: Record Details screen of MiSeqDx Run (MiSeqDX) 1.0 step showing AUTOMATED - Run Report Generation button and attached script-generated files
|
Constraints: Following the sequencing run, the run report will be automatically generated by the AUTOMATED - Run Report Generation automation. Do not change this name – it is expected by the sequencing service that captures instrument run results. The base name is stored in the sequenceProcessBaseName database property (see Table 7). If this name is changed without the database property being updated, the 'flow cell ID <-> sequencing step base name' matching will fail. Known limitation: On the Record Details screen, if the user clicks the Next Steps button before the run report has been automatically generated and attached to the step, they will not be able to return to the step and re-generate the report (run report generation can neither be invoked by the sequencing service, nor through the user interface via the automation script.) However, the user can refer to the run metrics that are populated in the grid at the bottom of the Record Details screen. If the user clicks the Next Steps button before data has been parsed into the step, there will be no data populated on the Record Details screen for that run. |
On the Record Details screen, do not click the AUTOMATED - Run Report Generation button. The run report is generated and attached to the step automatically. This process may take a while.
On the Record Details screen of the MiSeqDx Run (MiSeqDX) 1.0 step:
| 1. | The read-only field values are automatically populated as the sequencer runs. |
| 2. | Once the run has completed: |
| • | The read-only fields shown in Figure 27 are populated. |
| • | The Illumina Run Report and Log File are generated and attached. |
| • | The Run Parameters and Run Info files are attached. |
| • | The Link to Run Folder is generated and attached. |
| • | QC flags are set on each lane. |
| 3. | (Optional) In theFiles section, upload the Lab Tracking Form. 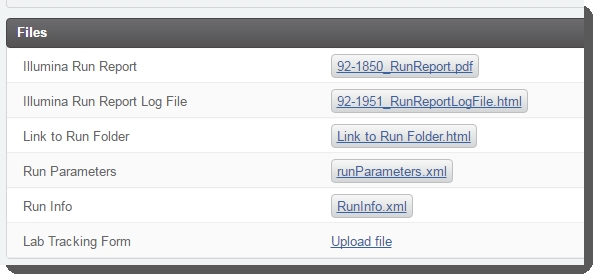 Figure 29: Record Details screen (Files section) of MiSeqDx Run (MiSeqDX) 1.0 step Figure 29: Record Details screen (Files section) of MiSeqDx Run (MiSeqDX) 1.0 step |
| 4. | On the Assign Next Steps screen, assign the samples to the VariantCalling (MiSeqDx) 1.0 step and click Finish Step. 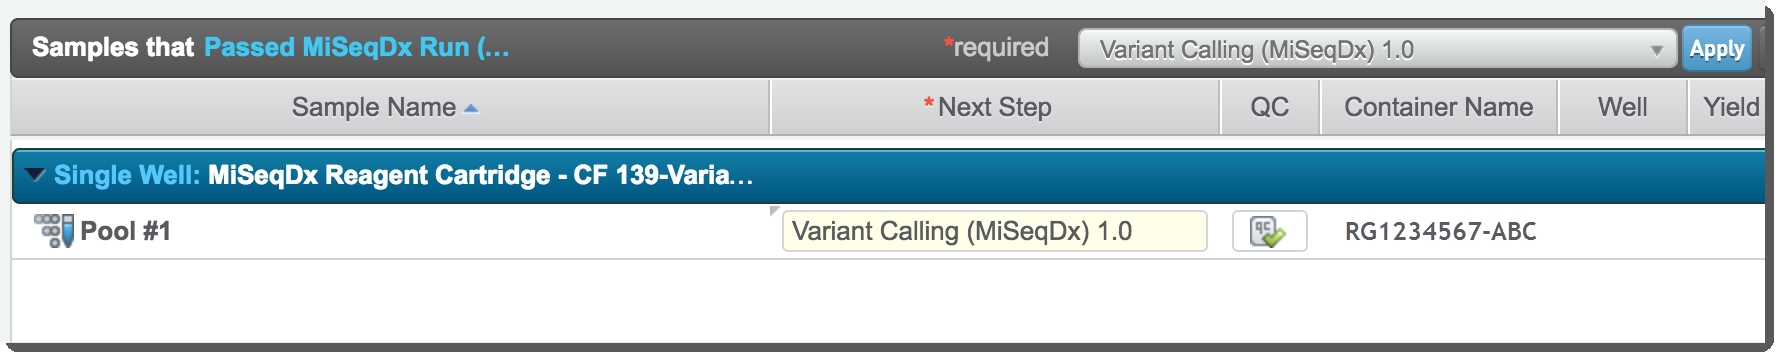 Figure 30: Assigning samples to the Variant Calling (MiSeqDx) 1.0 step Figure 30: Assigning samples to the Variant Calling (MiSeqDx) 1.0 step |
Secondary analysis output files attachment
The Variant Calling (MiSeqDX) step attaches secondary analysis output files for each of the samples.
In addition, a combined variant call file, a text file, and a variant call file for each individual sample are automatically captured following the completion of secondary analysis.
While the EndRun event is processed successfully for primary analysis, the sequence service generates a BeginSecondaryAnalysis event file in the same directory, specified by the miseqdex.seqservice.eventFileDirectory property.
An example of the secondary analysis event file, event-BeginSecondaryAnalysis-14141824.txt, has the following items:
netFolder = D:\Illumina\MiSeqOutput\161017_M99999_0047_FC1234567-ABCDErunNetworkLocation = /mnt/ussd-dev-mdx01/MiSeqOutput/161017_M99999_0047_FC1234567-ABCDEeventType = BeginSecondaryAnalysissoftwareType = MRScreationTime = Thu Oct 20 22:56:32 GMT 2016
This event file signals that secondary analysis has started. The sequence service periodically checks if the analysis is complete by looking for the appearance of the CompletedJobInfo.xml file in the folder specified by the runNetworkLocation parameter of the event file.
The frequency of checking is defined by the miseqdx.seqservice.synchronizationPeriod property.
| • | If the completion file appears, the sequence service processes the event. The event is archived in a similar way to how the EndRun event file is handled. |
| • | If the event completion does not appear within the number days specified by the miseqdex.seqservice.ignoreUnmatchedContainerIdsWaitDays property, the service stops monitoring the event file and the file is archived. |
Table 6 describes the Variant Call Format (VCF) files that the LIMS captures and attaches to the step following secondary analysis.
Table 6: Variant Call Format files captured by the LIMS following secondary analysis
|
Description |
|
|
Combined Variant Call File |
Variant call VCF files for all samples are compressed into a zip file and attached to the step for every run. Available for all 3 assays. |
|
Combined Output Text File |
For CF Clinical Sequencing Assay and CF 139-Variant Assayonly, a text file containing the summary of variant call information for all samples is attached for every run. |
|
Variant Call File per sample |
The general variant call VCF file (not CFTR VCF file) for each sample is attached. Available for all 3 assays. |
Following primary analysis, secondary analysis runs on the MiSeqDx instrument. LIMS service detects the completion of secondary analysis and this in turn lets the service know where to find the result files.
On the Record Details screen of the Variant Calling (MiSeqDX) 1.0 step:
| 1. | The file-naming format for the VCF file is SampleName_S#.vcf, where SampleName is the value in the Sample_Name column of the sample sheet, and # is the sample number determined by the order in which samples are listed in the sample sheet. |
| 2. | Once secondary analysis has completed: |
| • | A Combined Variant Call File is attached to the step, this is a compressed VCF file (zip file) containing all the variant call files, including the CFTR specific VCF files (Figure 31). |
| • | A Combined Output Text File is attached to the step, this is a combined text file containing a summary of all the sample metrics (Figure 31). |
| • | The Variant Call File per individual sample is attached (Figure 31). |
QC flags are set on each lane (Figure 31).
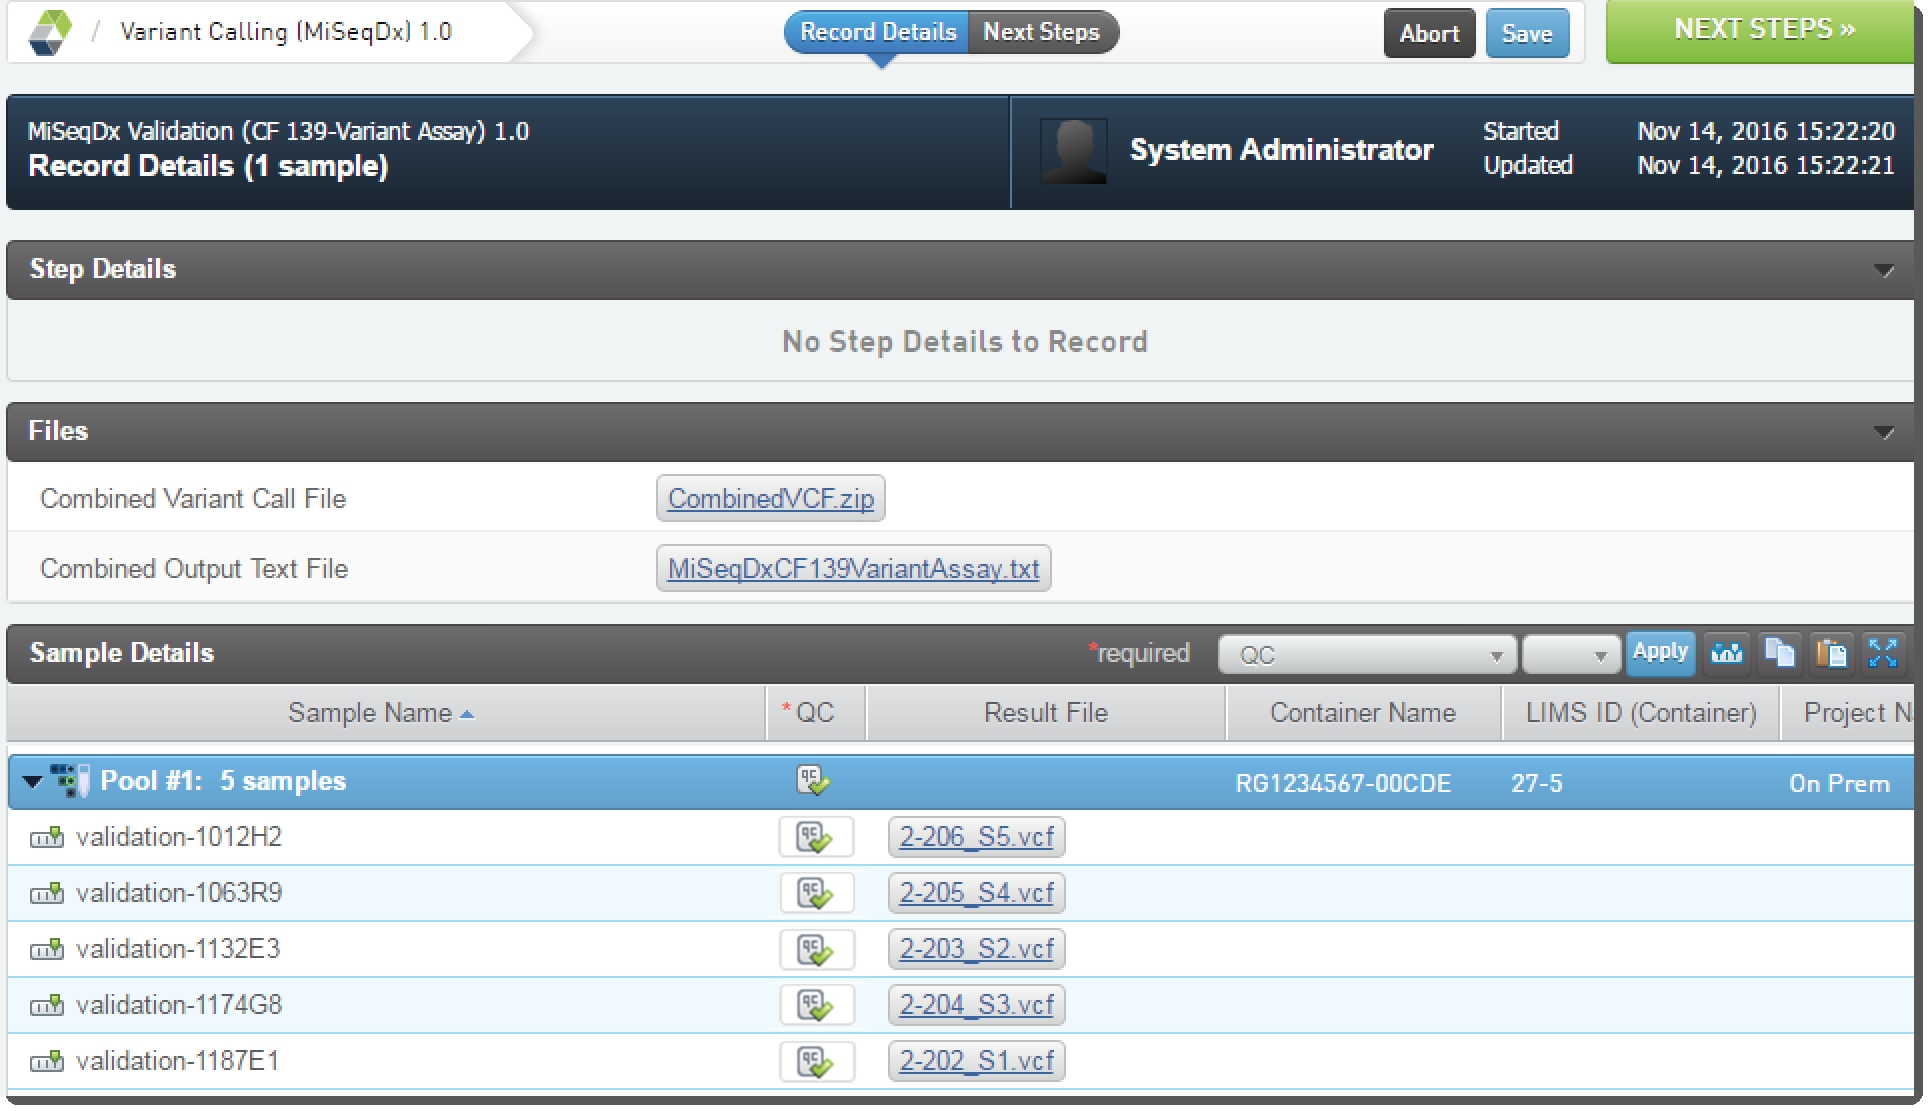
Figure 31: Variant Calling (MiSeqDX) 1.0 - QC flags set and files attached
Components installed with this integration
The Illumina MiSeqDx Integration RPM package installs the scripts and files listed in Table 7. Note that this integration requires installation of the associated NGS Extensions Package (see Release Notes).
Additional component details are provided in the four sections following the table:
| • | Database properties |
| • | Reagent categories / label groups |
| • | Reagent kits |
| • | Controls |
| • | Container types |
Table 7: Illumina MiSeqDx Integration RPM package - scripts and files installed
|
Files Installed |
Location and Description |
|
configure_extensions_miseqdx_workflow.sh |
/opt/gls/clarity/config/ Script that imports the integration configuration. |
|
miseqdx-extensions.jar |
/opt/gls/clarity/extensions/miseqdx Jar file containing API-based LIMS extensions used throughout the protocols. |
|
configure_extensions_miseqdx_sequencingservice.sh |
/opt/gls/clarity/config/extensions/miseqdx Script that imports the database properties for the integration. |
|
log4j.xml |
/opt/gls/clarity/extensions/miseqdx/SequencingService/conf File containing the settings for the sequencing jar’s logging. |
|
miseqdx-sequencing-report.jar |
/opt/gls/clarity/extensions/miseqdx/ Jar file containing API-based LIMS extensions used for report generation. |
|
miseqdx-sequencing.jar |
/opt/gls/clarity/extensions/miseqdx/SequencingService Sequencing service jar file that captures the run results. |
|
miseqdx_seqservice |
/opt/gls/clarity/extensions/miseqdx/SequencingService/bin Provides commands for interacting with the sequencing service. Accessible at /etc/init.d |
|
run_miseqdx_seqservice |
/opt/gls/clarity/extensions/miseqdx/SequencingService/bin Called by miseqdx_seqservice-v1, this script performs some basic system validation, then starts the sequencing service. |
|
MiSeqDxIntegrator.log |
/opt/gls/clarity/extensions/miseqdx/SequencingService Log file for Sequencing service. |
Table 8 lists the database properties installed with the Illumina MiSeqDx Integration Package.
Note that several additional properties, each with the ‘99’ suffix appended to their name, are also installed. These are intended for use by the LIMS support team in automated validation tests and are not listed in the table.
|
Constraints Sequencing runs are matched using the flow cell ID and the sequencing step’s base name – MiSeqDx Run (MiSeqDx). Do not change this name – it is expected by the sequencing service that captures instrument run results. The base name is stored in the sequenceProcessBaseName database property (see Table 8). If this name is changed without the database property being updated, the 'flow cell ID <-> sequencing step base name' matching system will fail. If required, you may modify the step name by editing or adding to the text after the base name portion as this is not used in the matching system. For example, you could change MiSeqDx Run (MiSeqDX) 1.0 to MiSeqDx Run (MiSeqDX)v1. |
Table 8: Database properties installed with the Illumina MiSeqDx Integration Package
|
Property |
Description |
Default Value |
|
miseqdx.seqservice.ignoreUnmatchedContainerIds |
A flag indicating if event files that cannot be matched to flow cells in the LIMS should be archived after a certain period of time (true), or continually reprocessed (false). |
false Note: To prevent the gls_events file directory from becoming cluttered, it is recommended that the value of this property is set to ‘true’. |
|
miseqdx.seqservice.ignoreUnmatchedContainerIdsWaitDays |
The number of days between when the event is created and the event file is archived. |
14 |
|
miseqdx.seqservice.synchronizationPeriod |
Invocation period in seconds. |
60 |
|
miseqdx.seqservice.sequenceProcessBaseName |
Sequencing process type base display name. Partial matching is used to look up the process type. |
MiSeqDx Run (MiSeqDx) |
|
miseqdx.seqservice.eventFileDirectory.1 |
A network location monitored for event files. |
/mnt/gls_events |
|
miseqdx.seqservice.netPathPrefixSearch.1 |
The network directory prefix contained in the event file. |
\\nas\network\run_data |
|
miseqdx.seqservice.netPathPrefixReplace.1 |
The mapped network directory mount name on the server used to access the run data directory. |
/mnt/run_data |
|
miseqdx.seqservice.eventFileDirectorySuffixes |
A list of eventFileDirectory path entries to monitor for event files. The value is one or more comma separated integers. |
99 |
|
miseqdx.seqservice.runReportViewsVersion |
The current version of the Run Report views in the database. The value 0 represents the state before the views are created. This property is automatically updated by the run report. |
0 |
|
miseqdx.seqservice.netPathPrefixSearchReplaceSuffixes |
A list of netPathPrefix search and replace entries for transforming Windows to Linux network paths. The value is one or more comma-separated integers. |
99 |
|
miseqdx.seqservice.variantCallingProcessBaseName 'Variant Calling (MiSeqDx)' |
Sequencing process type base display name. Partial matching is used to look up the process type. |
Variant Calling (MiSeqDx) |
Support for multiple seqservice.netPathPrefixSearch property values
It is possible to configure support for multiple, identical seqservice.netPathPrefixSearch property values. For details, see Configuring Multiple Identical netPathPrefixSearch Values.
Reagent categories / label groups installed
The following reagent categories / label groups are included in the default configuration for the Illumina MiSeqDx Integration Package:
| • | CF 139-Variant Assay Indexes |
| • | CF 139-Variant Assay 8-Sample Indexes |
| • | CF Clinical Sequencing Assay 8-Sample Indexes |
| • | Universal Kit Indexes |
| • | Universal Kit 8-Sample Indexes |
The following reagent kits are included in the default configuration for the Illumina MiSeqDx Integration Package:
|
|
The following controls are included in the default configuration for the Illumina MiSeqDx Integration Package:
| • | Negative Control for MiSeqDx |
| • | Positive Control for MiSeqDx |
The following container types are included in the default configuration for the Illumina MiSeqDx Integration Package:
| • | MiSeqDx Flow Cell - Universal Kit |
| • | MiSeqDx Flow Cell - CF 139-Variant Assay |
| • | MiSeqDx Flow Cell - CF Clinical Sequencing Assay |
| • | MiSeqDx Reagent Cartridge - CF 139-Variant Assay |
| • | MiSeqDx Reagent Cartridge - CF Clinical Sequencing Assay |
| • | MiSeqDx Reagent Cartridge - Universal Kit |
See also Support for container types.
|
To ensure that your Illumina instrument warranty remains valid, the instrument integration must be performed and maintained by the LIMS support team. To perform this integration, the LIMS support team will require direct access to the instrument via WebEx or Remote Desktop while the instrument is idle. |
Below is an overview of the steps performed by the LIMS support team when configuring the instrument for use with the Illumina MiSeqDx Integration to LIMS.
Configuring the Illumina instrument:
| 1. | Create directory on the local computer to hold the batch files. These batch files write event files to the network attached storage (NAS) share(s). |
| 2. | Create directory on the NAS to hold the event files. |
| 3. | Modify Illumina software configuration files to call the batch files that create the event files. |
| 4. | Update sequencing service default database properties to match the specifics of the installation. |
We recommend configuring sequencer instrument names in LIMS to track the specific lab instrument on which a run was completed.
This information should be configured on the MiSeqDx Run (MiSeqDx) 1.0 step, and should be set to the same name as is configured in the Illumina sequencing software – i.e., this will be value of the Instrument Run ID field described in the Metadata section above.
When the integration reads the Instrument Run ID field in the run results, it will update the instrument on the step in LIMS, eliminating the need for the user to manually enter this information.
For instructions on configuring instrument names, refer to the LIMS Documentation – see Adding Instruments and Instrument Types in the System Configuration forum.
Configuring sample sheet generation
Sample sheet generation occurs on the step prior to the sequencing run – Denature, Dilute and Load Sample 1.0 – which is the step where samples are placed on the container that will be loaded in the instrument.
By default, one instrument sample sheet is created for the container loaded during the Denature, Dilute and Load Sample 1.0 step.
All one-dimensional container types with both numeric rows and numeric columns are supported.
This integration operates with the following constraints:
| • | The Reagent Cartridge ID must be unique. There should not be multiple containers in the system with the same name. |
| • | The reagent cartridge ID must be scanned as the Container Name on the Denature, Dilute and Load Sample 1.0 step. |
| • | For MOS sample sheet generation constraints, see Illumina MiSeqDx 1.x Sample Sheet Generation. |
