Illumina NextSeq 500/550 Integration v2.0 Validation and Troubleshooting Guide
Contents
Introduction
This guide explains how to validate the installation of the Illumina NextSeq 500/550 Integration Package v2.0.
The validation process involves:
|
•
|
Running samples through the Library Prep Validation v1.0 workflow. The workflow contains a single-step protocol that models the library prep required to produce normalized libraries. At the end of the step, the normalized libraries are automatically advanced to the NextSeq 500/550 Sequencing v1.0 workflow. |
|
•
|
Running normalized libraries through the NextSeq 500/550 Sequencingv1.0 workflow. This validates the following:Automated generation of a sample sheet for use with bcl2fastq2 v2.20.0 analysis software. |
|
–
|
Automated tracking of the NextSeq sequencing run and parsing of run statistics into the LIMS, including:Run status and metrics of sequencing run |
|
–
|
Sequencing run parameters |
|
–
|
Real Time Analysis v2 (RTA2) run directory location and other run specific information |
Validation Steps
Activate Workflow, Create Project, Add and Assign Samples
The following steps set up the LIMS in preparation for running samples through the Library Prep Validation v1.0 and NextSeq 500/550 Sequencing v1.0 workflows.
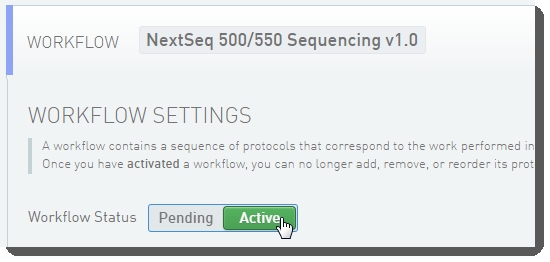
1. Activate the Workflows
|
•
|
In the LIMS configuration area, activate the Library Prep Validation v1.0 and NextSeq 500/550 Sequencing v1.0 (shown below) workflows. |
Workflow configuration and activation - LIMS v4.2

Workflow configuration and activation - LIMS v5.0
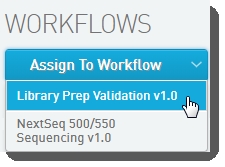
2. Create a Project, Add Samples
|
1.
|
On the Projects and Samples screen, create a project and add samples to it. |
|
2.
|
Assign your samples to the Library Prep Validation v1.0workflow. |
Library Prep Validation v1.0 Protocol
This single-step protocol models the library prep required to produce normalized libraries that are ready for the NextSeq 500/550 Sequencing v1.0 workflow.
Run Library Prep Validation v1.0 Step
|
1.
|
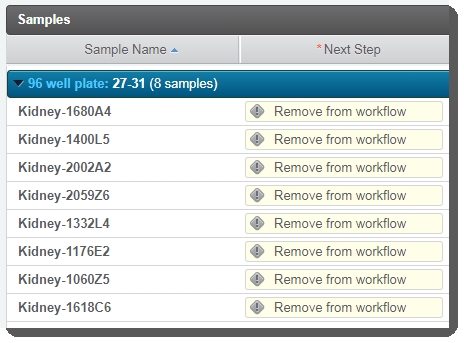
In Lab View, locate the Library Prep Validation v1.0 protocol. You will see your samples queued for the Library Prep Validation v1.0step. |
|
2.
|
Add the samples to the Ice Bucket and click View Ice Bucket. |
|
3.
|
On the Ice Bucket screen, click Begin Work. |
|
4.
|
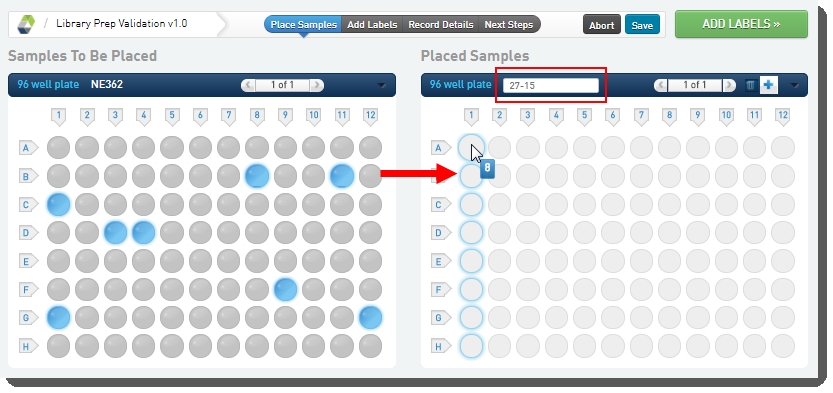
On the Placement screen: |
|
a.
|
In the Placed Samples area on the right, in the container field, scan or enter the barcode of the destination container. |
|
b.
|
Select the samples from the Samples to be Placed area on the left, and then drag them over to the container wells on the right. |
|
5.
|
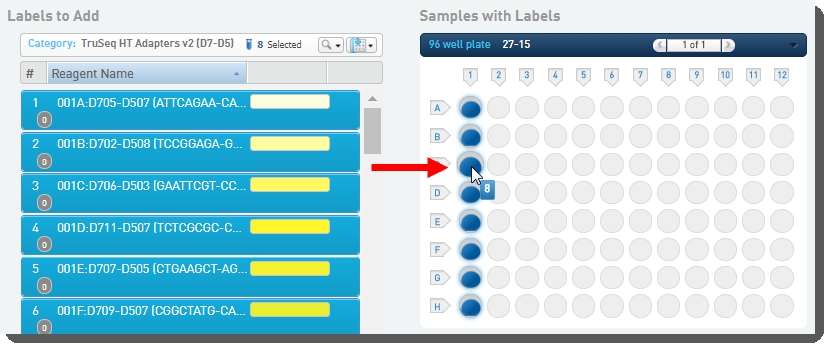
On the Add Labels screen: |
|
a.
|
Select labels on the left, and drag them over to the container on the right to assign them to placed samples. |
|
6.
|
On the Record Details screen: |
|
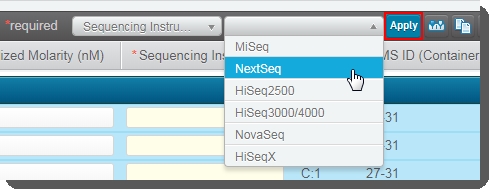
a.
|
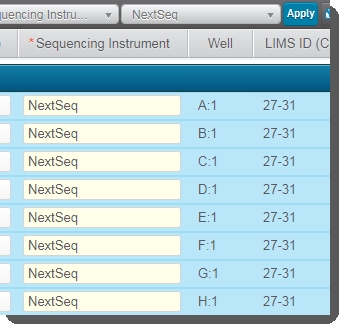
Select all of the samples in the Sample Details table and then in the Sequencing Instrument dropdown list, select NextSeq. |
|
b.
|
Click Applyto set this value for all selected samples. |
|
7.
|
On the Assign Next Steps screen, the next step is already set to Remove from Workflow (this is required by theRouting scriptautomation). |
|
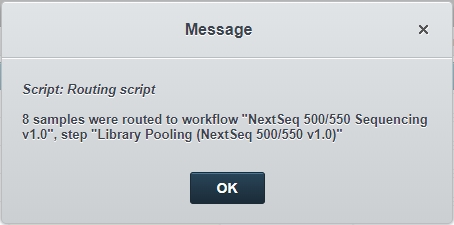
8.
|
Click Finish Step.The Routing script automation is triggered and samples are automatically routed to the first step in the NextSeq 500/550 Sequencing v1.0 protocol - Library Pooling (NextSeq 500/550 v1.0). |
NextSeq 500/550 Sequencing v1.0 Protocol
1. Run Library Pooling (NextSeq 500/550 v1.0) Step
|
1.
|
In Lab View, locate the NextSeq 500/550 Sequencing v1.0 protocol. You will see your samples queued for the Library Pooling (NextSeq 500/550 v1.0) step. Click the step to proceed to the Queuescreen. |
|
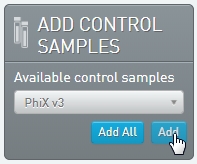
a.
|
Add the samples to the Ice Bucket. In the Add Control Samples panel, add the PhiX v3 control sample to the Ice Bucket. |
|
b.
|
Click View Ice Bucket. |
|
3.
|
On the Ice Bucket screen, click Begin Work. |
|
4.
|
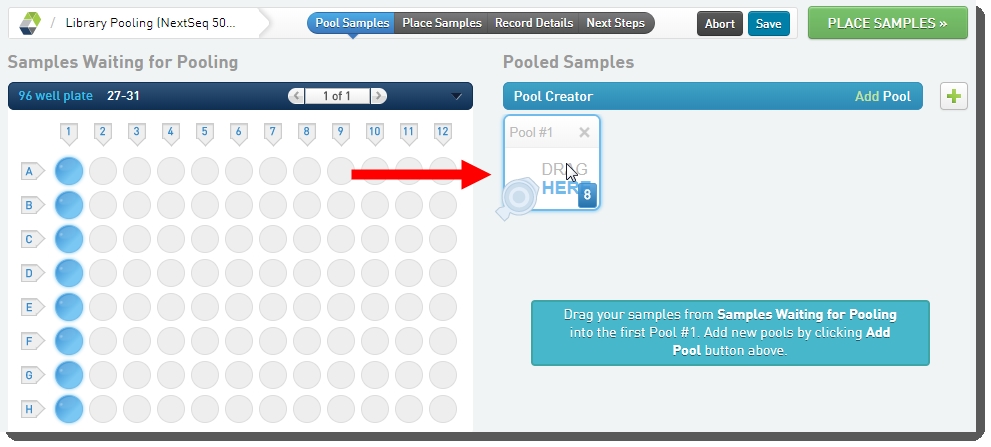
On the Pool Samples screen: |
|
a.
|
Create a pool of samples by dragging samples into the Pool Creator. |
|
b.
|
Name the pool, or accept the default name - Pool #1. |
|
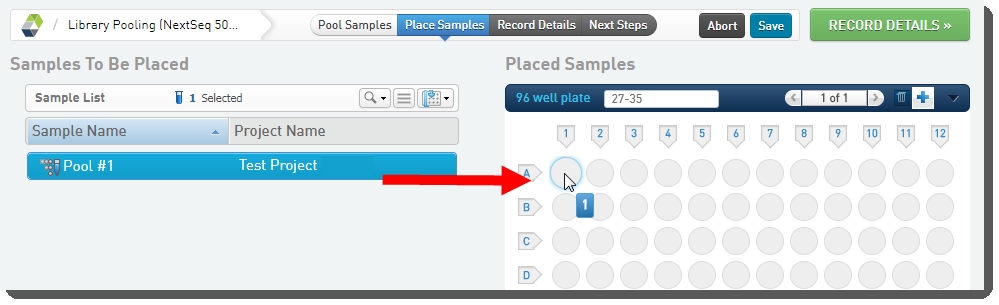
5.
|
On the Placement screen: |
|
a.
|
Select the pool in the Samples to be Placed area on the left and drag it over to the container on the right. |
|
6.
|
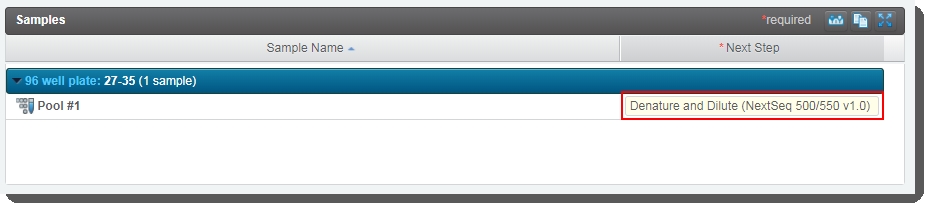
On the Record Details screen, click Next Steps. |
|
7.
|
On the Assign Next Steps screen, next step is already set to Denature and Dilute (NextSeq 500/550 v1.0). |
2. Run Denature and Dilute (NextSeq 500/550 v1.0) Step
|
1.
|
In Lab View, locate the NextSeq 500/550 Sequencing v1.0 protocol. You will see your pooled samples queued for the Denature and Dilute (NextSeq 500/550 v1.0) step. Click the step to proceed to the Queuescreen. |
|
2.
|
On the Queue screen, add the pool to the Ice Bucket and click View Ice Bucket. |
|
3.
|
On the Ice Bucket screen, click Begin Work. |
|
4.
|
On the Placement screen: |
|
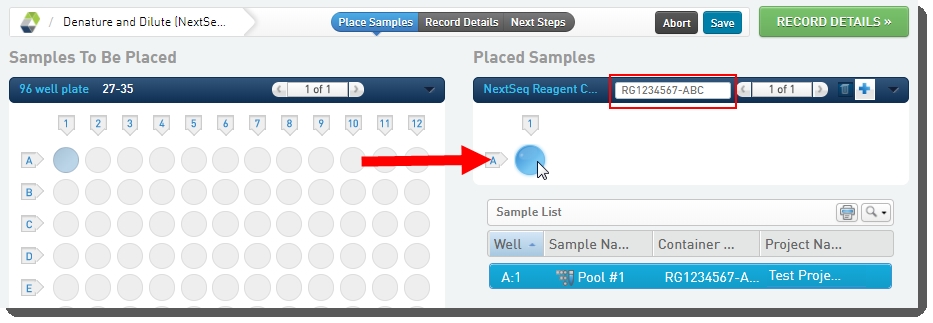
a.
|
Scan the NextSeq reagent cartridge barcode into the NextSeq Reagent Cartridge field. |
|
b.
|
Place the pool of samples into the reagent cartridge. |
|
5.
|
On the Record Details screen: |
|
6.
|
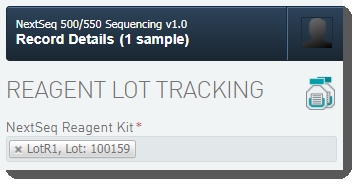
Under Reagent Lot Tracking, select the reagent lot used in the step. (You may need to add/activate the lot on the Reagents and Controlsscreen.) |
|
a.
|
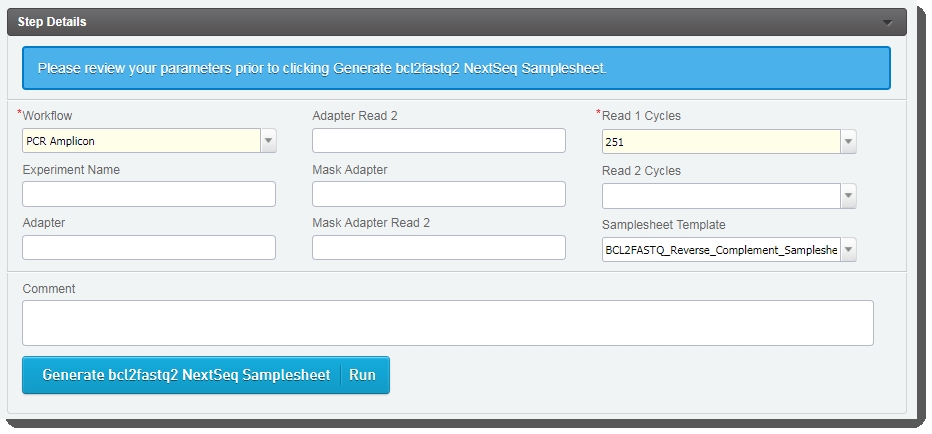
In the Step Details table, populate the fields as appropriate. Note the following:Workflow and Read 1 Cycles are required fields. |
|
b.
|
In the Samplesheet Template drop-down list, the reverse complement template is selected by default. Do not change this value. |
|
c.
|
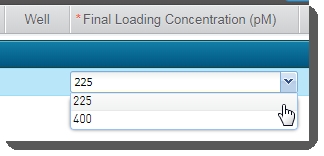
In the Sample Details table, enter the Final Loading Concentration. You may select from the two preset options - 225 (for PCR-free workflows) or400(for Nano workflows), or enter a different value. |
|
d.
|
Click Generate bcl2fastq2 NextSeq SampleSheet. |
|
e.
|
The LIMS generates the samplesheet and attaches it and a log file to placeholders in the Files area of the Record Detailsscreen. Download the files and validate their format and content. |
|
7.
|
On the Assign Next Steps screen, samples are already assigned to the NextSeq 500/550 Run (NextSeq 500/550 v1.0) step. |
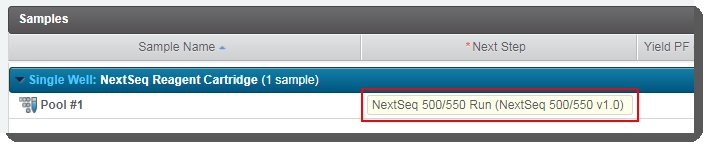
3. Run NextSeq 500/550 Run (NextSeq 500/550 v1.0) Step
|
1.
|
In Lab View, locate the NextSeq 500/550 Sequencing v1.0 protocol. You will see your pool of samples queued for the NextSeq 500/550 Run (NextSeq 500/550 v1.0) step. Click the step to proceed to the Queuescreen. |
|
2.
|
Add the pool to the Ice Bucket and click View Ice Bucket. |
|
3.
|
On the Ice Bucket screen, click Begin Work. |
|
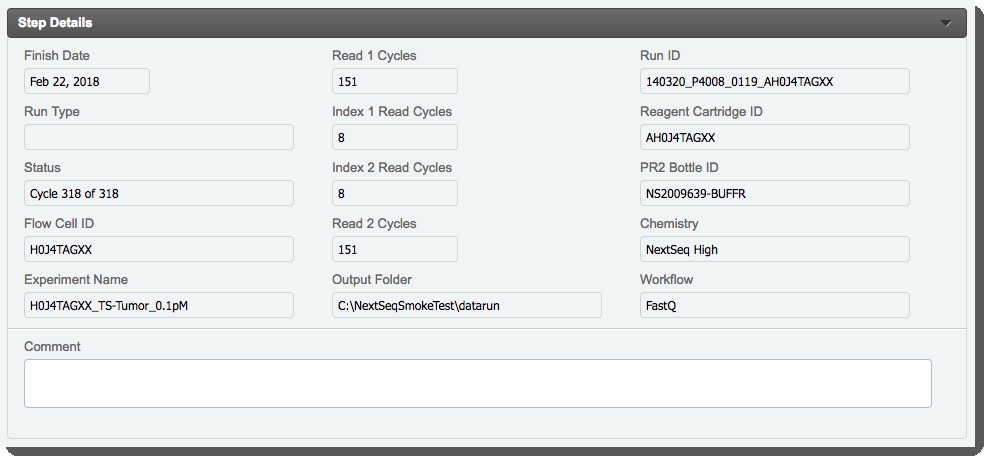
4.
|
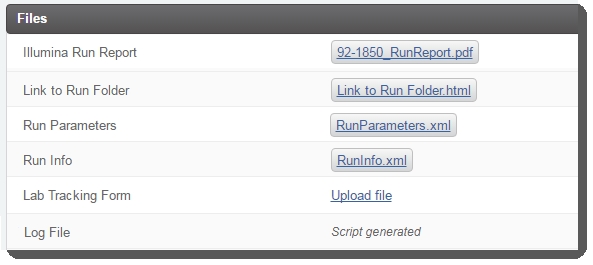
On the Record Details screen, the fields in the table are read-only. Once the run completes, the integration will automatically: |
|
•
|
Attach files to the Illumina Run Report, Link to Run Folder, Run Parameters, and Run Info placeholders. (Note that the Log File is attached once the next step for samples has been assigned by the Next Step - Advanceautomation.) |
Do not continue to step 5 and complete the step until the Illumina Run Report has been attached.
|
•
|
Populate the fields in the Sample Details table. See User and Configuration Guide for details. |
|
6.
|
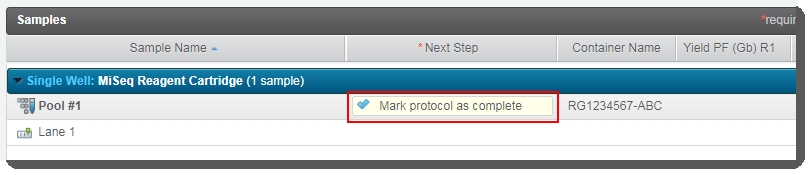
On the Assign Next Steps screen, the next step is already set to Mark protocol as complete. |
Validating Creation of Event Files
Follow the steps below to confirm that event files are created by the batch file in the destination path. The steps assume that the default configuration has been successfully imported.
This test validates that:
|
•
|
Your DESTINATION_PATH is correctly configured. |
|
•
|
The instrument computer can access and write to the DESTINATION_PATH. |
|
•
|
There are no syntax errors in the LIMS batch file. |
Steps
|
1.
|
In C:\gls, double-click gls_event_ncs_rta.bat |
|
2.
|
Confirm that an ‘empty’ event file appears in the configured DESTINATION_PATH. |
Manual invocation of the batch file will produce output resembling the following:
Filename: event-EndRun-07295667.txt
Contents: cycleNumber = runFolder = netFolder = \\eventType = EndRun softwareType = NCSfinishDate = 2018-03-31
Troubleshooting
If an automation trigger does not appear to run its corresponding scripts, see:
|
•
|
Troubleshooting Automated Informatics in the LIMS documentation (Automated Informatics section) |
|
•
|
Troubleshooting EPP / Automation in the API > API Overview > API Advanced Topics section |
If an error occurs that does not provide direction on how to proceed:
|
•
|
Confirm the version of the installed Illumina NextSeq Integration Package by running the following command from the server console: |
rpm -qa | grep -i nextseq
If the error is related to data parsing, retrieving run results data, or report values not appearing as expected:
|
•
|
Review the NextSeqIntegrator.log file, located at /opt/gls/clarity/extensions/Illumina_NextSeq/v2/SequencingService |
Additional troubleshooting information for this integration is provided on the Illumina Integrations FAQ page.
If you are unable to resolve the issue, contact the BaseSpace Clarity LIMS Support team, supplying the relevant information from the troubleshooting already performed.