
Illumina NovaSeq 6000 Integration v2.1 User and Configuration Guide
The Illumina NovaSeq 6000 Integration Package v2.1 supports the integration of BaseSpace Clarity LIMS to Illumina NovaSeq 6000 sequencers.
This User and Configuration Guide describes the integration and includes information about the preconfigured protocols, steps, and automations; installed components; and configuration requirements, rules, and constraints.
For instructions on validating and troubleshooting the Illumina NovaSeq 6000 Integration, see the NovaSeq 6000 Integration v2.1 - Validation and Troubleshooting Guide.
The integration includes the following functionality:
| • | Preconfigured NovaSeq 6000 v2.0 workflow that maps to lab protocols and instrument runs. |
| • | Preconfigured NovaSeq Standard (NovaSeq 6000 v2.0) protocol that supports the loading of pooled libraries into a library tube. |
| • | Preconfigured NovaSeq Xp (NovaSeq 6000 v2.0) protocol (hidden) that allows for the support of future functionality. For details, see Note below. |
| • | Automated generation of a sample sheet for use with bcl2fastq2 v2.19 analysis software. |
| • | Automatic generation of run recipe file (JSON format) that is automatically uploaded to the sequencing instrument and used to set up and initiate the run. |
| • | Automated tracking of the NovaSeq sequencing run and parsing of run statistics (per run per lane) into the LIMS, including:Progress and metrics of sequencing run |
| – | Per-instrument sequencing runs (tracked as part of the Run ID field value) |
| – | Sequencing run parameters |
| – | Real Time Analysis v3 (RTA3) run directory location and other run specific information |
| • | Preconfigured NovaSeq Validation Library Prep (NovaSeq 6000 v2.0) workflow used for validation purposes only. The workflow contains a single-step protocol that models the library prep required to produce normalized libraries that are ready for the NovaSeq 6000 v2.0 workflow. For details, see the NovaSeq 6000 Integration v2.1 - Validation and Troubleshooting Guide. |
Information on these features is provided in the following sections.
|
The NovaSeq Xp (NovaSeq 6000 v2.0) protocol will support individual lane loading on the NovaSeq in a future release. In NovaSeq 6000 Integration Package v2.1, the protocol is not displayed to users running samples through the LIMS; however, administrator users will see it in the Configuration screen. |
It is assumed that samples enter the NovaSeq 6000 v2.0 workflow as normalized libaries. That is, before they are assigned to the workflow:
| • | Samples have been accessioned into the LIMS. |
| • | Samples have been run through QC and library prep. |
| • | Samples have been normalized, and the value is captured in a field called Normalized Molarity (nM). |
For details on sample accessioning, see the following articles in the LIMS Documentation (Samples section):
| • | Sample Accessioning |
| • | Using Sample Lists to Upload and Modify Samples |
Samples can be assigned to the NovaSeq 6000 v2.0 workflow automatically (using a routing script), or manually from the Projects and Samples dashboard (see the Assigning Samples to Workflows article).
Workflows, protocols, and steps
The Illumina NovaSeq 6000 Integration Package v2.1 includes two workflows:
| • | NovaSeq 6000 v2.0 |
| • | NovaSeq Validation Library Prep (NovaSeq 6000 v2.0) |
Table 1 lists and describes the protocols and steps included in these workflows.
Table 1: llumina NovaSeq 6000 Integration Package v2.1 protocols and steps
|
NovaSeq Validation Library Prep (NovaSeq 6000 v2.0) workflow |
|||||||||||||||||
|
Protocol name |
Protocol purpose |
Steps included in protocol |
|||||||||||||||
|
NovaSeq Validation Library Prep (NovaSeq 6000 v2.0) |
Included for validation purposes only, this protocol models the library prep steps required to advance samples to the Run Format (NovaSeq 6000 v2.0) protocol. The protocol contains a single step - NovaSeq Validation Library Prep (NovaSeq 6000 v2.0). At the end of this step, a routing script sends the samples to the first step of the NovaSeq 6000 v2.0 workflow - Define Run Format (NovaSeq 6000 v2.0). |
|
|||||||||||||||
|
NovaSeq 6000 v2.0 workflow |
|||||||||||||||||
|
Protocol name |
Protocol purpose |
Steps included in protocol |
|||||||||||||||
|
Run Format (NovaSeq 6000 v2.0) |
Allows for the assignment of per sample values for Loading Workflow Type, Normalized Molarity, Flowcell Type, and Final Loading Concentration (pM):
Compares each sample's Normalized Molarity value with the Minimum Molarity value. Routing script sends samples to the NovaSeq Standard protocol, or removes them from the workflow if Normalized Molarity is less than Minimum Molarity. |
|
|||||||||||||||
|
NovaSeq Standard (NovaSeq 6000 v2.0 |
Samples are pooled and added to the library tube in preparation for the NovaSeq run. Routing script sends library tube to the AUTOMATED - NovaSeq Run (NovaSeq 6000 v2.0) protocol. |
|
|||||||||||||||
|
NovaSeq Xp (NovaSeq 6000 v2.0) |
In this release, this protocol is hidden from Lab View and the user cannot route samples to it. See Noteabove. |
||||||||||||||||
|
AUTOMATED - NovaSeq Run (NovaSeq6000 v2.0) |
Samples complete the workflow by going through this protocol. Generation of the samplesheet and the JSON file is dependent on the Loading Workflow Type. Note that in this release, the only supported workflow type is NovaSeq Standard.) This protocol contains 1 fully-automated step. |
|
|||||||||||||||
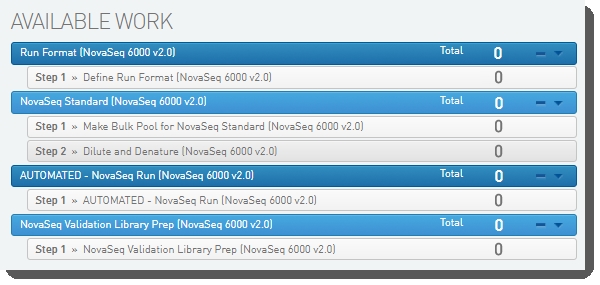
The following image show the protocols and their steps displayed in the LIMS Lab View.
Validation workflow
The NovaSeq Validation Library Prep (NovaSeq 6000 v2.0) workflow allows for validation of the system after installation is complete. For details, see the NovaSeq 6000 Integration v2.1 - Validation and Troubleshooting Guide.
Table 2 lists the step automations included in the NovaSeq 6000 v2.0 workflow. Automation details are provided in the sections following the table.
For details on the validation workflow, see the NovaSeq 6000 Integration v2.1 - Validation and Troubleshooting Guide.
Table 2: NovaSeq 6000 v2.0 workflow step automations
|
Protocol |
Step |
Automation |
|||||||||||||||
|
1. Run Format (NovaSeq 6000 v2.0) |
1. Define Run Format (NovaSeq 6000 v2.0) |
|
|||||||||||||||
|
2. NovaSeq Standard (NovaSeq 6000 v2.0) |
1. Make Bulk Pool for NovaSeq Standard (NovaSeq 6000 v2.0) |
|
|||||||||||||||
|
2. Dilute and Denature (NovaSeq 6000 v2.0) |
|
||||||||||||||||
|
3. NovaSeq Xp (NovaSeq 6000 v2.0) |
In this release, this protocol is hidden from Lab View and the user cannot route samples to it. See Noteabove. |
||||||||||||||||
|
4. AUTOMATED - NovaSeq Run (NovaSeq 6000 v2.0) |
1. AUTOMATED - NovaSeq Run (NovaSeq 6000 v2.0) |
|
|||||||||||||||
The sections below describe the configuration installed with the Illumina NovaSeq 6000 Integration.
|
Note: The Illumina NovaSeq 6000 Integration Package v2.1 supports BaseSpace Clarity LIMS v4.2 and v5.0. As of LIMS v5, the term user-defined field (UDF) has been replaced with custom field in the user interface (the API resource is still called udf). There are two types of custom fields:
|
Protocol 1: Run Format (NovaSeq 6000 v2.0)
This protocol sets the Loading Workflow Type and allows the user to choose the appropriate Flowcell Type and Final Loading Concentration(pM). At the end of the protocol, a routing script sends the normalized libraries to the NovaSeq Standard (NovaSeq 6000 v2.0) protocol.
This protocol contains one step: Step 1: Define Run Format (NovaSeq 6000 v2.0), described below.
Step 1: Define Run Format (NovaSeq 6000 v2.0)
Step input: NTP (normalized libraries)
Step output: None
The following automations are configured on this step:
| • | Routing Script |
| • | Set Next Steps |
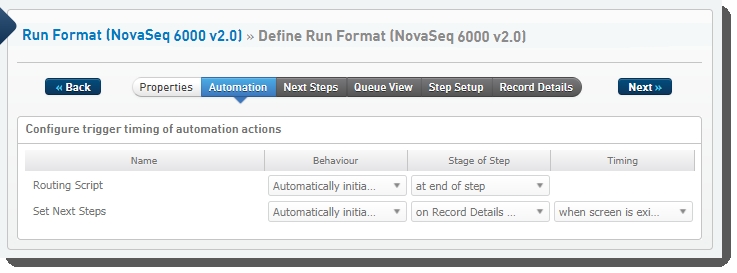 Define Run Format (NovaSeq 6000 v2.0) automation configuration - LIMS v4.2
 Define Run Format (NovaSeq 6000 v2.0) automation configuration - LIMS v5
These automations are described below, in the order in which they are triggered at run time
Automatically triggered on exit of the Record Details screen, this automation does the following:
| • | Sets the next step for samples to REMOVE: |
nextStep = ::REMOVE::
| • | Calculates the Minimum Molarity using the following formula: |
input.::Minimum Molarity (nM):: = (5 * input.::Final Loading Concentration (pM)::)/1000
| • | Checks Normalized Molarity value. For samples with no Normalized Molarity value (i.e., empty value, not including 0), generates an error message informing the user that the field cannot be empty: |
if (!input.hasValue(::Normalized Molarity (nM)::)) { fail(::The Normalized Molarity cannot be empty.::) ; }
| • | Compares each sample's Normalized Molarity value with the Minimum Molarity value. |
If Normalized Molarity value is lower than the Minimum Molarity value, sets the sample's Loading Workflow Type to [Remove from workflow] and records a message in the Warning field for the sample:
else if (input.::Normalized Molarity (nM):: < input.::Minimum Molarity (nM)::) { input.::Warning:: = ::The Normalized Molarity is too low.:: ; input.::Loading Workflow Type:: = ::[Remove from workflow]:: ; } else { input.::Warning:: = ::n/a:: }
At this point the user has two options:
| – | Correct the Normalized Molarity value on the Record Details screen. User will also need to edit the Loading Workflow Type field and set it to NovaSeq Standard. |
| – | Complete the protocol without correcting the Normalized Molarity value. In this case, those samples will be removed from the workflow. |
Automatically triggered on exit of the step, this automation invokes the changeWorkflow script, which routes step inputs appropriately.
| • | Samples with Loading Workflow Type field value = NovaSeq Standard are routed to the NovaSeq 6000 v2.0 workflow and queued for the Make Bulk Pool for NovaSeq Standard (NovaSeq 6000 v2.0) step. |
Default automation command line:
bash -c "/opt/gls/clarity/bin/java -jar /opt/gls/clarity/extensions/ngs-common/v5/EPP/ngs-extensions.jar -u {username} -p {password} -i {stepURI:v2} -l {compoundOutputFileLuid0} script:changeWorkflow \\--FIELD_NAME 'Loading Workflow Type' \--FIELD_VALUE 'NovaSeq Standard' \--WORKFLOW 'NovaSeq 6000 v2.0' \--STEP 'Make Bulk Pool for NovaSeq Standard (NovaSeq 6000 v2.0)' \--INPUTS_OR_OUTPUTS 'INPUTS' \\--FIELD_NAME 'Loading Workflow Type' \--FIELD_VALUE 'NovaSeq Xp' \--WORKFLOW 'NovaSeq 6000 v2.0' \--STEP 'Make Bulk Pool for NovaSeq Xp (NovaSeq 6000 v2.0)' \--INPUTS_OR_OUTPUTS 'INPUT
There are two fields defined on the Define Run Format (NovaSeq 6000 v2.0) step.
These fields are shown below in the BaseSpace Clarity LIMS v5 Configuration area (Custom Fields > Master Step Fields tab). See Table 3 for LIMS v4.2 and LIMS v5 field configuration details.

Table 3: Dilute and Denature (NovaSeq 6000 v2.0) step UDF / custom field configuration
|
Field Name |
Field Type |
Field Constraints / Options |
Preset Values / Additional Options and Dropdown Items |
|||||||||
|
Comment |
Multi-line Text |
|
None |
|||||||||
|
Instruction |
Single-line Text (v4.2) Text (v5) |
|
|
Table 4 lists the global UDFs / custom fields that are configured in the LIMS to support the Define Run Format (NovaSeq 6000 v2.0) step.
Table 4: Global UDF / custom field configuration
|
Field Name |
Field Type |
Field Constraints / Options |
Preset Values / Additional Options and Dropdown Items |
||||||||||||||||||
|
Configured on Analyte in LIMS v4.2 and Derived Samplein LIMS v5: |
|||||||||||||||||||||
|
Adjusted Per Sample Volume (ul) |
Numeric |
|
|
||||||||||||||||||
|
Final Loading Concentration (pM) |
Numeric (v4.2) Numeric Dropdown (v5) |
|
|
||||||||||||||||||
|
Flowcell Type |
Single-line Text (v4.2) Text Dropdown (v5) |
|
|
||||||||||||||||||
|
Loading Workflow Type |
Single-line Text (v4.2) Text Dropdown (v5) |
|
|
||||||||||||||||||
|
Minimum Molarity (nM) |
Numeric |
|
|
||||||||||||||||||
|
Normalized Molarity (nM) |
Numeric |
|
|
||||||||||||||||||
|
Per Sample Volume (ul) |
Numeric |
|
|
||||||||||||||||||
| 1. | On the Record Details screen, the Sample Details table contains the following fields that must be completed (values can vary across samples):Loading Workflow Type: As this release of the integration only supports the standard workflow, this field is pre-populated with the value NovaSeq Standard. |
| • | Flowcell Type: User selects S1, S2, or S4 from the drop-down list. |
| • | Final Loading Concentration (pM): User selects from the two preset options - 225 (for PCR-free workflows) or400 (for Nano workflows), or may enter a different value. |
| • | Normalized Molarity: User enters a value for each sample. |
| • | User clicks Next Steps. This triggers the Next Steps automation, which does the following: Sets the value of the next step (for all samples) to Remove from workflow. The Routing Script automation expects this value, and requires it in order to successfully advance samples to the next step. |
| – | Calculates the Minimum Molarity. |
| – | Checks Normalized Molarity value. For samples with no Normalized Molarity value (i.e., empty value, not including 0), generates an error message informing the user that the field cannot be empty. |
| – | Compares each sample's Normalized Molarity value with the Minimum Molarity value. |
| 2. | On the Assign Next Steps screen: |
| • | In the Sample Details table, the Next Step for all samples is pre-populated with Remove from workflow - regardless of the Loading Workflow Type  The user must not change this value! If Next Step is not set to Remove from workflow, the routing script will not be able to route samples correctly. The user must not change this value! If Next Step is not set to Remove from workflow, the routing script will not be able to route samples correctly. |
| • | For samples whose Normalized Molarity value was found to be lower than the Minimum Molarity value, the Loading Workflow Type is set to Remove from workflow and a message is recorded in the Warning field for the sample. At this point the user has two options: |
| – | Return to the Record Details screen and adjust the Normalized Molarity value so that it equals or exceeds the Minimum Molarity value. User will also need to set the Loading Workflow Type to NovaSeq Standard. |
| – | Complete the protocol without correcting the Normalized Molarity value. In this case, the samples in question will be removed from the LIMS workflow. |
| 3. | User clicks Finish Step. The Routing Script automation is triggered: |
| • | Samples whose Loading Workflow Type is set to Remove from workflow (i.e., whereNormalized Molarity value is lower than the Minimum Molarity) are removed from the LIMS workflow. |
| • | Samples whose Loading Workflow Type is set to NovaSeq Standard are routed to the Make Bulk Pool for NovaSeq Standard (NovaSeq 6000 v2.0) step. This is the first of two steps in the NovaSeq Standard (NovaSeq 6000 v2.0) protocol. |
Protocol 2: NovaSeq Standard (NovaSeq 6000 v2.0)
Samples are routed to this protocol if their Loading Workflow Type value is set to NovaSeq Standard. Samples are pooled and added to a library tube in preparation for the NovaSeq run.
At the end of this protocol, a routing script sends the library tube to the AUTOMATED - NovaSeq Run (NovaSeq 6000 v2.0) protocol.
This protocol contains two steps, described below:
| • | Step 1: Make Bulk Pool for NovaSeq Standard (NovaSeq 6000 v2.0) |
| • | Step 2: Dilute and Denature (NovaSeq 6000 v2.0) |
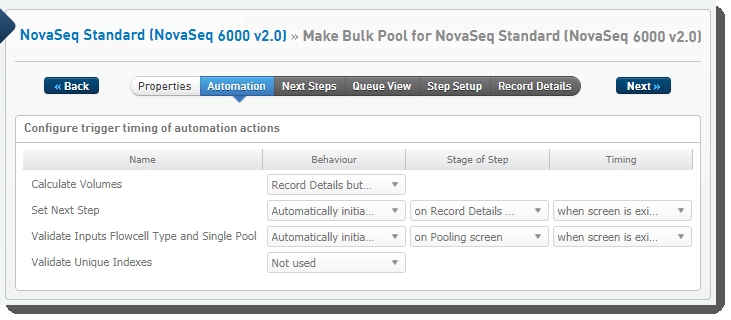
Step 1: Make Bulk Pool for NovaSeq Standard (NovaSeq 6000 v2.0)
In this step, user manually places libraries into a single pool. Resuspension buffer and reagents are added.
|
Note: User must only create one pool per step. |
Step input: NTP (normalized libraries)
Step output: Bulk pool
The following automations are configured on the step:
| • | Calculate Volumes |
| • | Set Next Step |
| • | Validate Inputs Flowcell Type and Single Pool |
| • | Validate Unique Indexes(Not used. This functionality is handled by the core LIMS configuration for pooling.) |
 Make Bulk Pool for NovaSeq Standard (NovaSeq 6000 v2.0) automation configuration - LIMS v4.2
 Make Bulk Pool for NovaSeq Standard (NovaSeq 6000 v2.0) automation configuration - LIMS v5
These automations are described below, in the order in which they are triggered at run time.
Automatically triggered when the user clicks the Calculate Volumes button on the Record Details screen, this automation:
| • | Calculates the number of samples in the pool: |
step.::Number of Samples in Pool:: = step.::Number of Samples in Pool:: + 1
| • | Sets the value of the Bulk Pool Volume (ul) field, based on the selected Flowcell Type: |
if (input.::Flowcell Type:: == ::S1::) { step.::Bulk Pool Volume (ul):: = step.::Number of Flowcells to Sequence:: * 85 + 30 }; if (input.::Flowcell Type:: == ::S2::) { step.::Bulk Pool Volume (ul):: = step.::Number of Flowcells to Sequence:: * 150 + 30 }; if (input.::Flowcell Type:: == ::S4::) { step.::Bulk Pool Volume (ul):: = step.::Number of Flowcells to Sequence:: * 310 + 30 };
| • | Calculates the Per Sample Volume (ul) to be added to the pool: |
input.::Per Sample Volume (ul):: = ( ( (input.::Final Loading Concentration (pM):: * 5 / 1000) / input.::Normalized Molarity (nM):: ) * step.::Bulk Pool Volume (ul):: ) / step.::Number of Samples in Pool::
|
Note: To ensure accurate pipetting of each sample in a pool for sequencing, the Per Sample Volume (ul) value must be equal to or higher than the Minimum Per Sample Volume (ul) (default value set at 5, may be edited by the user). Assuming the default Minimum Per Sample Volume (ul) value of 5, for a given batch: 1. If the smallest Per Sample Volume (ul) value is less than 5, the LIMS automatically assigns a value of 5 to the sample's Adjusted Per Sample Volume (ul) field. 2. The LIMS then adjusts the Adjusted Per Sample Volume (ul) field value for all other samples in the batch, based on the ratio used to increase the lowest value to 5. |
| • | Calculates the Total Sample Volume (ul) field value: |
step.::Total Sample Volume (ul):: = step.::Total Sample Volume (ul):: + input.::Adjusted Per Sample Volume (ul)::
| • | If the Total Sample Volume is less than the Bulk Pool Volume, calculates the RSB Volume (ul) field value: |
if (step.::Total Sample Volume (ul):: >= step.::Bulk Pool Volume (ul)::) {output.::RSB Volume (ul):: = 0} else {output.::RSB Volume (ul):: = step.::Bulk Pool Volume (ul):: - step.::Total Sample Volume (ul)::} ;
| • | Copies the Flowcell Type and Loading Workflow Type values from the step inputs to the step outputs: |
output.::Flowcell Type::= input.::Flowcell Type::;output.::Loading Workflow Type::= input.::Loading Workflow Type::;
| • | Sets the Volume of Pool to Denature (ul) value and calculates NaOH Volume (ul) and Tris-HCl Volume (ul) values, based on the Flowcell Type: |
if ( input.::Flowcell Type:: == ::S1:: ) { output.::Volume of Pool to Denature (ul):: = 85 ; output.::NaOH Volume (ul):: = 21.50 ; output.::Tris-HCl Volume (ul):: = 21.50 } ; if ( input.::Flowcell Type:: == ::S2:: ) {output.::Volume of Pool to Denature (ul):: = 150 ; output.::NaOH Volume (ul):: = 37.50 ; output.::Tris-HCl Volume (ul):: = 37.50 } ; if ( input.::Flowcell Type:: == ::S4:: ) { output.::Volume of Pool to Denature (ul):: = 310 ; output.::NaOH Volume (ul):: = 77.50 ; output.::Tris-HCl Volume (ul):: = 77.50 }
| • | Uses the NovaSeq_Standard_Bulk_Pool1.csv, NovaSeq_Standard_Bulk_Pool2.csv and NovaSeq_Standard_Bulk_Pool3.csv template files to generate a single CSV file containing information about the pool and the samples it contains. The generated file is available for download by the user on the Step Setup screen of the following step - Dilute and Denature (NovaSeq 6000 v2.0). |
script:driver_file_generator \ -t /opt/gls/clarity/extensions/novaseq/templates/NovaSeq_Standard_Bulk_Pool1.csv \ -o 1.csv \ script:driver_file_generator \ -t /opt/gls/clarity/extensions/novaseq/templates/NovaSeq_Standard_Bulk_Pool2.csv \ -o 2.csv \ script:driver_file_generator \ -t /opt/gls/clarity/extensions/novaseq/templates/NovaSeq_Standard_Bulk_Pool3.csv \ -o 3.csv \&& cat 1.csv 2.csv 3.csv > {compoundOutputFileLuid0}.csv
Validate Inputs Flowcell Type and Single Pool
Automatically triggered on exit of the Pooling screen, this automation checks that:
| • | All samples in the pool have the same Flowcell Type assigned to them. |
| • | Only one pool has been created. |
/opt/gls/clarity/bin/java -jar /opt/gls/clarity/extensions/novaseq/novaseq-extensions.jar script:validate_flowcell_for_input_pools -i {stepURI:v2} -u {username} -p {password} -l {compoundOutputFileLuid1} -validateSingleOutput true -poolType bulk
Automatically triggered on exit of the Record Details screen, this automation sets the next step for samples to ADVANCE, advancing them to the next step in the protocol - Dilute and Denature (NovaSeq 6000 v2.0):
nextStep = ::ADVANCE::
There are five fields defined on the Make Bulk Pool for NovaSeq Standard (NovaSeq 6000 v2.0) step.
These are shown below in the BaseSpace Clarity LIMS v5 Configuration area (Custom Fields > Master Step Fields tab). See Table 5 for LIMS v4.2 and LIMS v5 field configuration details.
Table 5: Make Bulk Pool for NovaSeq Standard (NovaSeq 6000 v2.0) step UDF / custom field configuration
|
Field Name |
Field Type |
Field Constraints / Options |
Preset Values / Additional Options and Dropdown Items |
||||||||||||
|
Bulk Pool Volume (ul) (for calculation purposes, not displayed) |
Numeric |
|
|
||||||||||||
|
Number of Flowcells to Sequence |
Numeric |
|
|
||||||||||||
|
Total Sample Volume (ul) (for calculation purposes, not displayed) |
Numeric |
|
|
||||||||||||
|
Minimum Per Sample Volume (uL) |
Numeric |
|
|
||||||||||||
|
Number of Samples in Pool (for calculation purposes, not displayed) |
Numeric |
|
|
Table 6 lists the global UDFs / custom fields that are configured in the LIMS to support the Make Bulk Pool for NovaSeq Standard (NovaSeq 6000 v2.0) step.
Table 6: Global UDF / custom field configuration
|
Field Name |
Field Type |
Field Constraints / Options |
Preset Values / Additional Options and Dropdown Items |
||||||||||||||||||
|
Configured on Analyte in LIMS v4.2 and Derived Samplein LIMS v5: |
|||||||||||||||||||||
|
Flowcell Type |
Single-line Text (v4.2) Text Dropdown (v5) |
|
|
||||||||||||||||||
|
Loading Workflow Type |
Single-line Text (v4.2) Text Dropdown (v5) |
|
|
||||||||||||||||||
|
NaOH Volume (ul) |
Numeric |
|
|
||||||||||||||||||
|
RSB Volume (ul) |
Numeric |
|
|
||||||||||||||||||
|
Tris-HCl Volume (ul) |
Numeric |
|
|
||||||||||||||||||
|
Volume of Pool to Denature (ul) Used in Make Bulk Pool for NovaSeq Standard (NovaSeq 6000 v2.0) step only. Displays on Record Detailsscreen and in the generated CSV file. |
Numeric |
|
|
||||||||||||||||||
| 1. | On the Queue screen, user adds samples of the same Flowcell Type to the Ice Bucket and clicks View Ice Bucket. |
| 2. | On the Ice Bucket screen, user clicks Begin Work. |
| 3. | On the Pooling screen, user: Creates a pool by dragging samples into the Pool Creator.  |
| • | Names the pool, or accepts the default name - Pool #1.  |
| • | Clicks Record DetailsOn exit from the Pooling screen, the Validate Inputs Flowcell Type and Single Pool is triggered. The automation checks that all samples in the pool have been assigned the same Flowcell Type, and only one pool has been created. |
| 4. | On the Record Details screen, the Step Details area contains two required fields:Number of Flowcells to Sequence: The value entered in this field is used in volume calculations, to ensure that volumes are sufficient for the number of times the pool will be sequenced. |
| • | Minimum Per Sample Volume (ul): In many applications, and particularly where robotics are used, a minimum sample volume is required. The value in this field is used to calculate how much of each sample will be included in the pool. The field is pre-populated with the configured default value - 5ul, but may be edited if required. 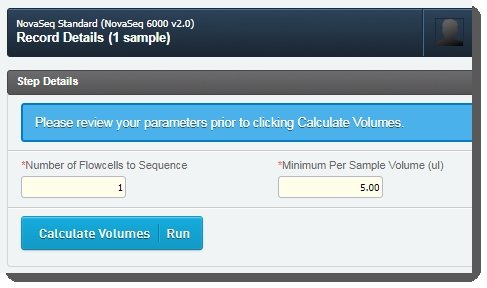 |
| • | In the Sample Details table, the user can click on the pool icon to view details on the pool composition. |
| • | The user clicks Calculate Volumes. This triggers the Calculate Volumes automation, which performs volume calculations based on the selected Flowcell Type : Calculates Bulk Pool Volume (ul) value. |
| – | Calculates the Per Sample Volume (ul) value to be added to the pool. |
| – | Calculates the Total Sample Volume (ul) value. |
| – | If the Total Sample Volume is less than the Bulk Pool Volume, calculates the RSB Volume (ul) value. |
| – | Populates the Flowcell Type and Loading Workflow Type columns of the Sample Details table. |
| – | Populates the Volume of Pool to Denature (ul), NaOH Volume (ul) and Tris-HCI Volume (ul) columns of the Sample Details table. (Values are set by a script and are not editable by the user.) |
| – | Generates the Calculation File (CSV) and attaches it to the step. This file contains volume information about the pool and the individual samples it contains. The user can click on the file to download it, and then open it in Excel.(Click image to view full size.)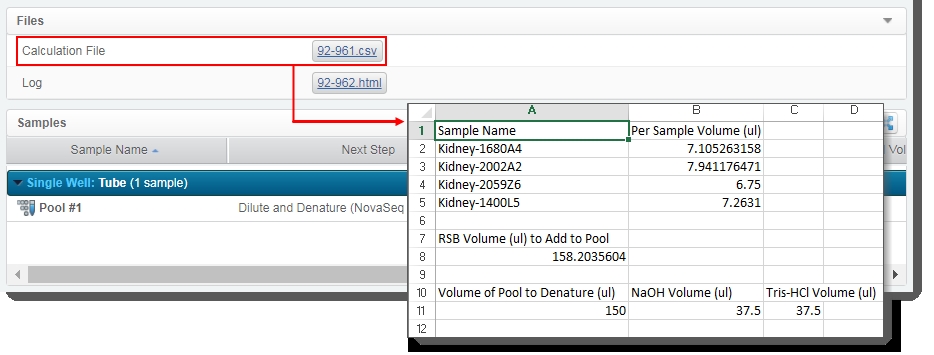 |
| • | The user clicks Next Steps. This triggers the Set Next Step automation. This automation sets the next step for samples to ADVANCE, advancing them to the next step in the protocol - Dilute and Denature (NovaSeq 6000 v2.0). |
| 5. | On the Assign Next Steps screen: The next step is already set to Dilute and Denature (NovaSeq 6000 v2.0). 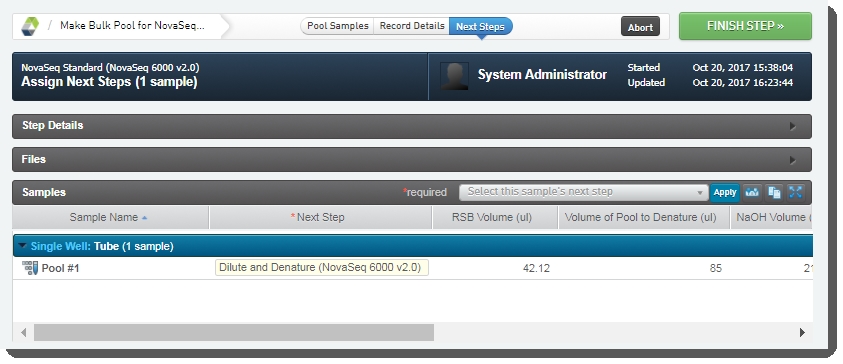 |
| • | User clicks Finish Step. At the end of this step, the pool of samples automatically advances to the Dilute and Denature (NovaSeq 6000 v2.0) step. |
Step 2: Dilute and Denature (NovaSeq 6000 v2.0)
In this step, pooled samples are denatured and diluted by the addition of NaOH, Tris-HCl, and Resuspension Buffer (RSB), and are manually placed by the user into the library tube that will be used in the NovaSeq run. In addition, this step generates the sample sheet file and the run recipe (JSON file) needed to start the NovaSeq run.
Step input: Bulk pool
Step output: Library tube
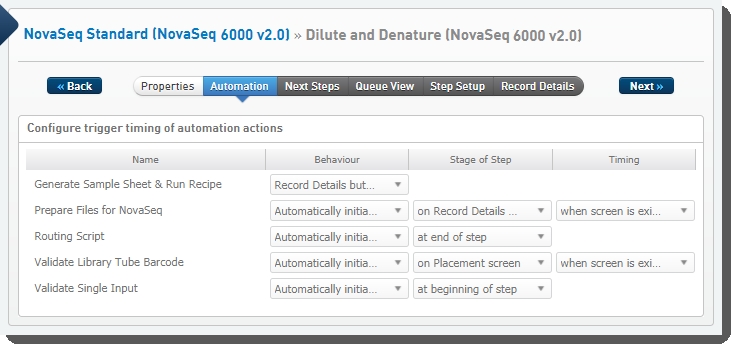
The following automations are configured on the step:
| • | Generate Sample Sheet and Run Recipe |
| • | Prepare Files for NovaSeq |
| • | Routing Script |
| • | Validate Library Tube Barcode |
| • | Validate Single Input |
 Dilute and Denature (NovaSeq 6000 v2.0) automation configuration - LIMS v4.2
 Dilute and Denature (NovaSeq 6000 v2.0) automation configuration - LIMS v5
These automations are described below, in the order in which they are triggered at run time.
Automatically triggered at the beginning of the step, this automation checks that there is only one container input to the step.
script:validateSampleCount -min 1 -max 1
Automatically triggered on exit of the Placement screen, this automation validates the library tube barcode to ensure it conforms to the barcode mask [A-Za-z]{2}[0-9]{7}-[A-Za-z]{3}:
if (!output.container.name.matches(::[A-Za-z]{2}[0-9]{7}-[A-Za-z]{3}::)) { fail(::Invalid Library Tube Barcode. Please verify and try again.::) }
Generate Sample Sheet and Run Recipe
Automatically triggered when user clicks a button on the Record Details screen, this automation:
| • | Copies the Flowcell Type from the step input to the step output: |
output.::Flowcell Type:: = input.::Flowcell Type::
| • | Copies the Flowcell Type from the step input to the Run Mode field (hidden): |
step.::Run Mode:: = input.::Flowcell Type::
| • | Copies the Loading Workflow Type values from the step inputs to the step outputs: |
output.::Loading Workflow Type:: = input.::Loading Workflow Type::;
| • | Validates the parameters entered on the Record Details screen: |
| – | Experiment Name may only contain alphanumeric, dash, or underscore characters. Spaces are not permitted. |
| – | When Workflow Type = No Index, Index Read 1 must be zero. For any other Workflow Type, Index Read 1 must be greater than zero. |
if(!step.::Experiment Name::.matches(::[a-zA-Z0-9-_]+::)) { fail(::Experiment Name contains prohibited characters. Allowed characters are: a-z, A-Z, 0-9, -, and _::)};if(step.::Workflow Type::== ::No Index::) { if(step.::Index Read 1::!= 0) { fail(::Index Read 1 must be 0 if the Workflow Type is No Index.::) }} else { if(step.::Index Read 1::== 0) { fail(::Index Read 1 must be greater than 0 if the Workflow Type is ::+ step.::Workflow Type::+ ::.::) } };
| • | Sets Read 2 Cycles value: |
| – | If Paired End = True, copies the value of Read 1 Cycles into Read 2 Cycles. |
| – | If Paired End = False, sets Read 2 Cycles to 0. |
step.::Read 2 Cycles:: = step.::Paired End::.toBoolean() ? step.::Read 1 Cycles:: : 0;
| • | Determines Index Read 2 based on the Workflow Type and Index Read 1 : When Workflow Type = No Index or Single Index, Index Read 2 is set to 0. |
| – | When Workflow Type = Dual Index or Custom, Index Read 2 is set to the same as Index Read 1. |
if (step.::Workflow Type:: == ::No Index:: || step.::Workflow Type:: == ::Single Index::) { step.::Index Read 2:: = 0 } else { step.::Index Read 2:: = step.::Index Read 1:: }
| • | Sets the next step for samples to REMOVE: |
nextStep = ::REMOVE::
| • | Generates the sample sheet and the run recipe file and attaches them to the step. For details on how the files are generated, and their contents, see Sample sheet and run recipe file generation section, below. |
Automatically triggered on exit of the Record Details screen, this automation invokes the copy_attachments_to_network_folder script, which is included in the novaseq-remote-extensions.jar file. This script places the generated sample sheet and run recipe (JSON file) into the appropriate folder on the NAS, where the instrument will use them to start the run.
For more information, see Sample sheet and run recipe file generation section, below.
Automatically triggered on exit of the step, this automation invokes the changeWorkflow script, which routes step outputs to the NovaSeq 6000 v2.0 workflow, and queues them for the AUTOMATED - NovaSeq Run (NovaSeq 6000 v2.0) step.
Default automation command line:
bash -l -c "/opt/gls/clarity/bin/java -jar /opt/gls/clarity/extensions/ngs-common/v5/EPP/ngs-extensions.jar -u {username} -p {password} -i {stepURI:v2} -l {compoundOutputFileLuid2} script:changeWorkflow \ \ --FIELD_NAME 'N/A' \ --FIELD_VALUE 'N/A' \ --WORKFLOW 'NovaSeq 6000 v2.0' \ --STEP 'AUTOMATED - NovaSeq Run (NovaSeq 6000 v2.0)' \ --INPUTS_OR_OUTPUTS 'OUTPUTS'"
There are 14 fields defined on the Dilute and Denature (NovaSeq 6000 v2.0) step. These fields are required for sample sheet and JSON file generation..
These fields are shown below in the BaseSpace Clarity LIMS v5 Configuration area (Custom Fields > Master Step Fields tab). See Table 7 for LIMS v4.2 and LIMS v5 field configuration details.

Table 7: Dilute and Denature (NovaSeq 6000 v2.0) step UDF / custom field configuration
|
Field Name |
Field Type |
Field Constraints / Options |
Preset Values / Additional Options and Dropdown Items |
||||||||||||||||||||||||
|
BaseSpace Sequence Hub Configuration |
Single-line Text (v4.2) Text Dropdown (v5) |
|
|
||||||||||||||||||||||||
|
Experiment Name |
Single-line Text (v4.2) Text (v5) |
|
|||||||||||||||||||||||||
|
Index Read 1 |
Numeric (v4.2) Numeric Dropdown (v5) |
|
|
||||||||||||||||||||||||
|
Index Read 2 |
Numeric (v4.2) Numeric (v5) |
|
|
||||||||||||||||||||||||
|
Paired End |
Single-line Text (v4.2) Text Dropdown (v5) |
|
|
||||||||||||||||||||||||
|
Read 1 Cycles |
Numeric (v4.2) Numeric Dropdown (v5) |
|
|
||||||||||||||||||||||||
|
Read 2 Cycles |
Numeric (v4.2) Numeric (v5) |
|
|
||||||||||||||||||||||||
|
Run Mode (not displayed in user interface) |
Single-line Text (v4.2) Text Dropdown (v5) |
|
|
||||||||||||||||||||||||
|
Sample Sheet Path |
Single-line Text (v4.2) Text (v5) |
|
|||||||||||||||||||||||||
|
Use Custom Index Read 1 Primer |
Check Box (v4.2) Toggle Switch (v5) |
|
|
||||||||||||||||||||||||
|
Use Custom Read 1 Primer |
Check Box (v4.2) Toggle Switch (v5) |
|
|
||||||||||||||||||||||||
|
Use Custom Read 2 Primer |
Check Box (v4.2) Toggle Switch (v5) |
|
|
||||||||||||||||||||||||
|
Workflow |
Single-line Text (v4.2) Text (v5) |
|
GenerateFASTQ |
||||||||||||||||||||||||
|
Workflow Type |
Single-line Text (v4.2) Text Dropdown (v5) |
|
|
Table 8 lists the global UDFs / custom fields that are configured in the LIMS to support the Dilute and Denature (NovaSeq 6000 v2.0) step.
Table 8: Global UDF / custom field configuration
|
Field Name |
Field Type |
Field Constraints / Options |
Preset Values / Additional Options and Dropdown Items |
||||||||||||||||||||||||
|
Configured on Analyte in LIMS v4.2 and Derived Samplein LIMS v5: |
|||||||||||||||||||||||||||
|
Flowcell Type |
|
|
|
||||||||||||||||||||||||
|
Loading Workflow Type |
|
|
|
||||||||||||||||||||||||
| 1. | On the Placement screen, user does the following: Drags the pool into the library tube in the Placed Samples area. 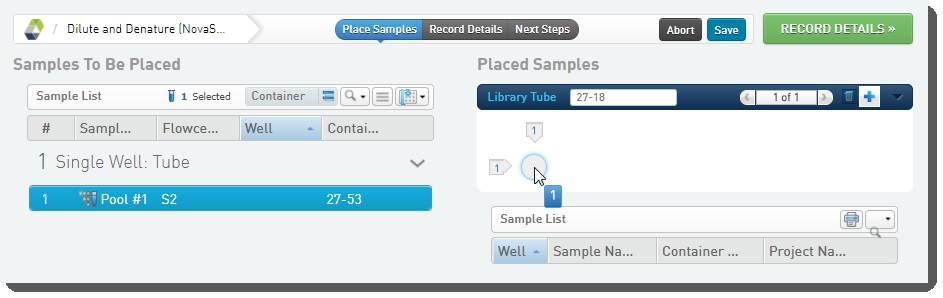 |
| • | Scans or types the barcode of the library tube into the Library Tubefield. 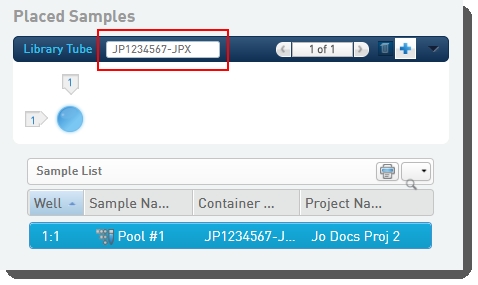 |
| • | Clicks Record Details.On exit of the Placement screen, the Validate Library Tube Barcode automation checks that the library tube barcode conforms to the barcode mask [A-Za-z]{2}[0-9]{7}-[A-Za-z]{3}, and displays an error message if this is not the case. |
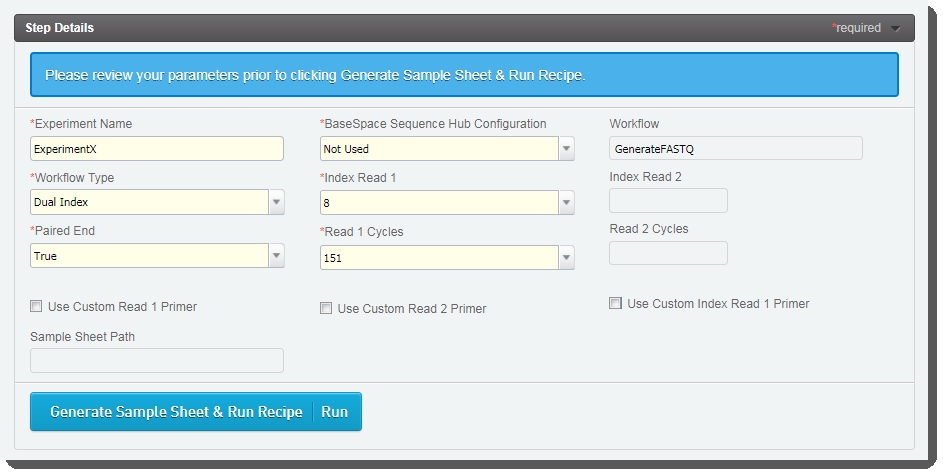
| 2. | On the Record Details screen: |
| • | The Reagent Lot Tracking section lets you track the NaOH, Resuspension Buffer, and Tris-HCIreagents used in the step. The user selects from the active lots displayed in each drop-down list. |
|
Field |
Value |
|
Experiment Name |
User enters the name. Only alphanumeric characters, dashes, and underscores are permitted. Spaces are not permitted. |
|
BaseSpace Sequence Hub Configuration |
User selects from preset options: Not Used, Run Monitoring Only, or Run Monitoring and Storage |
|
Workflow Type |
User selects from preset options: No Index, Single Index, Dual Index, or Custom |
|
Index Read 1 |
User selects from preset option: 0, 6, or 8 - or types a value between 0 and 20 |
|
Index Read 2 |
If user selected the Dual Index workflow type, once the sample sheet has been generated, Index Read 2 value is automatically populated to match Index Read 1. |
|
Paired End |
User selects from preset options: True or False |
|
Read 1 Cycles |
User selects from preset options: 151, 101, or 51 - or types a value between 1 and 151 |
|
Read 2 Cycles |
If user selected Paired End =True, once the sample sheet has been generated, Read 2 Cycles value is automatically populated to match Read 1 Cycles. |
|
Use Custom Read 1 Primer |
User selects if applicable. |
|
Use Custom Read 2 Primer |
User selects if applicable. |
|
Use Custom Index Read 1 Primer |
User selects if applicable. |
|
Sample Sheet Path |
Automatically populated once the sample sheet has been generated. |
|
Workflow |
Automatically populated with preset - GenerateFASTQ. |
| 3. | On the Record Details screen, user clicks Generate Sample Sheet and Run Recipe . This triggers the automation script, which does the following.Generates the sample sheet and JSON files and attaches them to the placeholders in the Files area of the Record Detailsscreen. 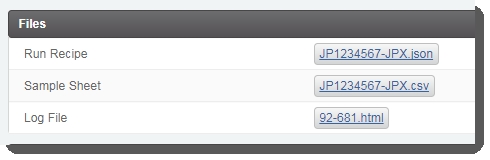 |
| • | Populates the Sample Sheet Pathfield with the path to the sample sheet file.  |
| • | If applicable, populates the Index Read 2 and Read 2 Cycles fields. |
| • | Sets the value of the next step to Remove from workflow. The Routing Script automation expects this value, and requires it in order to successfully advance samples to the next step. |
| • | User clicks Next Steps. This triggers the Prepare Files for NovaSeq automation, which copies the sample sheet and run recipe files to the location specified during installation. |
| 4. | On the Assign Next Steps screen: |
| • | The Next Step for all samples is pre-populated with Remove from workflow. |
The user must not change this value! If Next Step is not set to Remove from workflow, the routing script will not be able to route samples correctly.
| • | User clicks Finish Step. |
| 5. | On exit from the step: The Routing Script automation is triggered and samples are routed to the AUTOMATED - NovaSeq Run (NovaSeq 6000 v2.0) protocol. |
| • | In Lab View, the pool of samples is queued for the AUTOMATED - NovaSeq Run (NovaSeq 6000 v2.0) step. |
At this point in the workflow, the user interaction ends. The integration automatically starts the AUTOMATED - NovaSeq Run (NovaSeq 6000 v2.0) step and data from the run is parsed back into the LIMS.
Protocol 3: NovaSeq Xp (NovaSeq 6000 v2.0)
In this release, the NovaSeq Xp (NovaSeq 6000 v2.0) protocol is hidden and does not display in Lab View.
This protocol allows for the support of functionality that will be used in a future release.
Do not delete or modify the configuration of the protocol, or the steps it contains.
Protocol 4: AUTOMATED - NovaSeq Run (NovaSeq 6000 v2.0)
This final protocol contains one fully-automated step, AUTOMATED - NovaSeq Run (NovaSeq 6000 v2.0), described below.
This is a fully-automated step. The user must not add samples to the Ice Bucket or start the step manually.
Step 1: AUTOMATED - NovaSeq Run (NovaSeq 6000) 1.0
Step input: Library tube from NovaSeq Standard protocol
Step output: Result file / measurement
The user must not start this step. This is a fully-automated step and the sequencing service will not update samples correctly if they have been manually started.
In this step, pooled samples are sequenced on the NovaSeq instrument. The run data network folder is monitored by the sequencing service and automation worker to determine when the sequencing run begins and ends.
| 1. | When the user initiates a run on the NovaSeq instrument, the NovaSeq Control Software (NVCS) looks for the sample sheet and run recipe (*.json file) on the shared network drive.The NVCS copies the sample sheet to the run directory. |
| • | The NVCS uses the run recipe to start the sequencing run. |
| 2. | When the run starts: The instrument software creates a new run folder (named < libraryID >) on the shared network drive and copies the following files into that folder:RunParameters.xml |
| – | RunInfo.xml |
| – | LIMS/ <libraryID>.json file (run recipe) |
| • | The Real-Time Analysis v3 (RTA3) software creates the InterOp folder. |
| 3. | The sequencing service detects the presence of the RunParameters, RunInfo, and JSON files and starts the AUTOMATED- NovaSeq Run (NovaSeq 6000 v2.0) step in the LIMS. |
| 4. | As the run progresses, the InterOp data files are filled in. |
| 5. | At the end of the run, the NovaSeq: Copies the run data files to the InterOp folder. |
| • | Creates the CopyComplete.txt file in the run folder. This indicates to the sequencing service that the run has completed and the data files are ready. |
| 6. | The sequencing service triggers the Read InterOp Metrics automation, which reads the files, records the parsed metrics into the LIMS, and finally completes the step in LIMS. |
The following automations are configured on the step:
| • | Parse Run Parameters and Generate Link to Run Folder |
| • | Read InterOp Metrics |
| • | Set Next Steps |
 AUTOMATED - NovaSeq Run (NovaSeq 6000 v2.0) automation configuration - LIMS v4.2
 AUTOMATED - NovaSeq Run (NovaSeq 6000 v2.0) automation configuration - LIMS v5
These automations are described below, in the order in which they are triggered at run time.
Parse Run Parameters and Generate Link to Run Folder
Automatically triggered on entry to the Record Details screen, this automation:
| • | Parses the RunParameters.xml file attached on the Step Setup screen. |
| • | Populates the step UDFs / custom fields with extracted values. |
| • | If there is an instrument in the LIMS that matches the instrument name in the file (InstrumentName field), the script associates this instrument with the run. |
| • | Generates and attaches a link to the run folder using the run output folder parsed from RunParameters.xml. |
Rules and constraints
| • | If there is no InstrumentName value in the file, the script continues, but logs a warning. |
| • | If there is an InstrumentName value in the file and multiple instruments with the same name exist in the LIMS, the script fails and logs an error. |
| • | If the RunParameters.xml file is not attached to the step during step setup, the script fails. |
| • | Every RunParameters.xml field that has an equivalent step UDF / custom field in the LIMS is required - except for InstrumentName. If a field is not present in the RunParameters.xml file, the LIMS logs an error to this effect. |
Step UDFs/custom fields
Table 10, below, shows how the parsed RunParameters.xml fields map to step UDFs / custom fields configured on the AUTOMATED - NovaSeq Run (NovaSeq 6000 v2.0) step in the LIMS.
Table 10: Fields parsed by parse_novaseq_run_parameters script
|
RunParameters.xml Data |
LIMS Step UDF / Custom Field Configuration |
|
RunParameters field |
Step UDF / Custom Field Name |
|
FlowCellSerialBarcode |
Flow Cell ID |
|
FlowCellPartNumber |
Flow Cell Part Number |
|
FlowCellLotNumber |
Flow Cell Lot Number |
|
FlowCellExpirationdate |
Flow Cell Expiration Date |
|
FlowCellMode |
Flow Cell Mode |
|
RunId |
Run ID |
|
ClusterSerialBarcode |
PE Serial Barcode |
|
ClusterPartNumber |
PE Part Number |
|
ClusterLotNumber |
PE Lot Number |
|
ClusterExpirationdate |
PE Expiration Date |
|
ClusterCycleKit |
PE Cycle Kit |
|
SbsSerialBarcode |
SBS Serial Barcode |
|
SbsPartNumber |
SBS Part Number |
|
SbsLotNumber |
SBS Lot Number |
|
SbsExpirationdate |
SBS Expiration Date |
|
SbsCycleKit |
SBS Cycle Kit |
|
BufferSerialBarcode |
Buffer Serial Barcode |
|
BufferPartNumber |
Buffer Part Number |
|
BufferLotNumber |
Buffer Lot Number |
|
BufferExpirationdate |
Buffer Expiration |
|
OutputRunFolder |
Output Folder |
|
WorkflowType |
Loading Workflow Type |
Automatically triggered when the sequencing service detects the CopyComplete.txt file has been created, this automation parses the InterOp data generated by the run.
| • | Read summary metrics are recorded on the library pool. These values are aggregated across all lanes. Some values - for example Yield PF (Gb) - are summed, while others are averaged. |
| • | Per-lane metrics are recorded on the measurement outputs. |
The read_interop_metrics script loads data from the InterOp files and records summary metrics into derived sample UDFs / custom fields in the LIMS. The script will fail if any field is not configured or cannot be written to.
The following key metrics are parsed back into the LIMS:
| • | Yield PF (Gb) R1 |
| • | Yield PF (Gb) R2 |
| • | Reads PF (M) R1 |
| • | Reads PF (M) R2 |
| • | Cluster Density (K/mm^2) R1 |
| • | Cluster Density (K/mm^2) R2 |
| • | %PF R1 |
| • | %PF R2 |
| • | % Bases >=Q30 R1 |
| • | % Bases >=Q30 R2 |
| • | Intensity Cycle 1 R1 |
| • | Intensity Cycle 1 R2 |
| • | % Phasing R1 |
| • | % Phasing R2 |
| • | % Prephasing R1 |
| • | % Prephasing R2 |
| • | % Aligned R1 |
| • | % Aligned R |
| • | % Error Rate R1 |
| • | % Error Rate R2 |
Automatically triggered on exit of the Record Details screen, this automation sets the next step to ADVANCE and the samples complete the protocol.
nextStep = ::ADVANCE::
Components installed with this integration
The following sections describe the various components - files, database properties, reagent categories / label groups, reagent kits, and containers - that are installed by default as part of this integration. Information on installed workflows, protocols, steps, and automation points is provided in the Workflows, protocols and steps section, above.
The Illumina NovaSeq 6000 Integration v2.1 is distributed as two RPM packages:
| • | BaseSpaceLIMS-novaseq-extensions |
| • | BaseSpaceLIMS-novaseq-sequencing-service |
The RPM packages install the components listed in the following table.
Note that the NovaSeq 6000 Integration requires installation of NGS Extensions Package v5.15 or later.
| • | If the NGS Extensions Package is not already installed, or if a version earlier than than v5.15 is installed, v5.16 is installed by default with the NovaSeq integration. See Release Notes for details. |
| • | If NGS Extensions Package v5.15 is already installed, upgrade is not forced or required. |
Table 11: Illumina NovaSeq 6000 Integration RPM components
|
Files Installed |
Location and Description |
|||||||||||||||||||||
|
configure_extensions_novaseq.sh |
/opt/gls/clarity/config/ Script that imports LIMS configuration into the application database and updates property values. |
|||||||||||||||||||||
|
novaseq-extensions.jar |
/opt/gls/clarity/extensions/novaseq Jar file containing API-based LIMS extensions used throughout the protocols. |
|||||||||||||||||||||
|
novaseq-sequencing.jar |
/opt/gls/clarity/extensions/novaseq/SequencingService Sequencing service jar file that captures the run results. |
|||||||||||||||||||||
|
novaseq-remote-extensions.jar |
/opt/gls/clarity/extensions/novaseq Jar file containing scripts that require access to the run folders on the NAS. |
|||||||||||||||||||||
|
InterOp libraries |
/opt/gls/clarity/extensions/novaseq/lib Illumina shared library for parsing InterOp data files. |
|||||||||||||||||||||
|
/opt/gls/clarity/extensions/novaseq/Templates Template files used for file generation throughout the protocols. |
Table 12 lists the database properties installed with the Illumina NovaSeq 6000 Integration Package.
Table 12: Database properties installed
|
Property |
Description |
|
novaseq.runSetupFolder |
The directory where the run recipe files will be written. |
|
novaseq.sampleSheetPathPrefixSearch.SUFFIX |
The directory where the instrument control software or analysis software looks for sample sheets, typically a Windows path to a network drive. |
|
novaseq.sampleSheetPathPrefixReplace.SUFFIX |
The directory where the sample sheets will be written. |
|
novaseq.sampleSheetPathPrefixSearchReplaceSuffixes* |
Search and replace entries for transforming Windows to Linux network paths. This property must be set to the single SUFFIX used in the two properties above. |
|
novaseq.seqservice.netPathPrefixSearch.SUFFIX |
The search prefix used to map the OutputRunFolder field in RunParameters.xml to the corresponding Linux directory. |
|
novaseq.seqservice.netPathPrefixReplace.SUFFIX |
The directory where the sequencing service will look for run folders. |
|
novaseq.seqservice.netPathPrefixSearchReplaceSuffixes* |
Search and replace entries for transforming Windows to Linux network paths. This property must be set to the single SUFFIX used in the two properties above. |
*This version of the integration only supports a single active search-replace pair of each type: sampleSheetPathPrefixSearchReplaceSuffixes and netPathPrefixSearchReplaceSuffixesmust each contain a single number, rather than a comma-separated list of numbers.
Reagent categories/label groups
| • | TruSeq HT Adapters v2 (D7-D5) |
| • | DPX1 |
| • | DPX2 |
| • | DPX3 |
| • | Resuspension Buffer (RSB) |
| • | NaOH |
| • | Tris HCl |
| • | Library Tube |
Instructions for configuring the NovaSeq instrument for LIMS integration are provided in the NovaSeq Sequencing System Guide.
The requirements for the routing script functionality are as follows:
| • | On the steps that use the routing script - Define Run Format (NovaSeq 6000 v2.0) and Dilute and Denature (NovaSeq 6000 v2.0) - the Next Step for all samples must be set to Remove from workflow. This value is set by a script, and the user running the step must not change this value in the Assign Next Steps screen. |
| • | LIMS v5: In the protocol configuration screen, the following settings are required and must not be changed:In the Next Steps section, for the last step in the protocol, the method of assigning the next step must be set to Automatic.  |
| • | LIMS v4.2: In the protocol configuration area, for all protocol steps on which the Routing Script automation is configured, the following settings are required and must not be changed: |
On the Next Steps configuration tab, the Next Steps are set by a script toggle switch must be set to Yes. 
Sample sheet and run recipe file generation
Sample sheet and run recipe file generation occurs on the step prior to the run – Dilute and Denature (NovaSeq 6000 v2.0) – which is the step where samples are placed on the library tube that will be loaded in the instrument.
In the out-of-the-box configuration, the Generate Sample Sheet and Run Recipe automation generates the following:
| • | One CSV format sample sheet file for use bcl2fastq v2.19 downstream analysis |
| • | One JSON format run recipe file |
The Prepare Files for NovaSeq automation, which runs at the end of the step, places the generated files on the NAS where the instrument will use them to start the run.
| • | The Prepare Files for NovaSeq automation command line invokes the copy_attachments_to_network_folder script in novaseq-remote-extensions.jar .The script may be used on a remote AI node / automation worker, in case the LIMS server does not have direct access to the NAS. |
| • | The output folder for the run recipe file is found in the novaseq.runSetupFolder property. |
| • | The output folder for the sample sheet is determined by using the novaseq.sampleSheetPathSearchReplaceSuffixes property. This property must contain exactly one suffix (not a comma-separated list) to derive a full property name based on novaseq.sampleSheetPathPrefixReplace.<suffix>. |
The contents of the sample sheet are controlled by the following fields configured on the Dilute and Denature (NovaSeq 6000 v2.0) step:
| • | Experiment Name |
| • | Read 1 Cycles |
| • | Read 2 Cycles |
| • | Workflow |
See the Bcl2fastq2 Sample Sheet Generation article for detailed information on the following:
| • | Sample sheet generation script parameters and usage |
| • | Sample sheet data and configuration options |
| • | Enabling unique FASTQ file names per sequencing run |
The contents of the run recipe are controlled by the following fields. These fields are configured on the Dilute and Denature (NovaSeq 6000 v2.0) step.
| • | Experiment Name |
| • | Run Mode |
| • | Workflow Type |
| • | Sample Loading Type (populated based on Workflow field) |
| • | Paired End |
| • | Read 1 |
| • | Read 2 |
| • | Index Read 1 |
| • | Index Read 2 |
| • | Sample Sheet Path |
| • | BaseSpace Configuration |
| • | Use Custom Read 1 Primer |
| • | Use Custom Read 2 Primer |
| • | Use Custom Index Read 1 Primer |
For field configuration details, see Table 7, above. To see how these fields are populated on the Record Details screen at run time, see Table 9.
The following fields are also included in the run recipe:
| • | Output Container Name (librarytube_ID in JSON file): The library tube barcode derived from the container name entered or scanned on the Placement screen |
| • | Rehyb - preset to False |
| • | Output Folde r (output_folder in JSON file): Derived from the system property novaseq.seqservice.netPathPrefixSearch |
| • | Attachment: Derived from the system property novaseq.sampleSheetPathPrefixSearch with the name of the sample sheet added to the end of the path |
| • | Use BaseSpace (use_basespace in JSON file): Set to False if the BaseSpace Sequence Hub Configuration step UDF / custom field value is 'Not Used', and true otherwise |
| • | The sample sheet and run recipe files are mandatory inputs for the AUTOMATED - NovaSeq Run (NovaSeq 6000 v2.0) step. For the automated run to start successfully, the user must have clicked the Generate Sample Sheet and Run Recipe button to generate these files. |
| • | The output folders must exist on the system where the script runs (this may be a remote AI node / automation worker). |
| • | The output folders must be writable by the glsai user. |
This integration supports the Library Tube container type with barcode provided in the format [A-Za-z]{2}[0-9]{7}-[A-Za-z]{3} - for example, AB1234567-XYZ.
| • | The workflow configuration contains several validation checks. To ensure that the calculations work properly, it is important that you do not disable any of this validation logic. The validation checks determine:Which samples, and how many, can enter each step together. |
| – | Which samples, and how many, can be pooled together. |
| • | Reagent labels (indexes) must be unique. |
| • | The library tube ID must be unique. There should not be multiple library tube containers in the system with the same name. |
| • | Only controls are permitted as unindexed samples; all other unindexed samples and pools are not permitted. |
| • | For sample sheet generation constraints, refer to the Bcl2fastq2 Sample Sheet Generation article. |
| • | Users must not manually start the AUTOMATED - NovaSeq Run (NovaSeq 6000 v2.0) step. This is a fully-automated step and the sequencing service will not update samples correctly if they have been manually started. |
| • | The output folder must be readable by the LIMS server's glsjboss account. For details, see Installation Guide. |
