Weekly Maintenance
In addition to the steps in Daily Maintenance, complete the following tasks on the last working day of each week.
|
1.
|
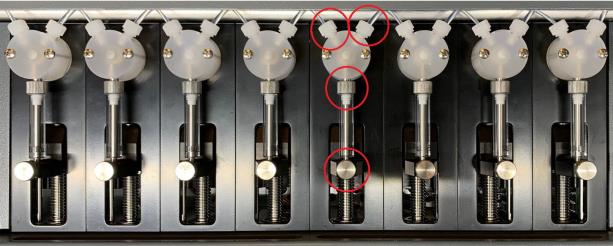
Check and finger tighten all 16 screws for the tubing going into and out of each of the eight 3-way syringe valves. |
|
2.
|
Check the plunger lock screws and syringe screws and tighten manually. |
IAPS with Highlighted Finger-Tightened Points
|
3.
|
Place the aspirating inlet tubing in a bottle with a recommended cleaning agent and flush the liquid system twice. |
For instructions, refer to Perform Liquid System Flush. For cleaning agent options, refer to Infinium Assay Consumables and Equipment (document # 1000000084294).
|
4.
|
Allow the cleaning agent to react for at least 10 minutes. |
|
5.
|
Place the same aspirating inlet tubing in a separate bottle with deionized water and flush the liquid system twice. |
|
6.
|
Place the aspirating inlet tubing back in the original system liquid container and flush the system eight times. |
|
7.
|
Empty and clean the system liquid container with 70% EtOH. Refill the container. |
|
8.
|
Clean all other liquid containers to prevent deposition of crystals and growth of microorganisms. |
Make sure to allow solvents (eg, ethanol) to evaporate before filling reagents into the containers.
|
9.
|
Make sure the barcode scanner on the RoMa arm remains in position B. |
|
10.
|
Make sure the PosID3 barcode scanner is in a vertical position with the laser output window accessible. |
|
11.
|
Turn off the instrument and wait for all system components to cool down. |
|
12.
|
Remove the carriers in front of the PosID3. |
|
13.
|
Check the barcode scanner on the PosID3. If necessary, clean the scanner with 70% EtOH on a lint-free tissue. |
|
14.
|
Clean the No Tube sensor on the PosID3 with 70% EtOH on a lint-free tissue. |

