
Load Consumables Into the Cartridge
| 1. | [Optional] To open an instructional video on cartridge preparation and loading, select Sequence. |
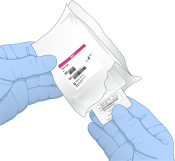
| 2. | Open the cartridge bag |
| 3. |
|
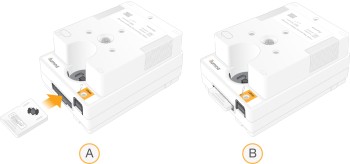
| 4. | Invert |
Internal components can rattle during inversion, which is normal.
| 5. | Tap |
| 6. | If you are not using custom primers, proceed to Load Library. If you are using custom primers, refer to Custom Primers. |
| 1. |
|

| 2. | Discard the pipette tip to prevent contamination. |
| 3. | Add 20 µl diluted library to the bottom of the reservoir. Avoid touching the foil. |
If you are using custom primers, add the custom primers before the diluted library.
| 1. | Open the |
| 2. | Pull the flow cell out of the package. |
| • | Touch only the plastic when handling the flow cell. |
| • | Avoid touching the electrical interface, CMOS sensor, glass, and gaskets on either side of the glass. |
| 3. | Hold the flow cell by the grip points with the label facing up. |
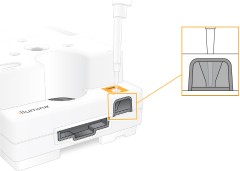
| 4. | Insert the flow cell into |
An audible click indicates that the flow cell is in place. When properly loaded, the grip protrudes from the cartridge and the glass is visible from the access window.
- Loading the flow cell
- Loaded flow cell
| 5. | Dispose of the packaging |
| a. | Remove the clamshell case from the foil package. |
| b. | Remove the desiccant from the clamshell case. |
| c. | Recycle the clamshell case, and discard the foil package and desiccant. |
| 6. | Proceed depending on whether the system is integrated with Local Run Manager: |
| • | If using Local Run Manager, refer to Set Up a Sequencing Run (Local Run Manager). |
| • | If not using Local Run Manager, refer to Set Up a Sequencing Run (Manual Mode). |
